
The dashboard is the first thing you see after signing in, and it stays the place you check every day: is the site live, how did this week go, and is anything waiting for you. This guide walks every card on it, the switcher for running more than one site, the Alerts page it links to, and the two Settings sections that aren't about the site itself — your own account, and what you pay.
Dashboard → SettingsEvery plan
Your dashboard opens on the Your website card. View live site shows it as guests see it — now click Edit your site to open the Builder and change pages.
Website card, weekly numbers, today’s service, details, tables and to-dos read, alerts found, then your account, footer links, plan and sign-in safety opened — nothing saved on the practice copy.
- WHAT YOU NEED
- Just your TableSpark login
- TIME
- About 8 minutes
- HOW HARD?
- Like checking a weather app
- CAN I BREAK IT?
- No — only account deletion is permanent, and it asks first
IN PLAIN WORDS / TAP A TERM
What does the “Live” badge mean?
Whether your website is actually published and visible to guests right now, versus still being built. “Not published yet” means only you can see it.
What’s the site switcher?
The dropdown next to your greeting, for restaurants running more than one site. Pick any site you own and the whole dashboard reloads to show that one.
What does “Acknowledge” do on Alerts?
Clears an alert once you’ve dealt with it. Only an owner or admin can press it, so nothing gets dismissed by accident.
What’s a “sparkline”?
The small trend line on each weekly stat card — a shape, not a chart to study, just enough to see if the week is moving up or down at a glance.
Your first sign-in
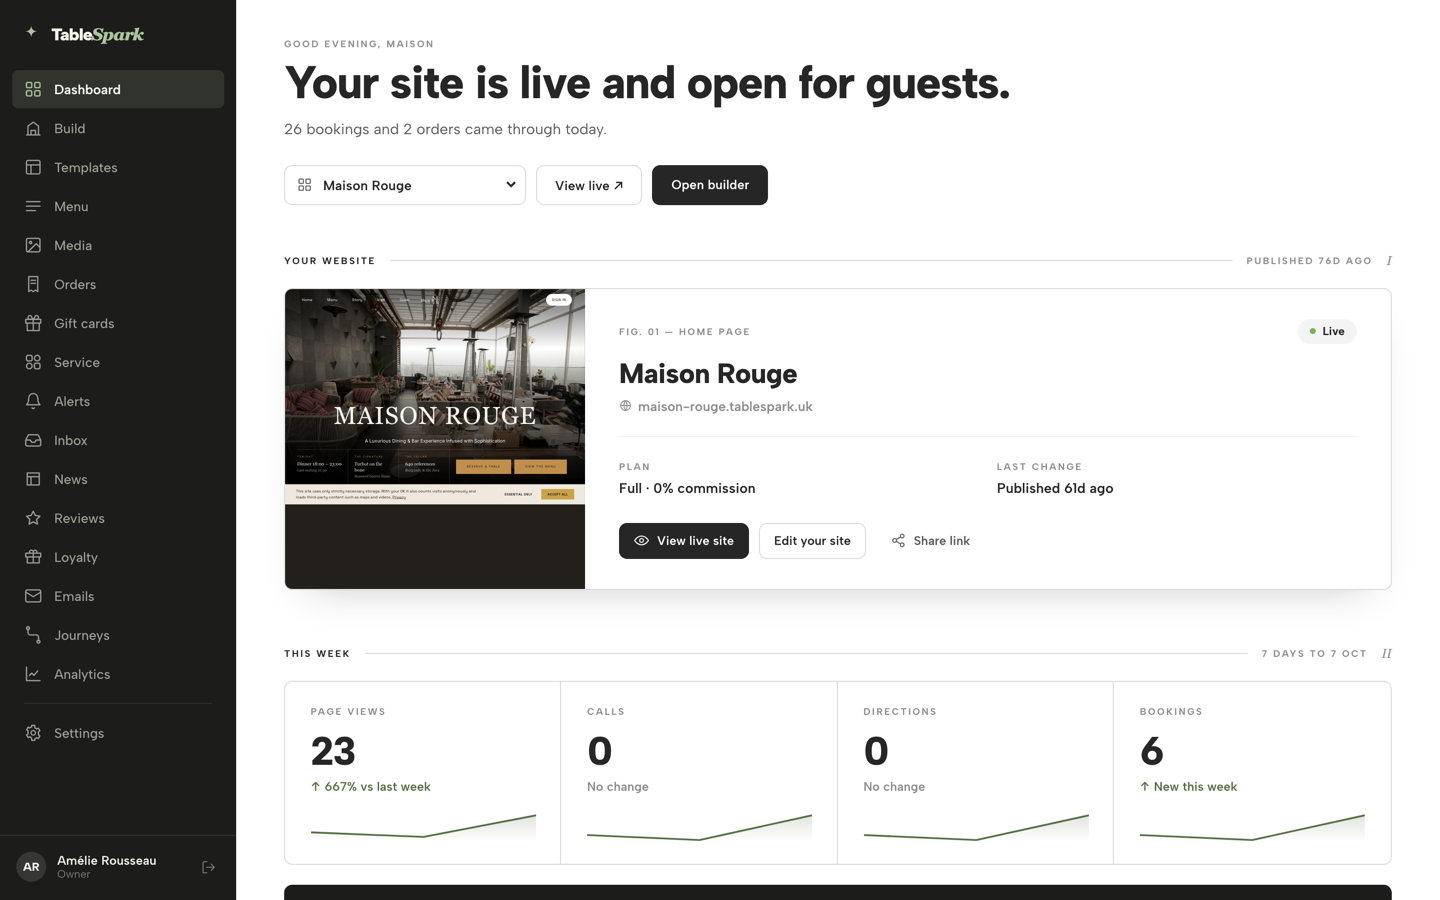
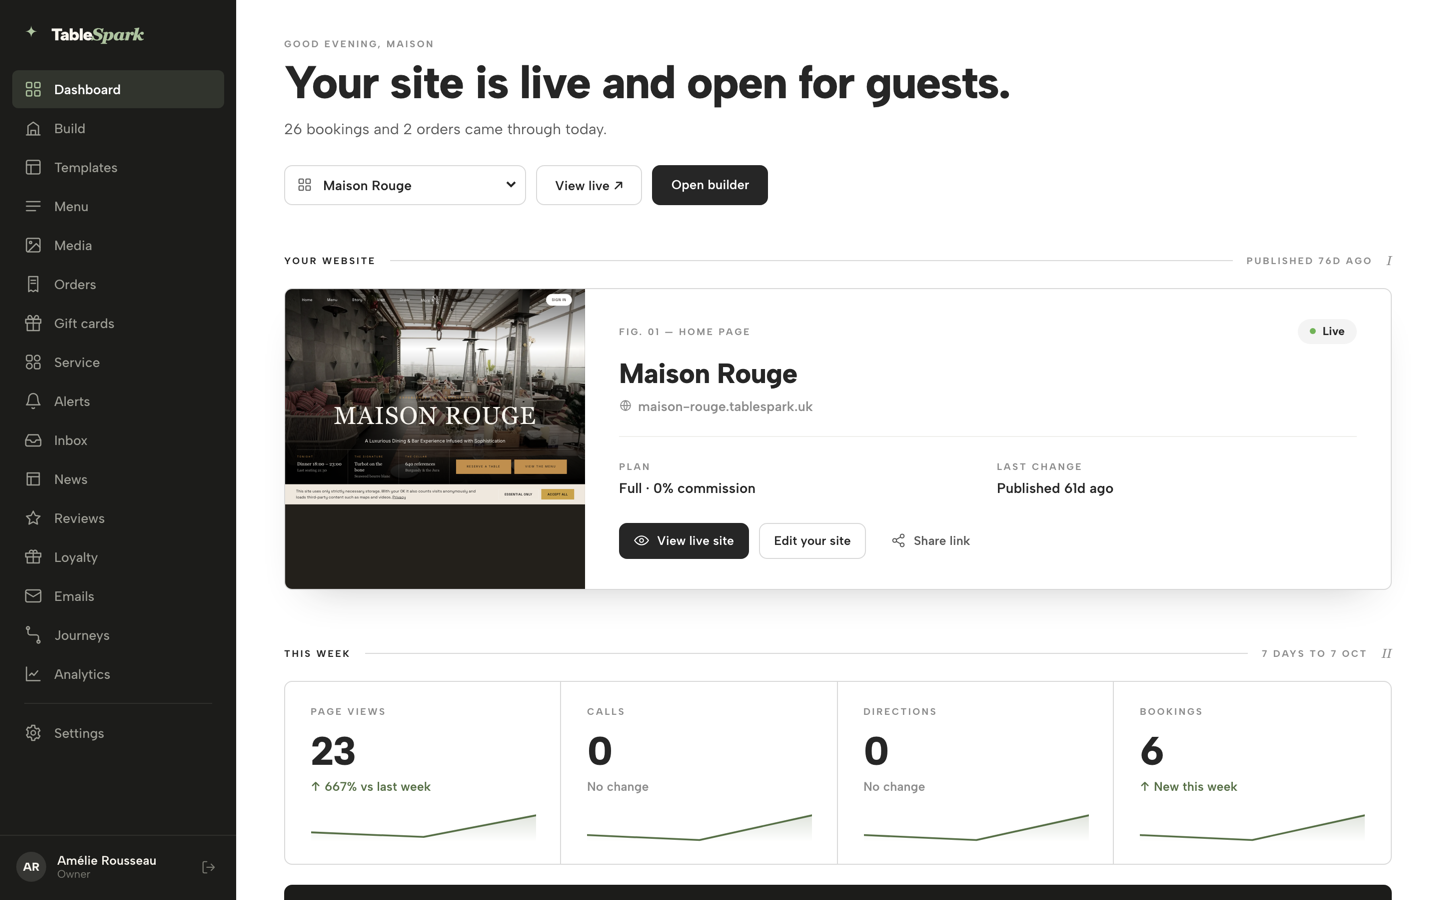
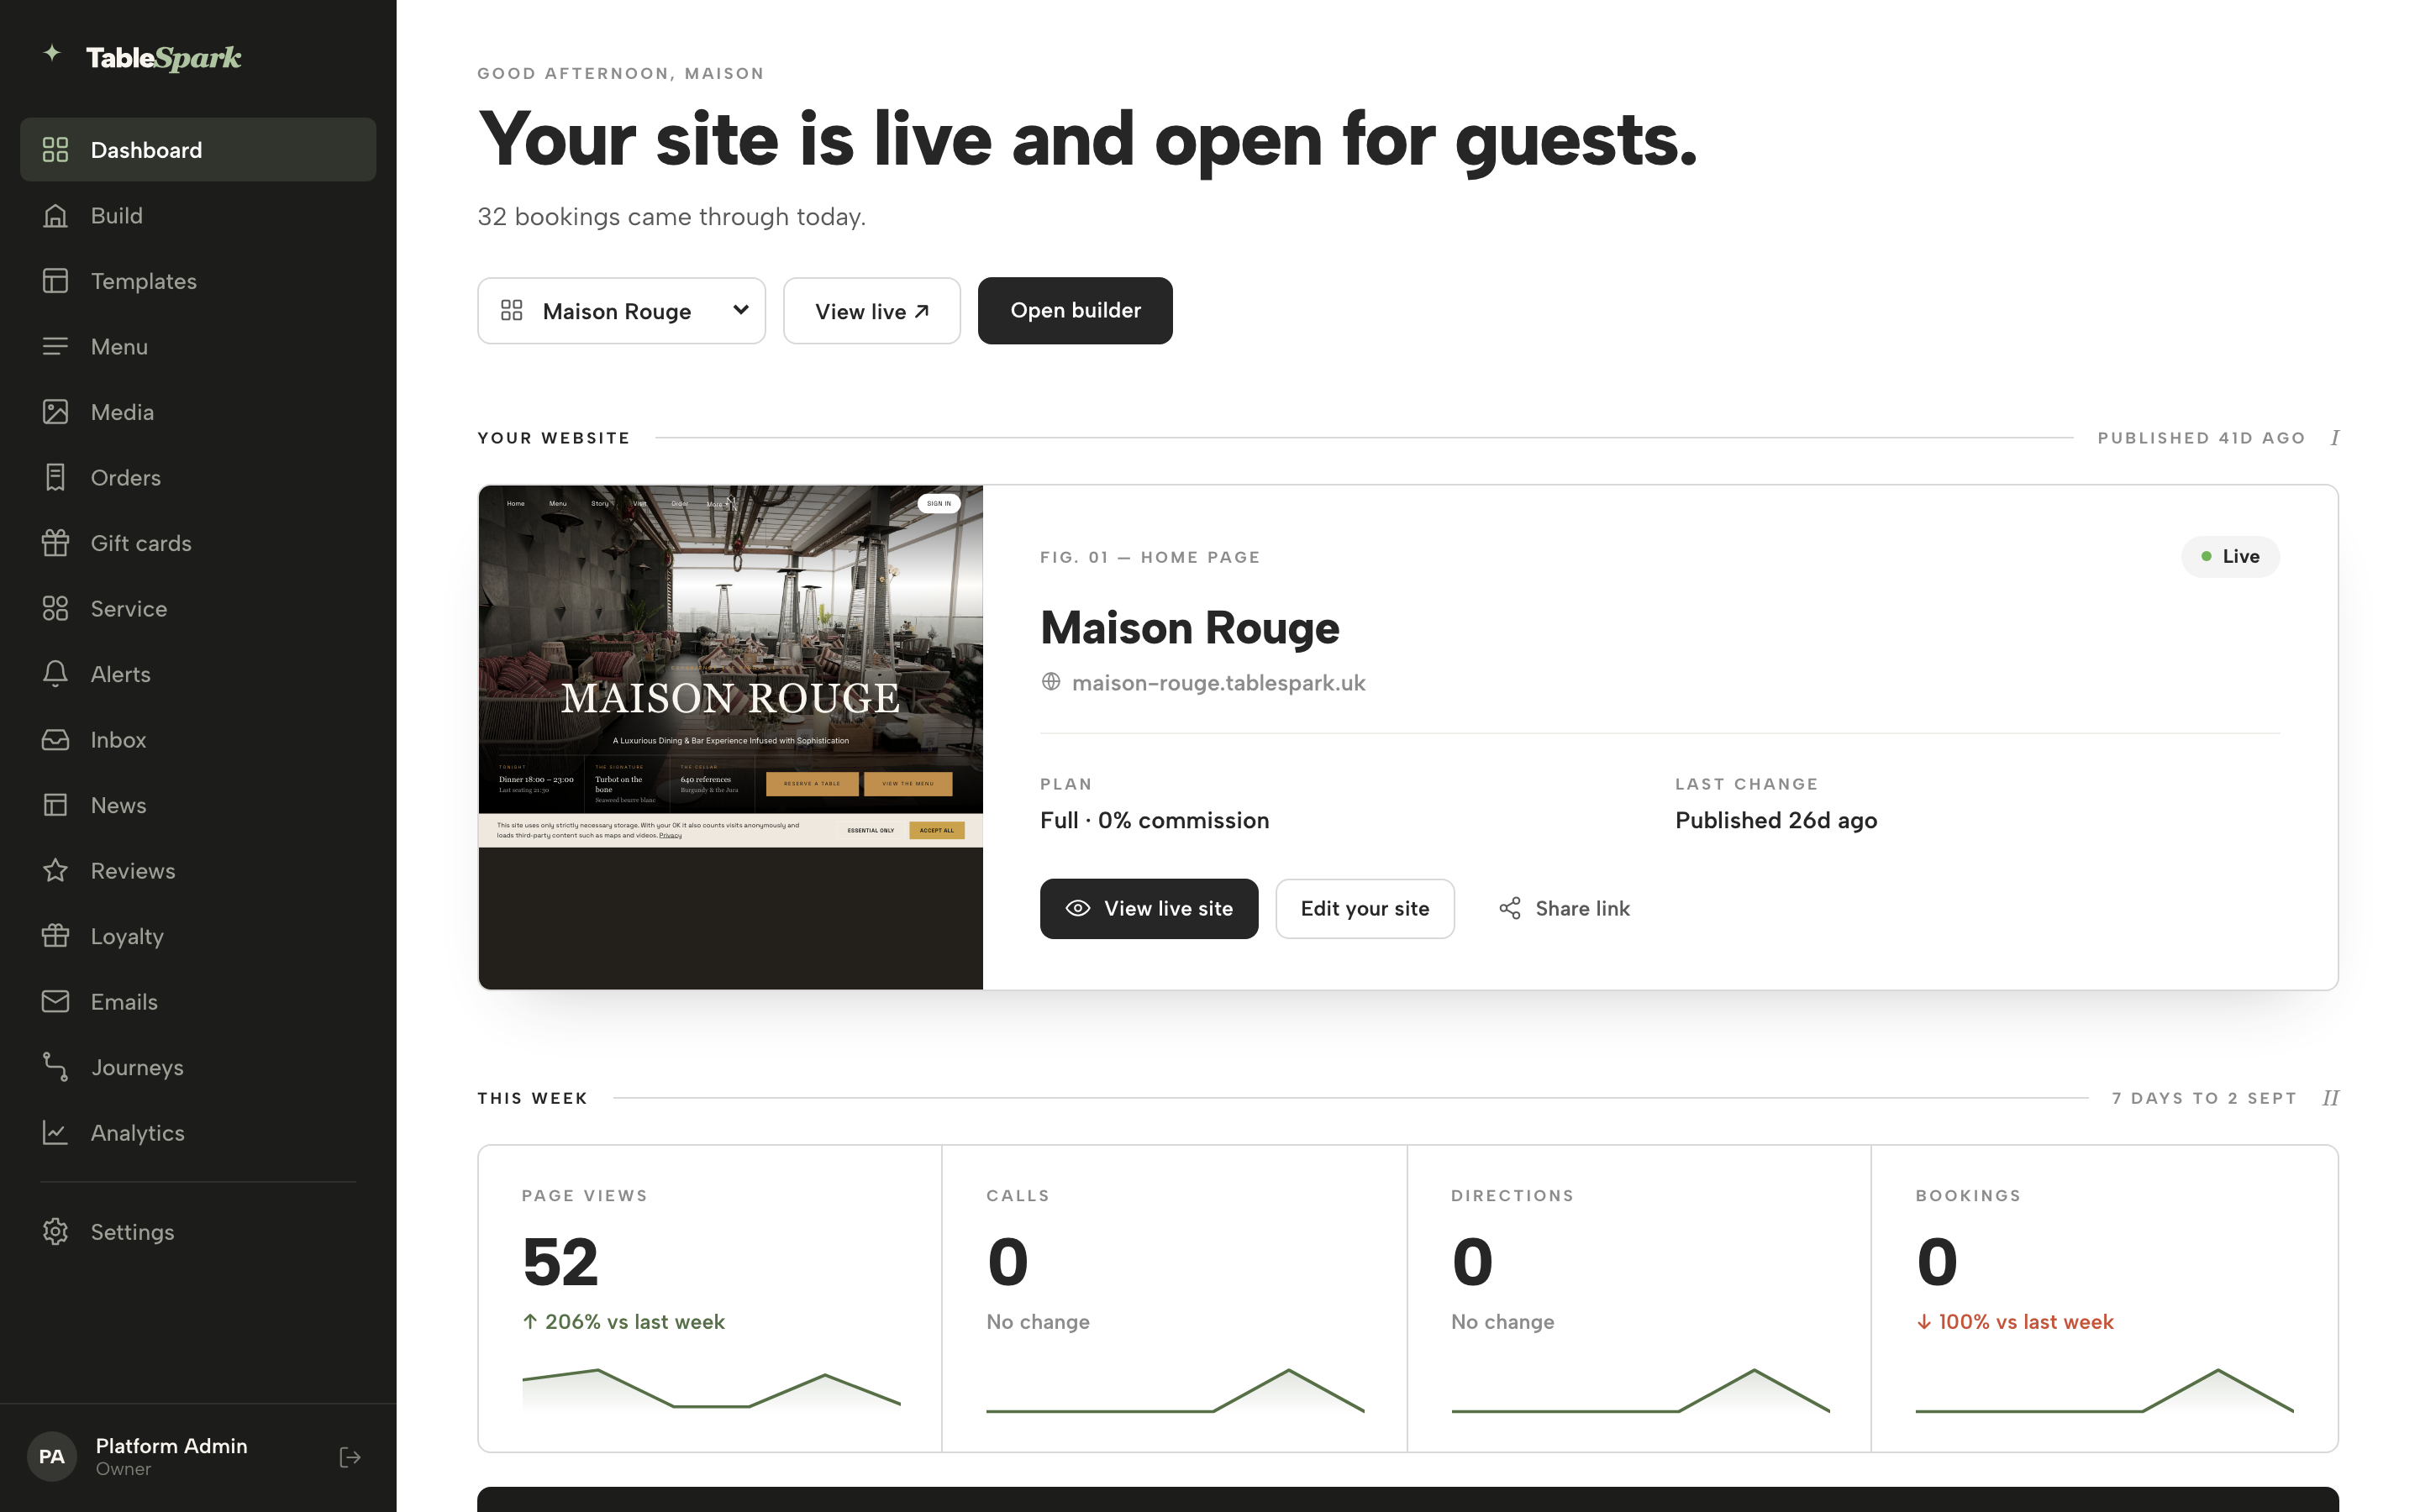
Sign in and the dashboard greets you by name — “Good morning, Maison,” “Good afternoon” or “Good evening” to match the time of day — followed by a plain-English headline that changes with your site's state: “Your site is live and open for guests” once you've published, or “Your site is nearly ready to go live” while you're still building. Underneath, one line sums up today — “26 bookings and 2 orders came through today,” for example.
Two shortcuts sit right there in the header, on every visit: View live opens your public site in a new tab, and Open builder jumps straight into the page editor — no digging through menus for either one.
Switching between sites
Next to the greeting sits the site switcher (see Fig. 01 above). If you run one restaurant, it's a plain New site button. Once you're running more than one, it becomes a dropdown showing the current site's name — open it and pick any other site you have, or choose + New site… at the bottom to start another. Choosing a different site reloads the whole dashboard for that site, so every card on the page — stats, alerts, plan — is always about the site you're currently looking at.
A second site is a Full plan feature. If you're on a lower plan and try to add one, TableSpark tells you which plan unlocks it rather than leaving the button to fail silently.
Your website card
The first big panel — “Your website” (see Fig. 01) — is a real, live thumbnail of your homepage, captioned “Fig. 01 — Home page.” Next to it: a Live or Not published yet badge, your restaurant's name, and your web address as a clickable link once you're live. Two more facts sit underneath — your current Plan (for example “Full · 0% commission”) and the Last change, e.g. “Published 61d ago.”
Below that, the actions adapt to where you are: no pages yet shows Open the builder; pages but not published shows Publish your site and Edit your site; live shows View live site and Edit your site. A Share link button is always there to copy your web address for a quick message to a supplier or a friend.
This week: your stats
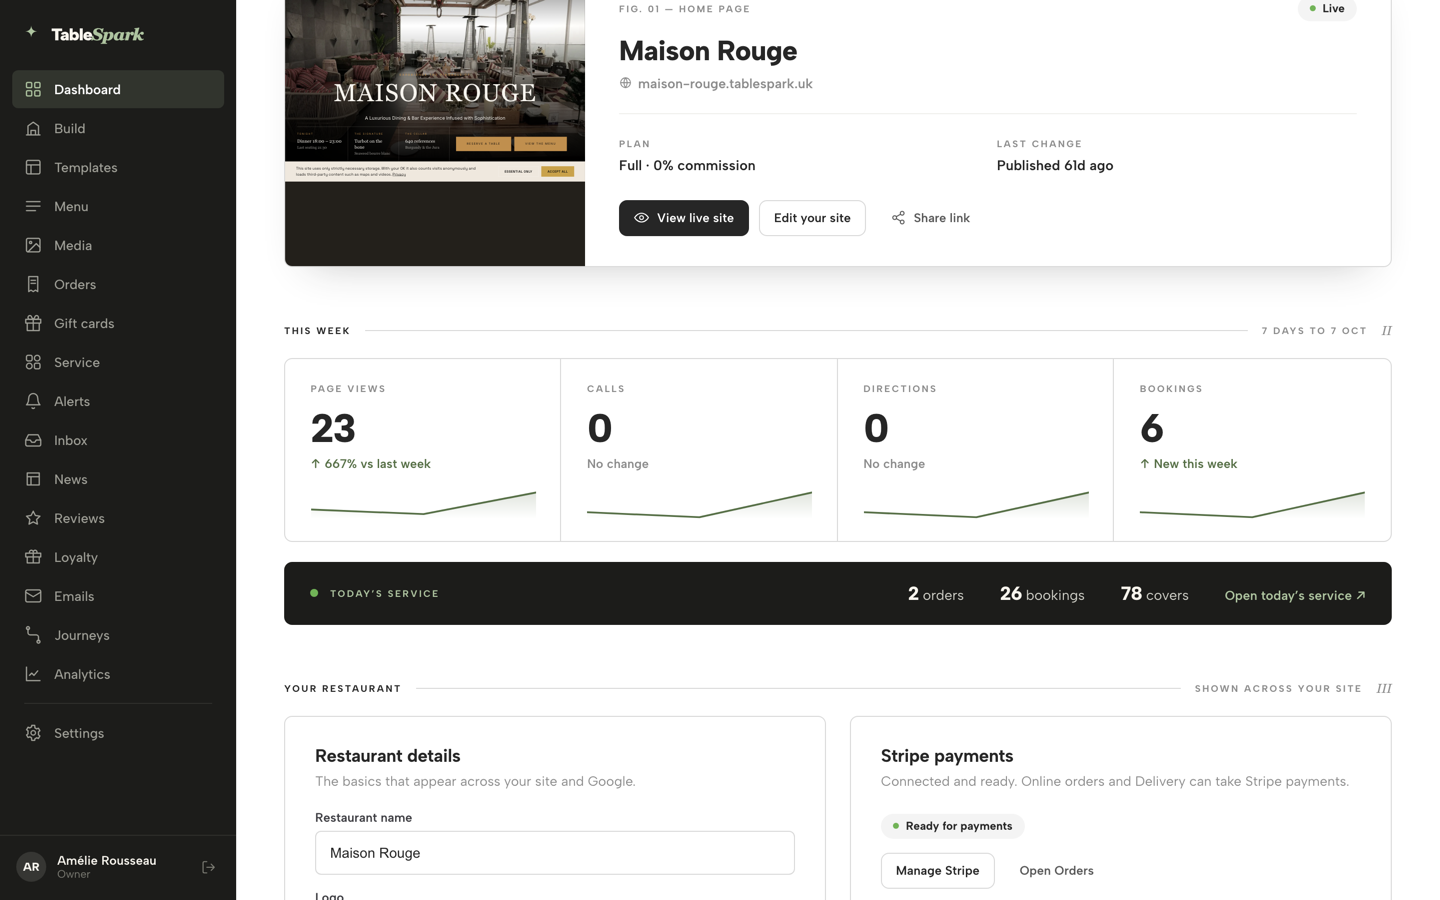
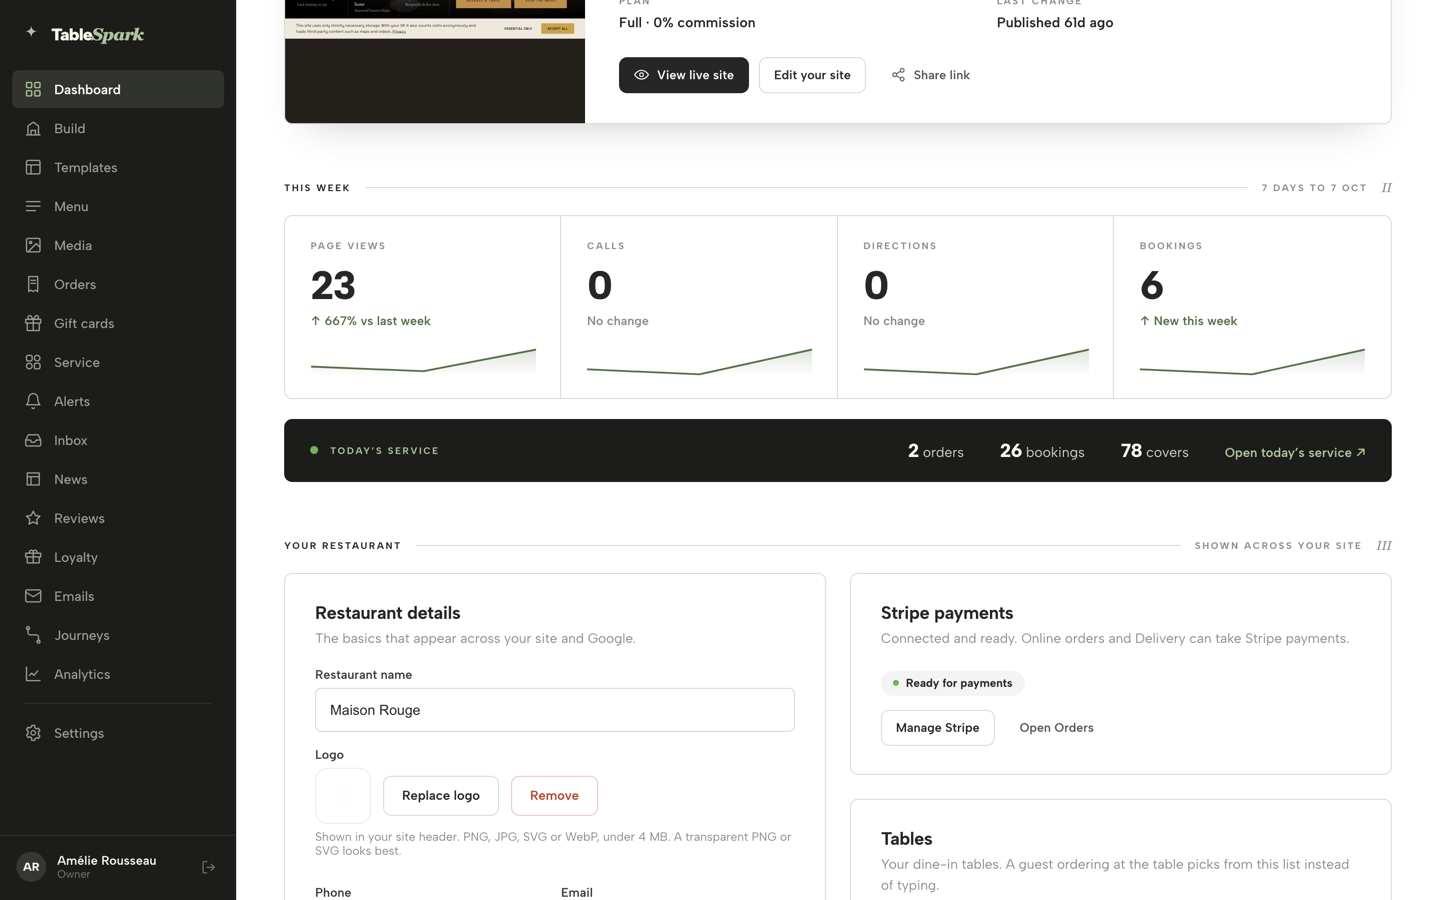
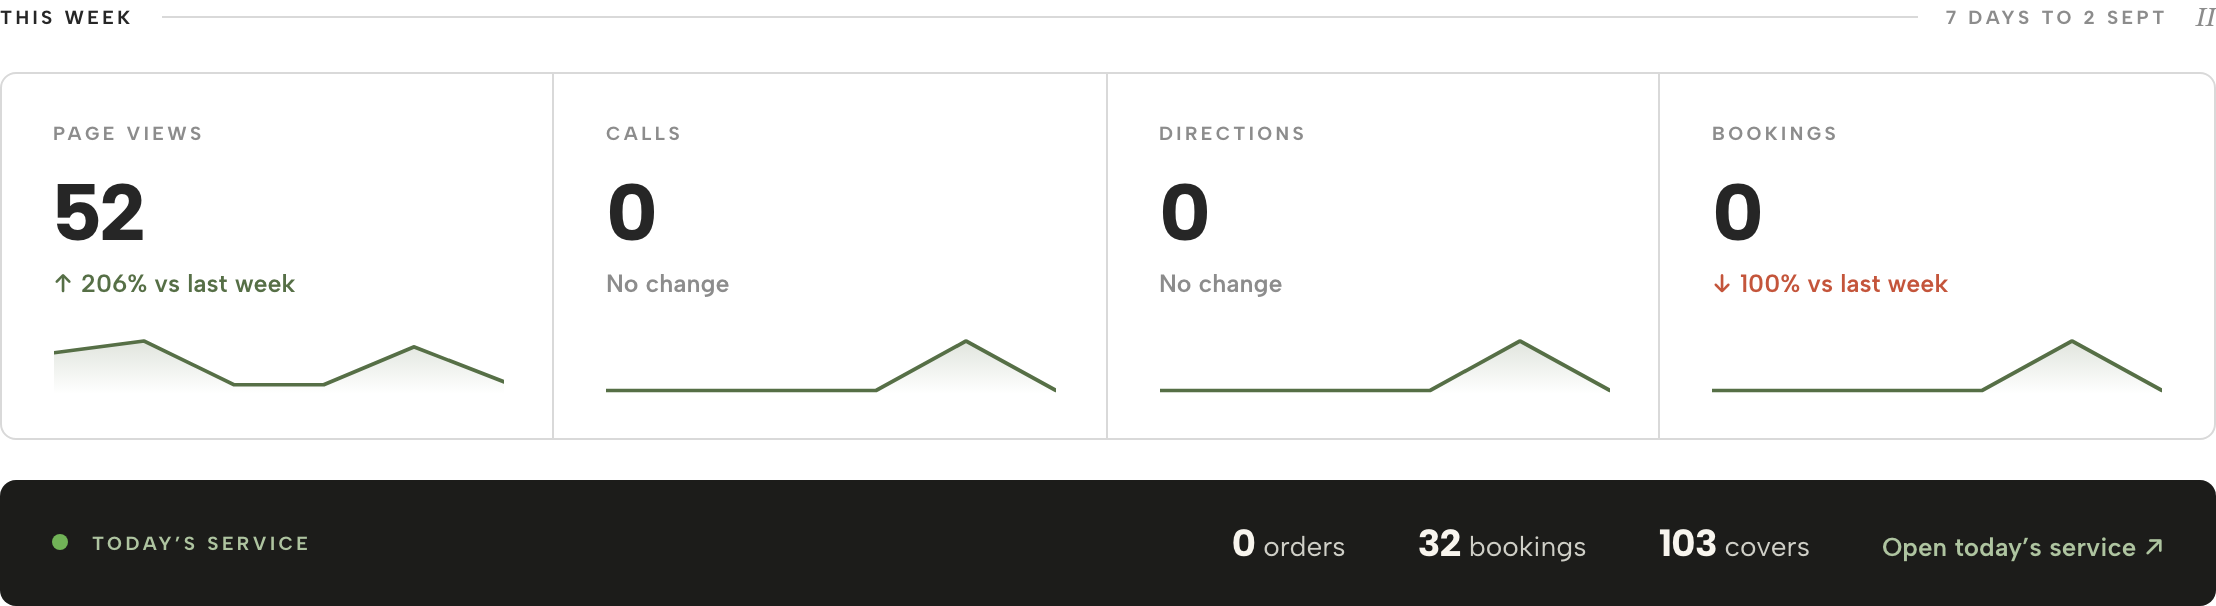
The “This week” row is four cards — Page views, Calls, Directions and Bookings — each with this week's total, a trend against last week (“↑ 667% vs last week,” “New this week” for a first, or “No change” when nothing's moved), and a small 7-day line so you can see the shape of the week at a glance. Calls and Directions count guests tapping to phone you or get directions straight from your live site — useful signals even before a single booking comes in.
Underneath, a dark Today's service strip totals the day itself — orders, bookings and covers — with an Open today's service link that opens your Inbox, where today's bookings wait. The orders figure links through to Orders.
Restaurant details and tables
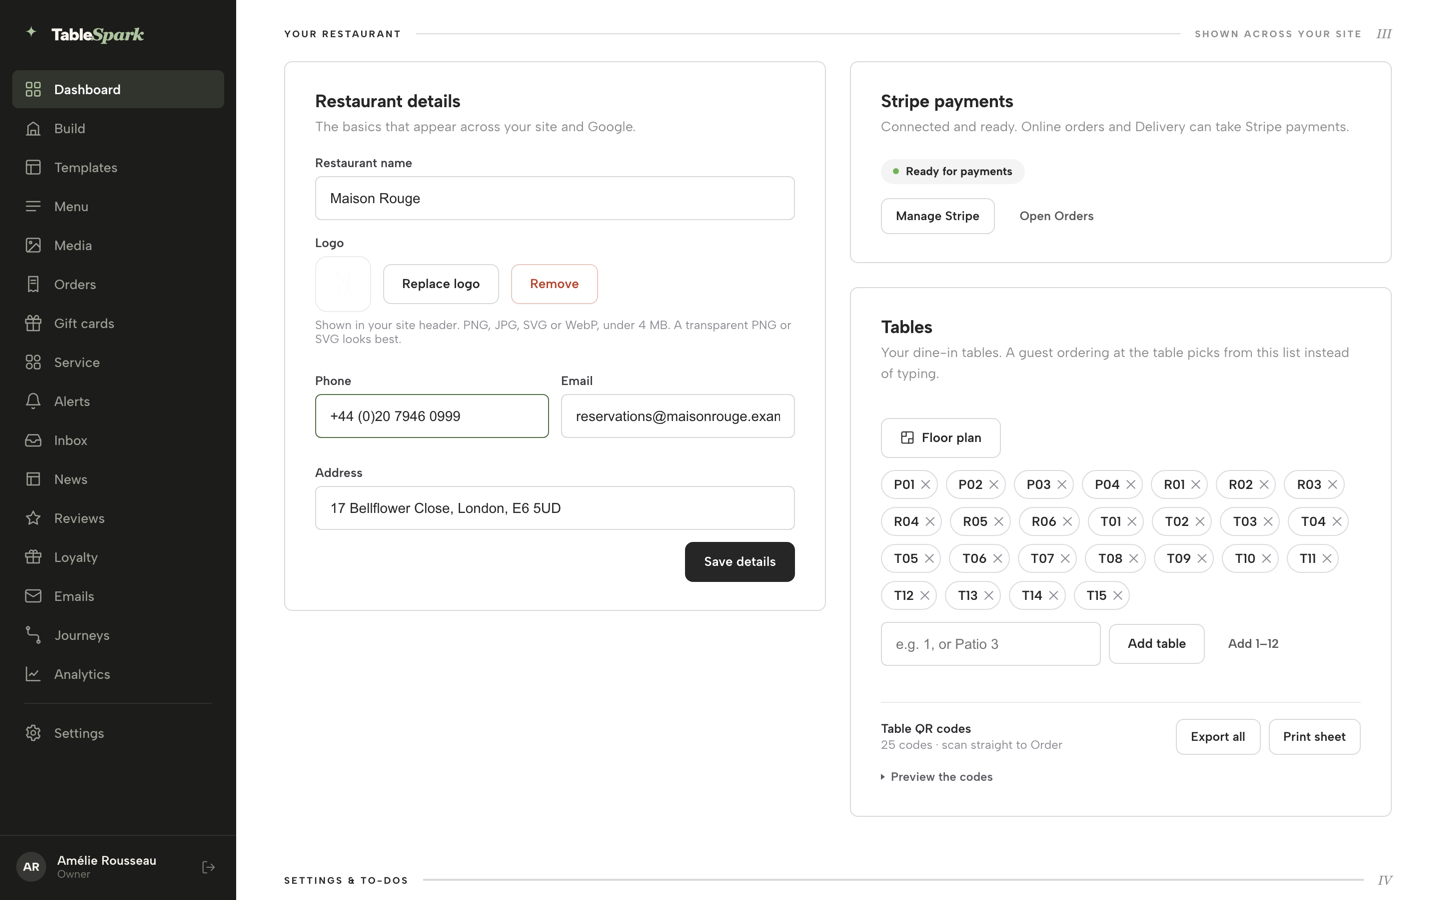
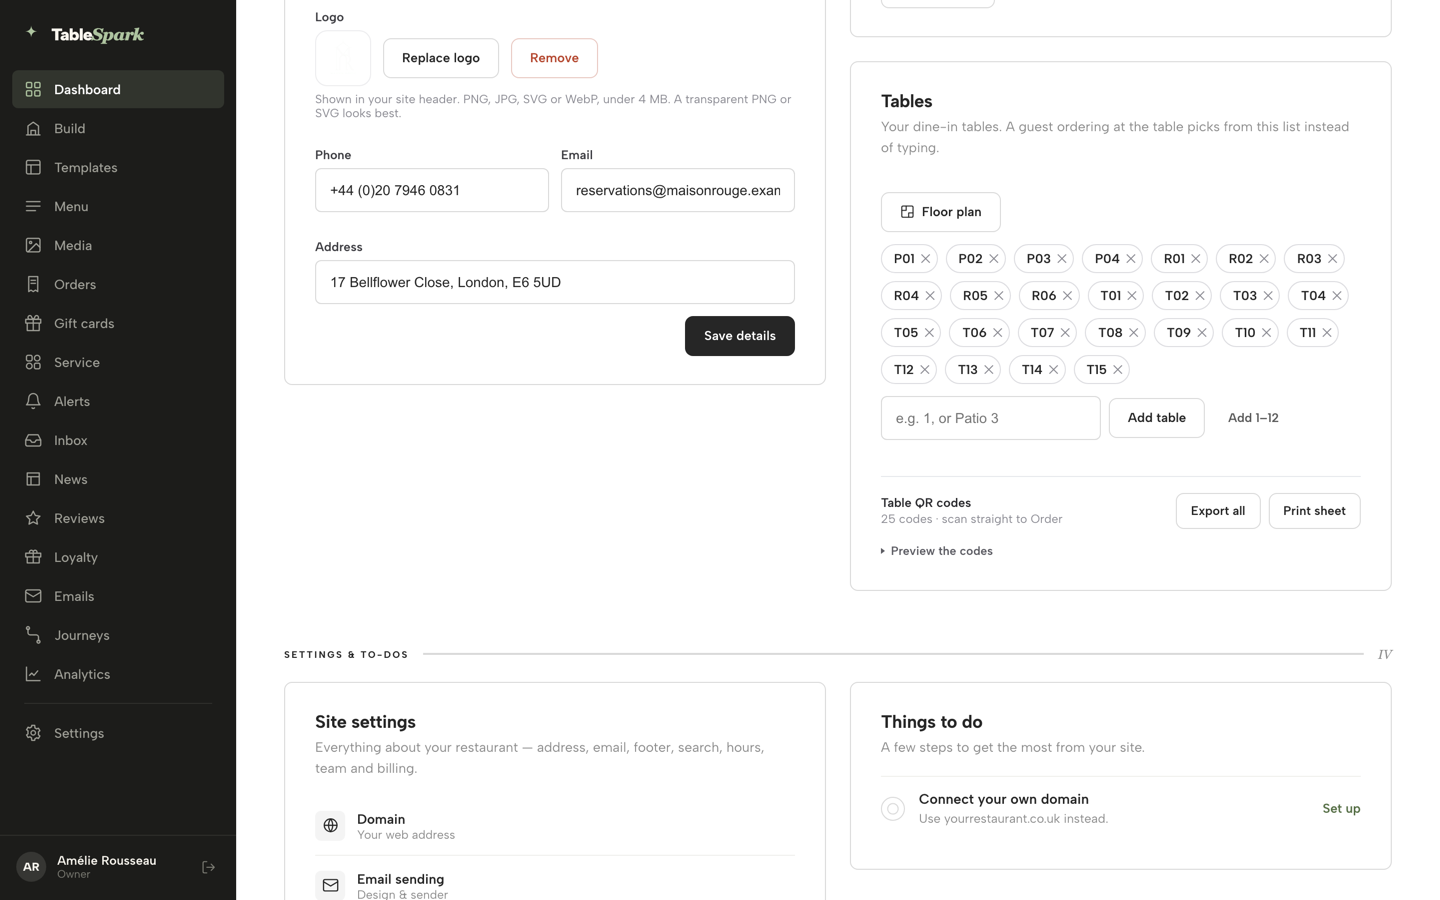
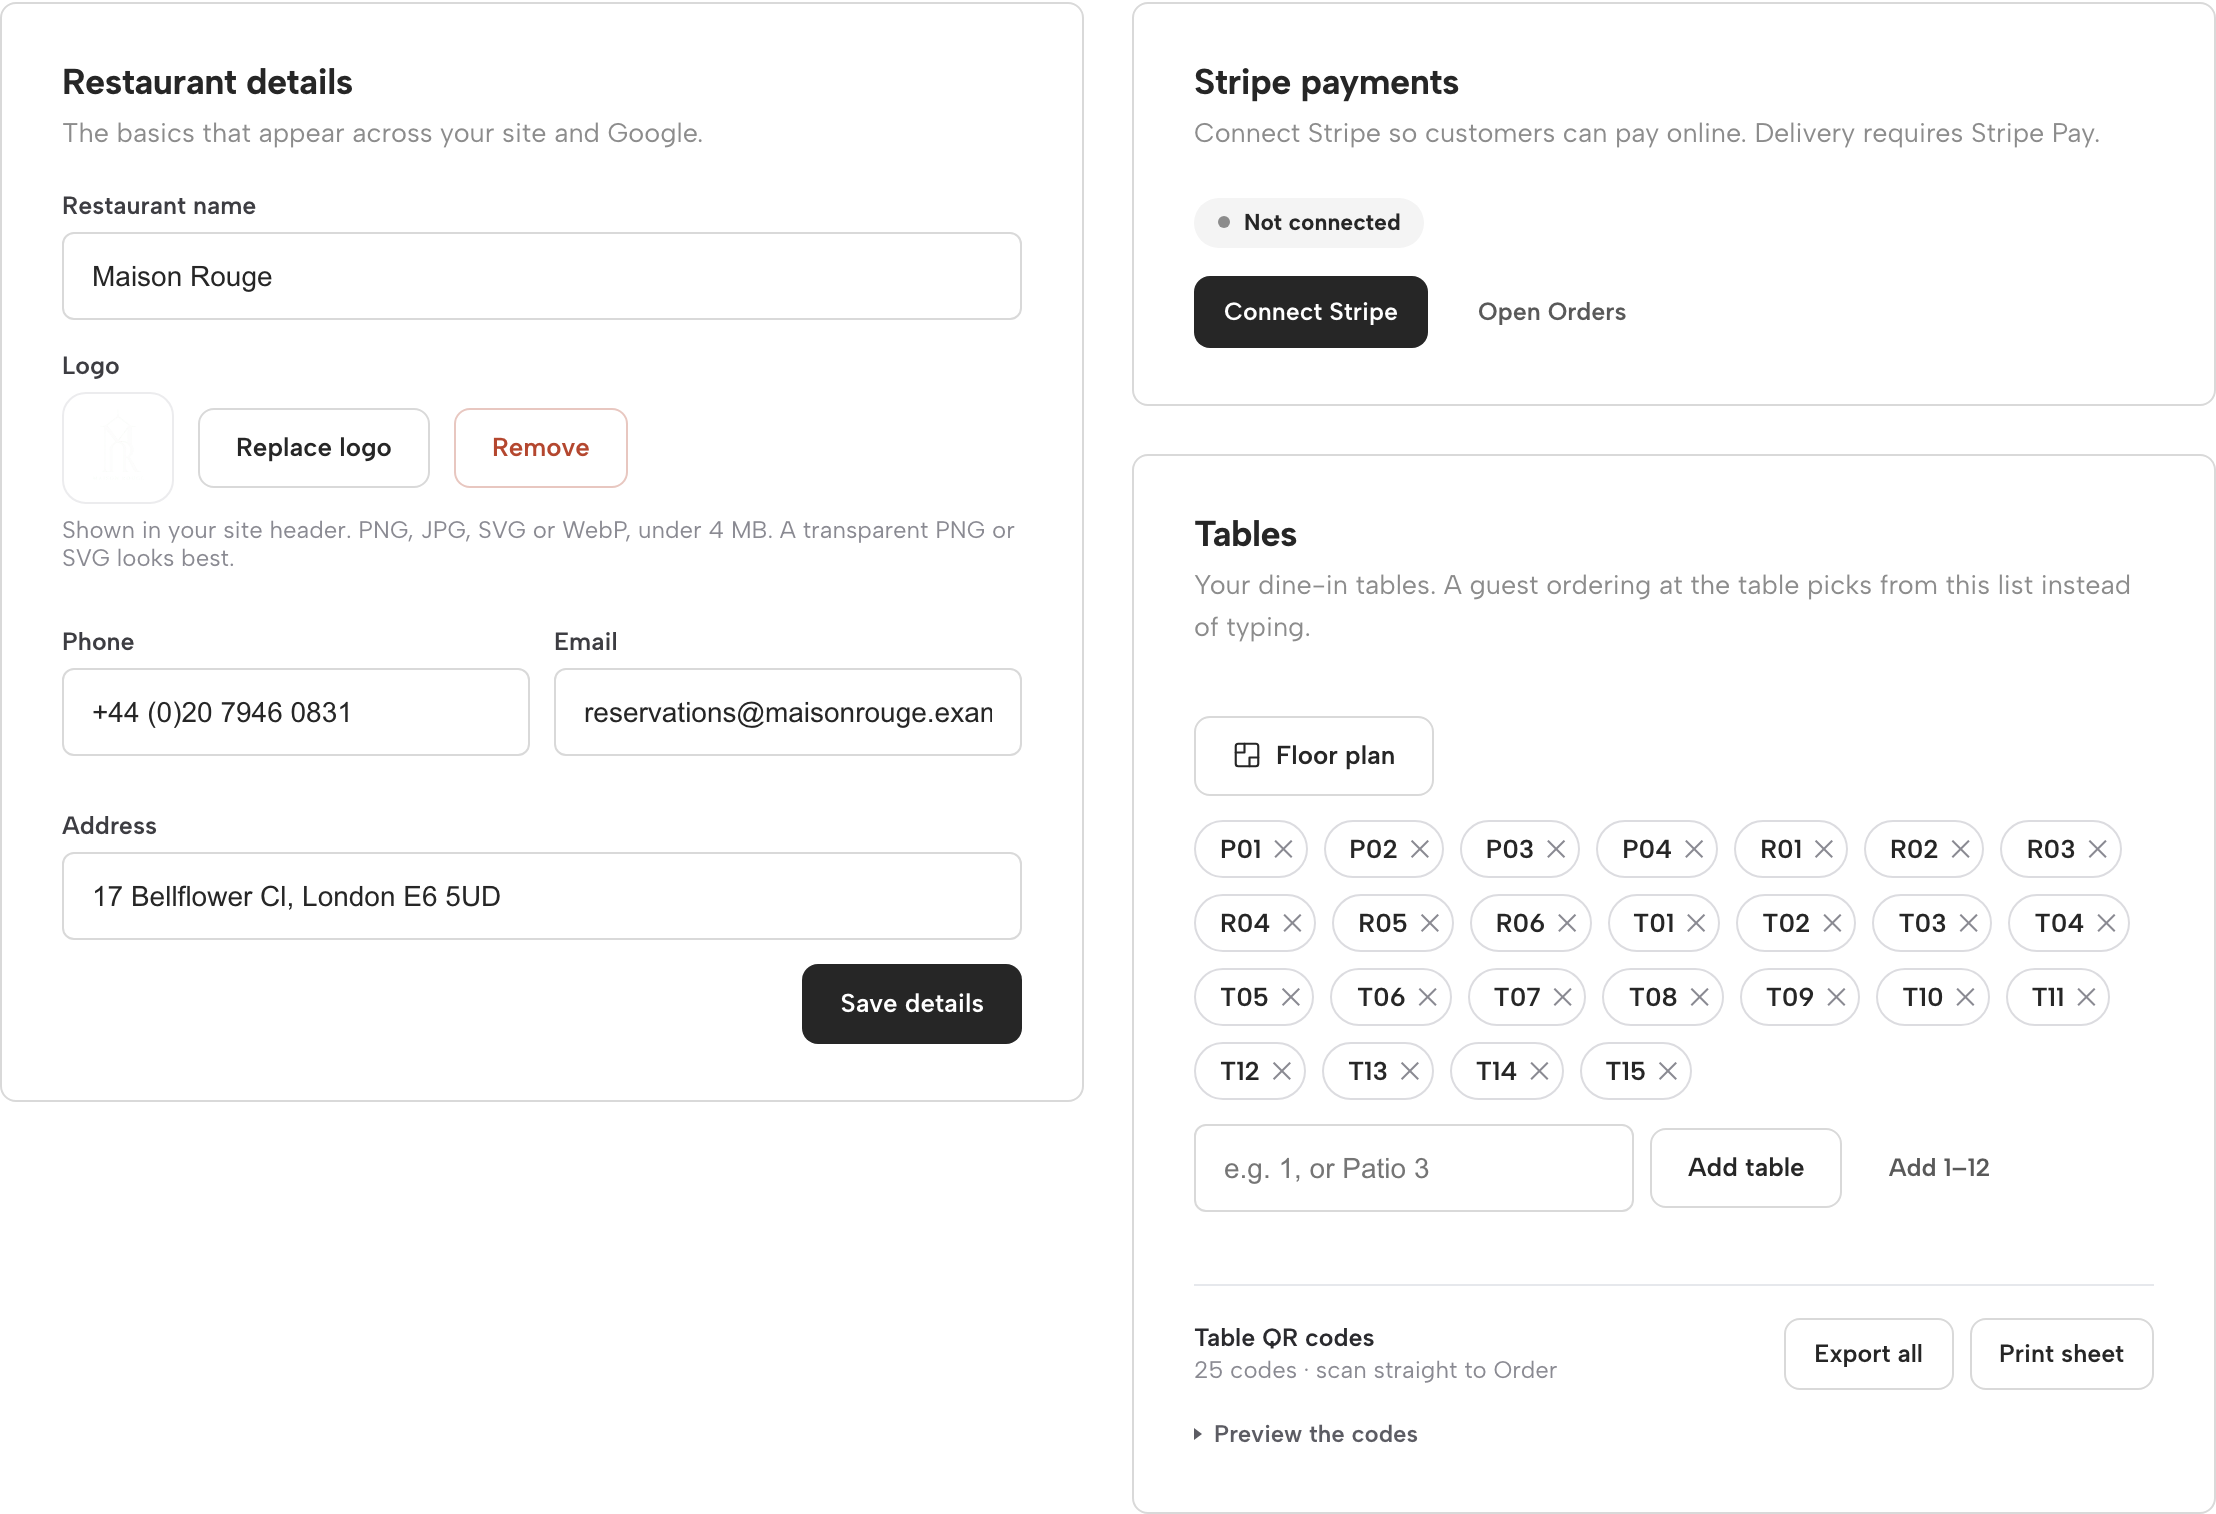
The “Your restaurant” panel keeps the basics you'd otherwise hunt for in Settings right on the dashboard. Restaurant details holds your name, logo (Replace logo or Remove), phone, email and address — the same facts shown across your site and to Google — saved with Save details. On plans with online ordering, a Stripe payments card sits beside it, showing Not connected, Action required or Ready for payments, with a Connect Stripe or Manage Stripe shortcut and an Open Orders link.
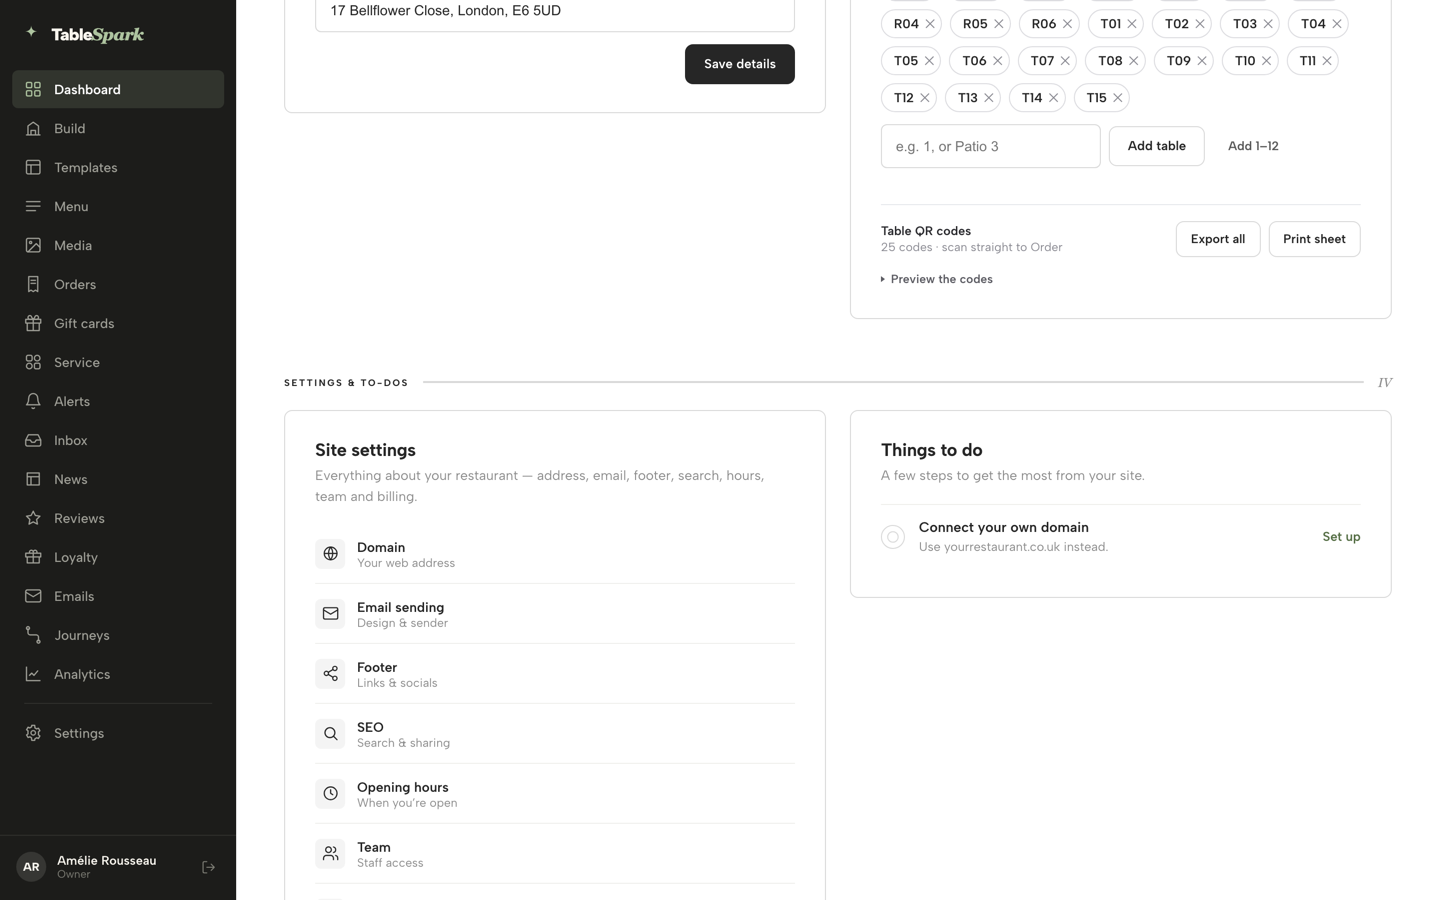
Below that, Tables lists every dine-in table as a removable chip, lets you add one at a time with Add table or a whole batch with Add 1–12, opens the layout editor with Floor plan, and generates one QR code per table — Preview the codes, Export all or Print sheet — so a guest scanning at the table can order straight from that list instead of typing anything.
Settings shortcuts and things to do
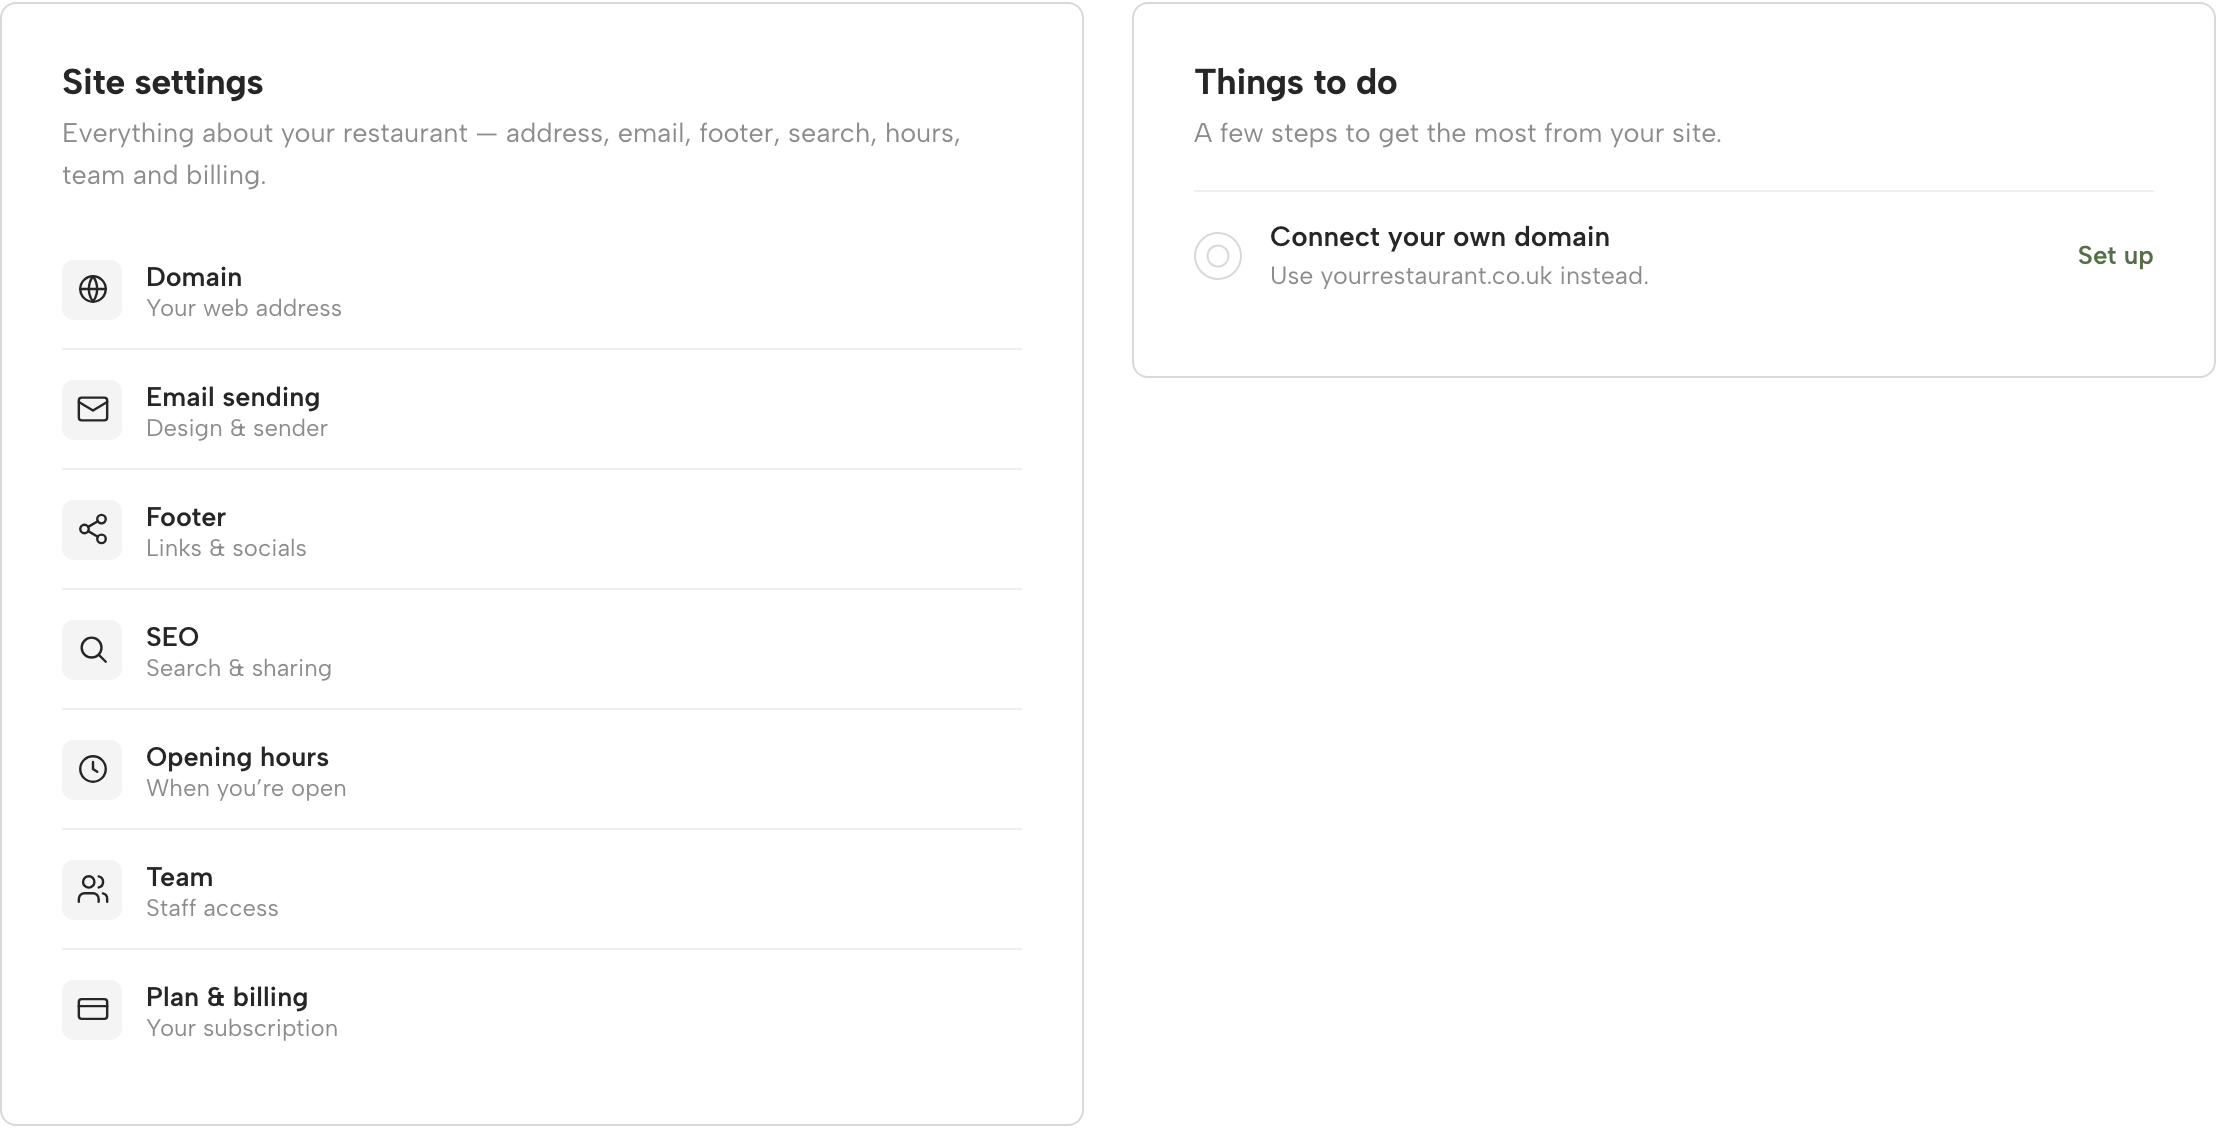
Two panels close out the dashboard. Site settings is a grid of quick links straight into Settings — Domain, Email sending, Footer, SEO, Opening hours, Team, and Plan & billing — so you never have to remember where a setting lives. Things to do is personal to your site: whatever's left to finish shows up here, each with a one-click action — connecting a domain, adding opening hours, adding allergens to your menu. Clear everything and the panel simply says “You're all set. Nice work.”
The Alerts page
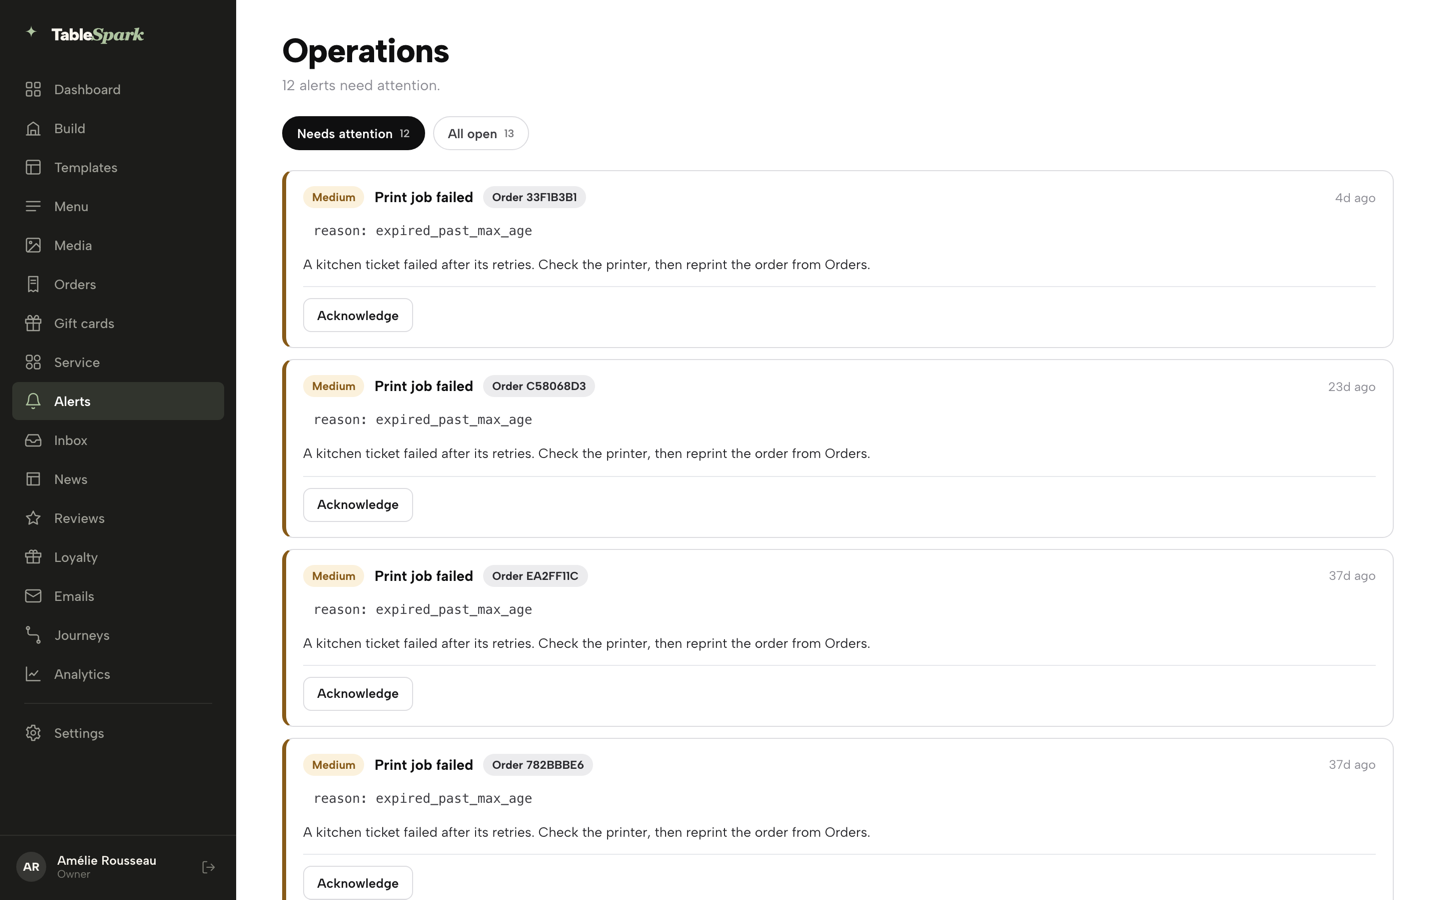
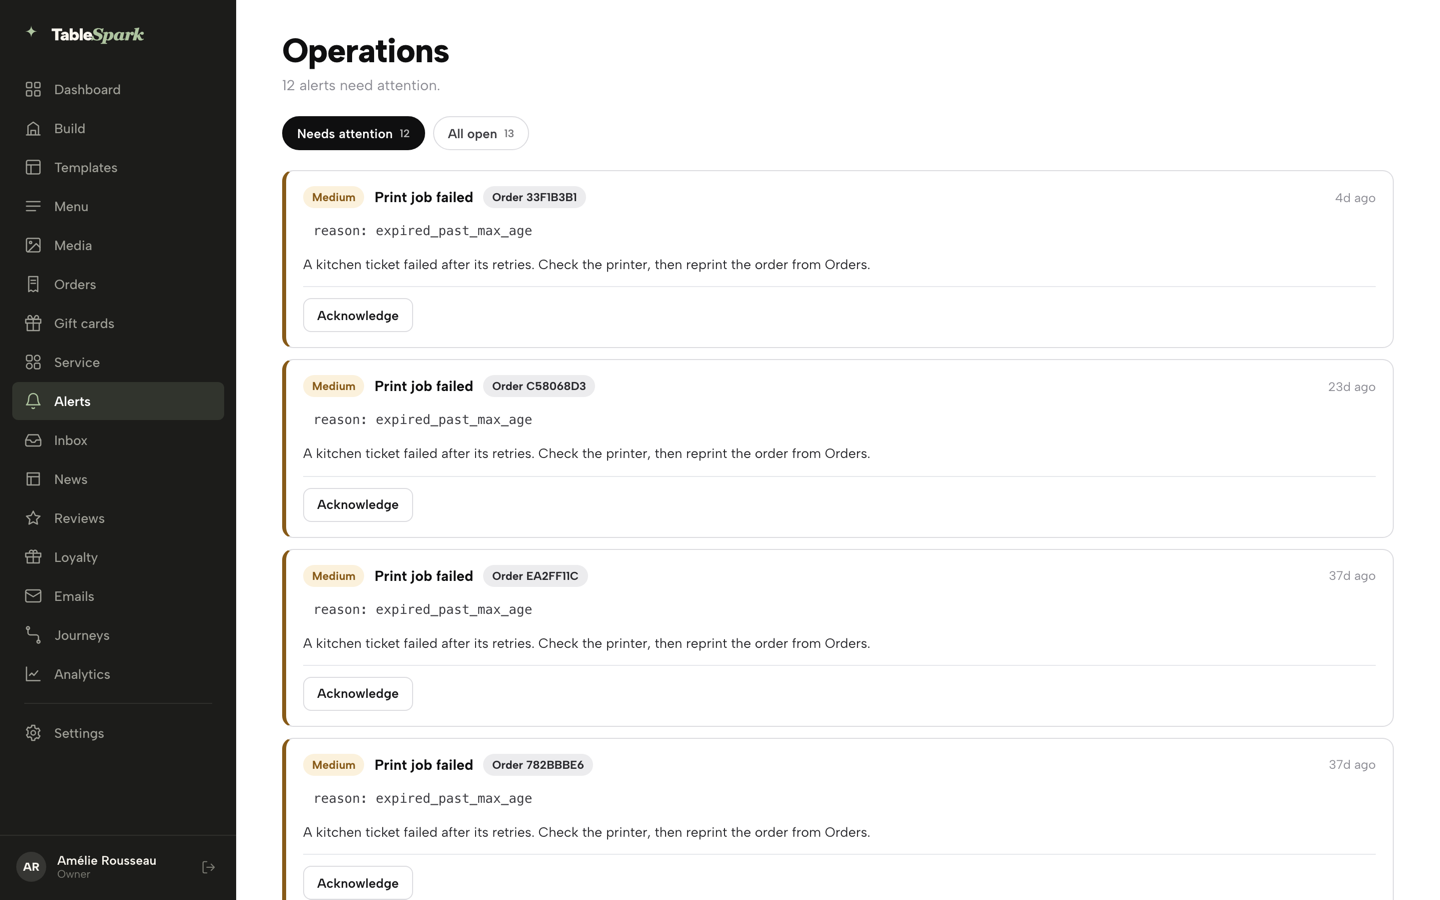
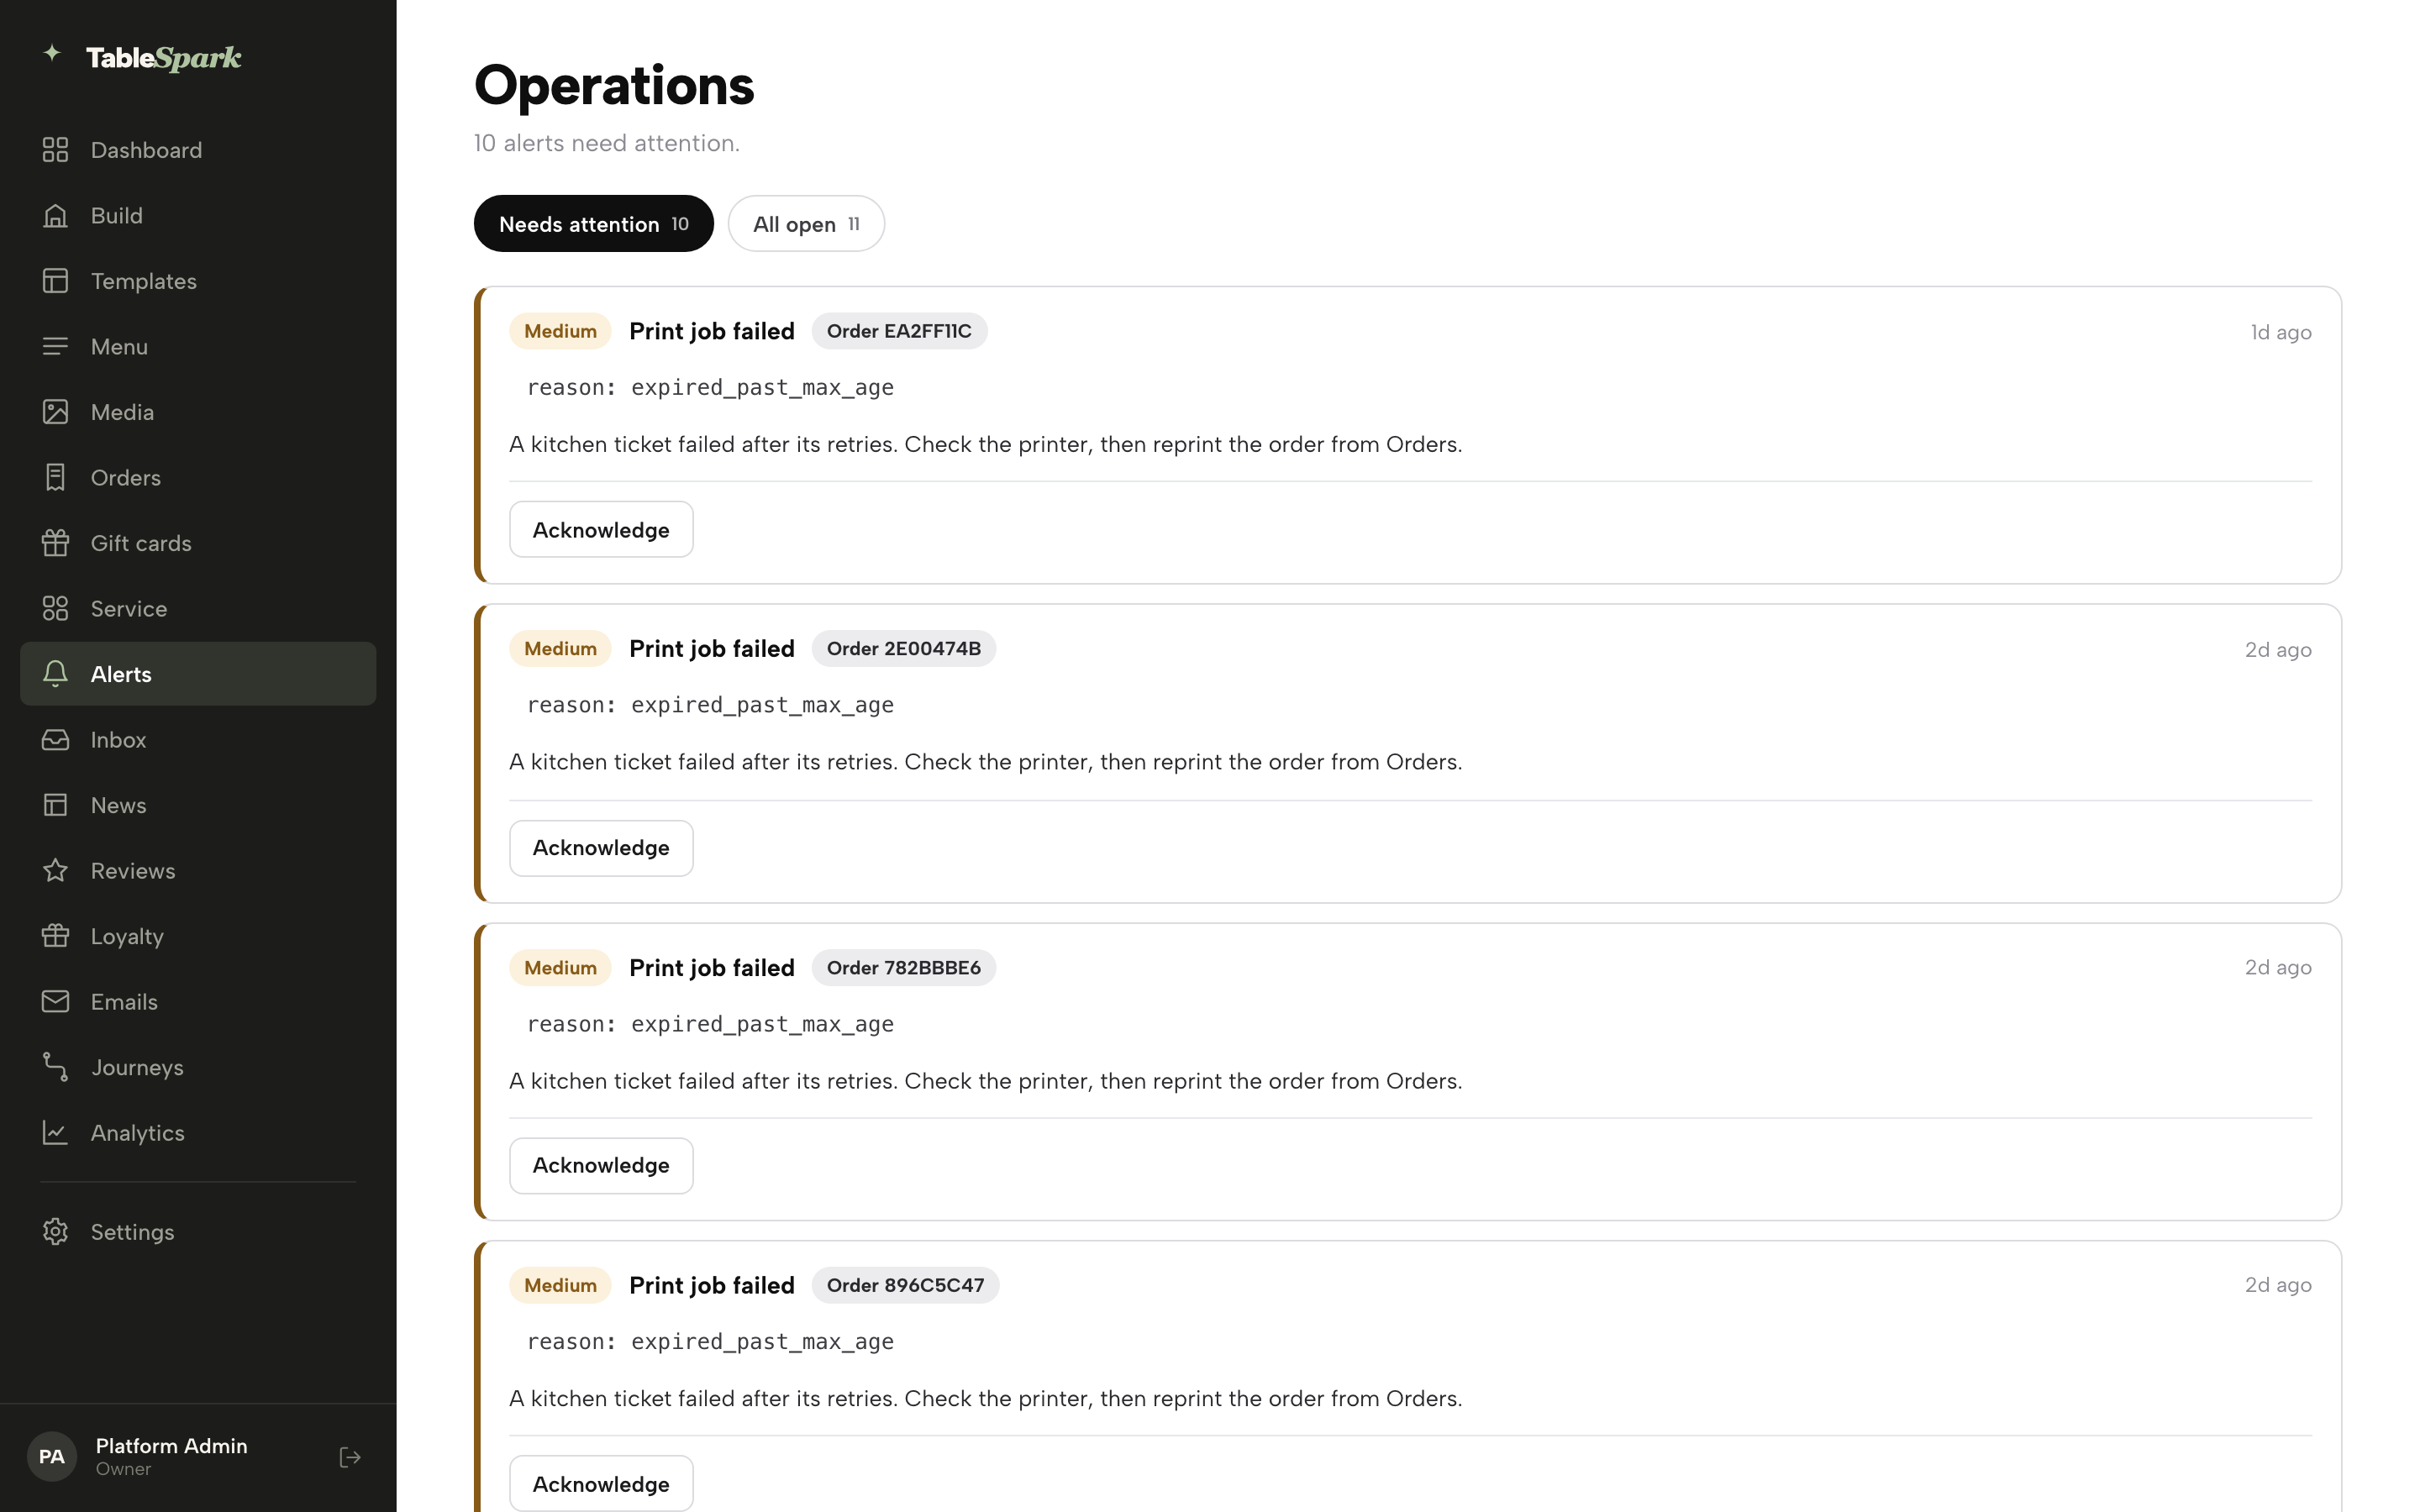
Open Alerts in the left sidebar and you land on a page headed “Operations” — the place things that need a human look surface, so you catch a problem without digging through Orders or your Stripe dashboard yourself. The line under the heading counts what is waiting (“12 alerts need attention”). It opens on Needs attention, next to an All open tab that also shows alerts you've already cleared. Every card carries a severity chip, a plain-English label, a related order or booking reference where relevant, a short factual line (such as the reason a job failed), and what to do about it — “A kitchen ticket failed after its retries. Check the printer, then reprint the order from Orders,” for instance.
Press Acknowledge once you've dealt with an alert and it drops off “Needs attention” and shows as acknowledged under All open, with an Undo if you pressed it too soon. A gift-card delivery alert also offers Retry delivery. Only an owner or admin can do this — anyone else sees a note that an owner or admin can acknowledge it, so nothing gets waved away by mistake. When there's genuinely nothing open, the page says “Everything is running cleanly.”
Your account settings
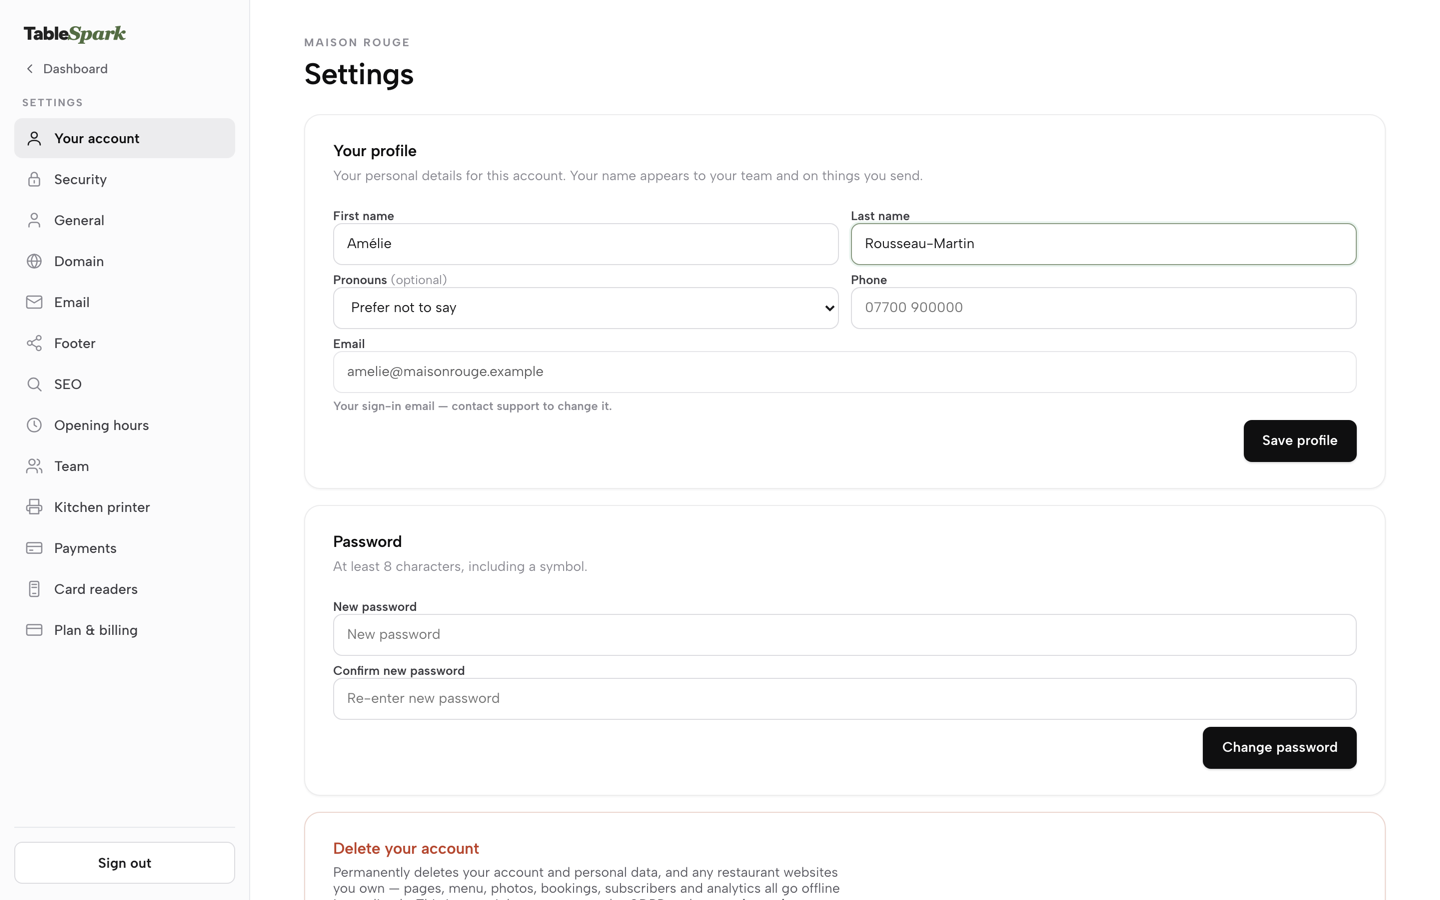
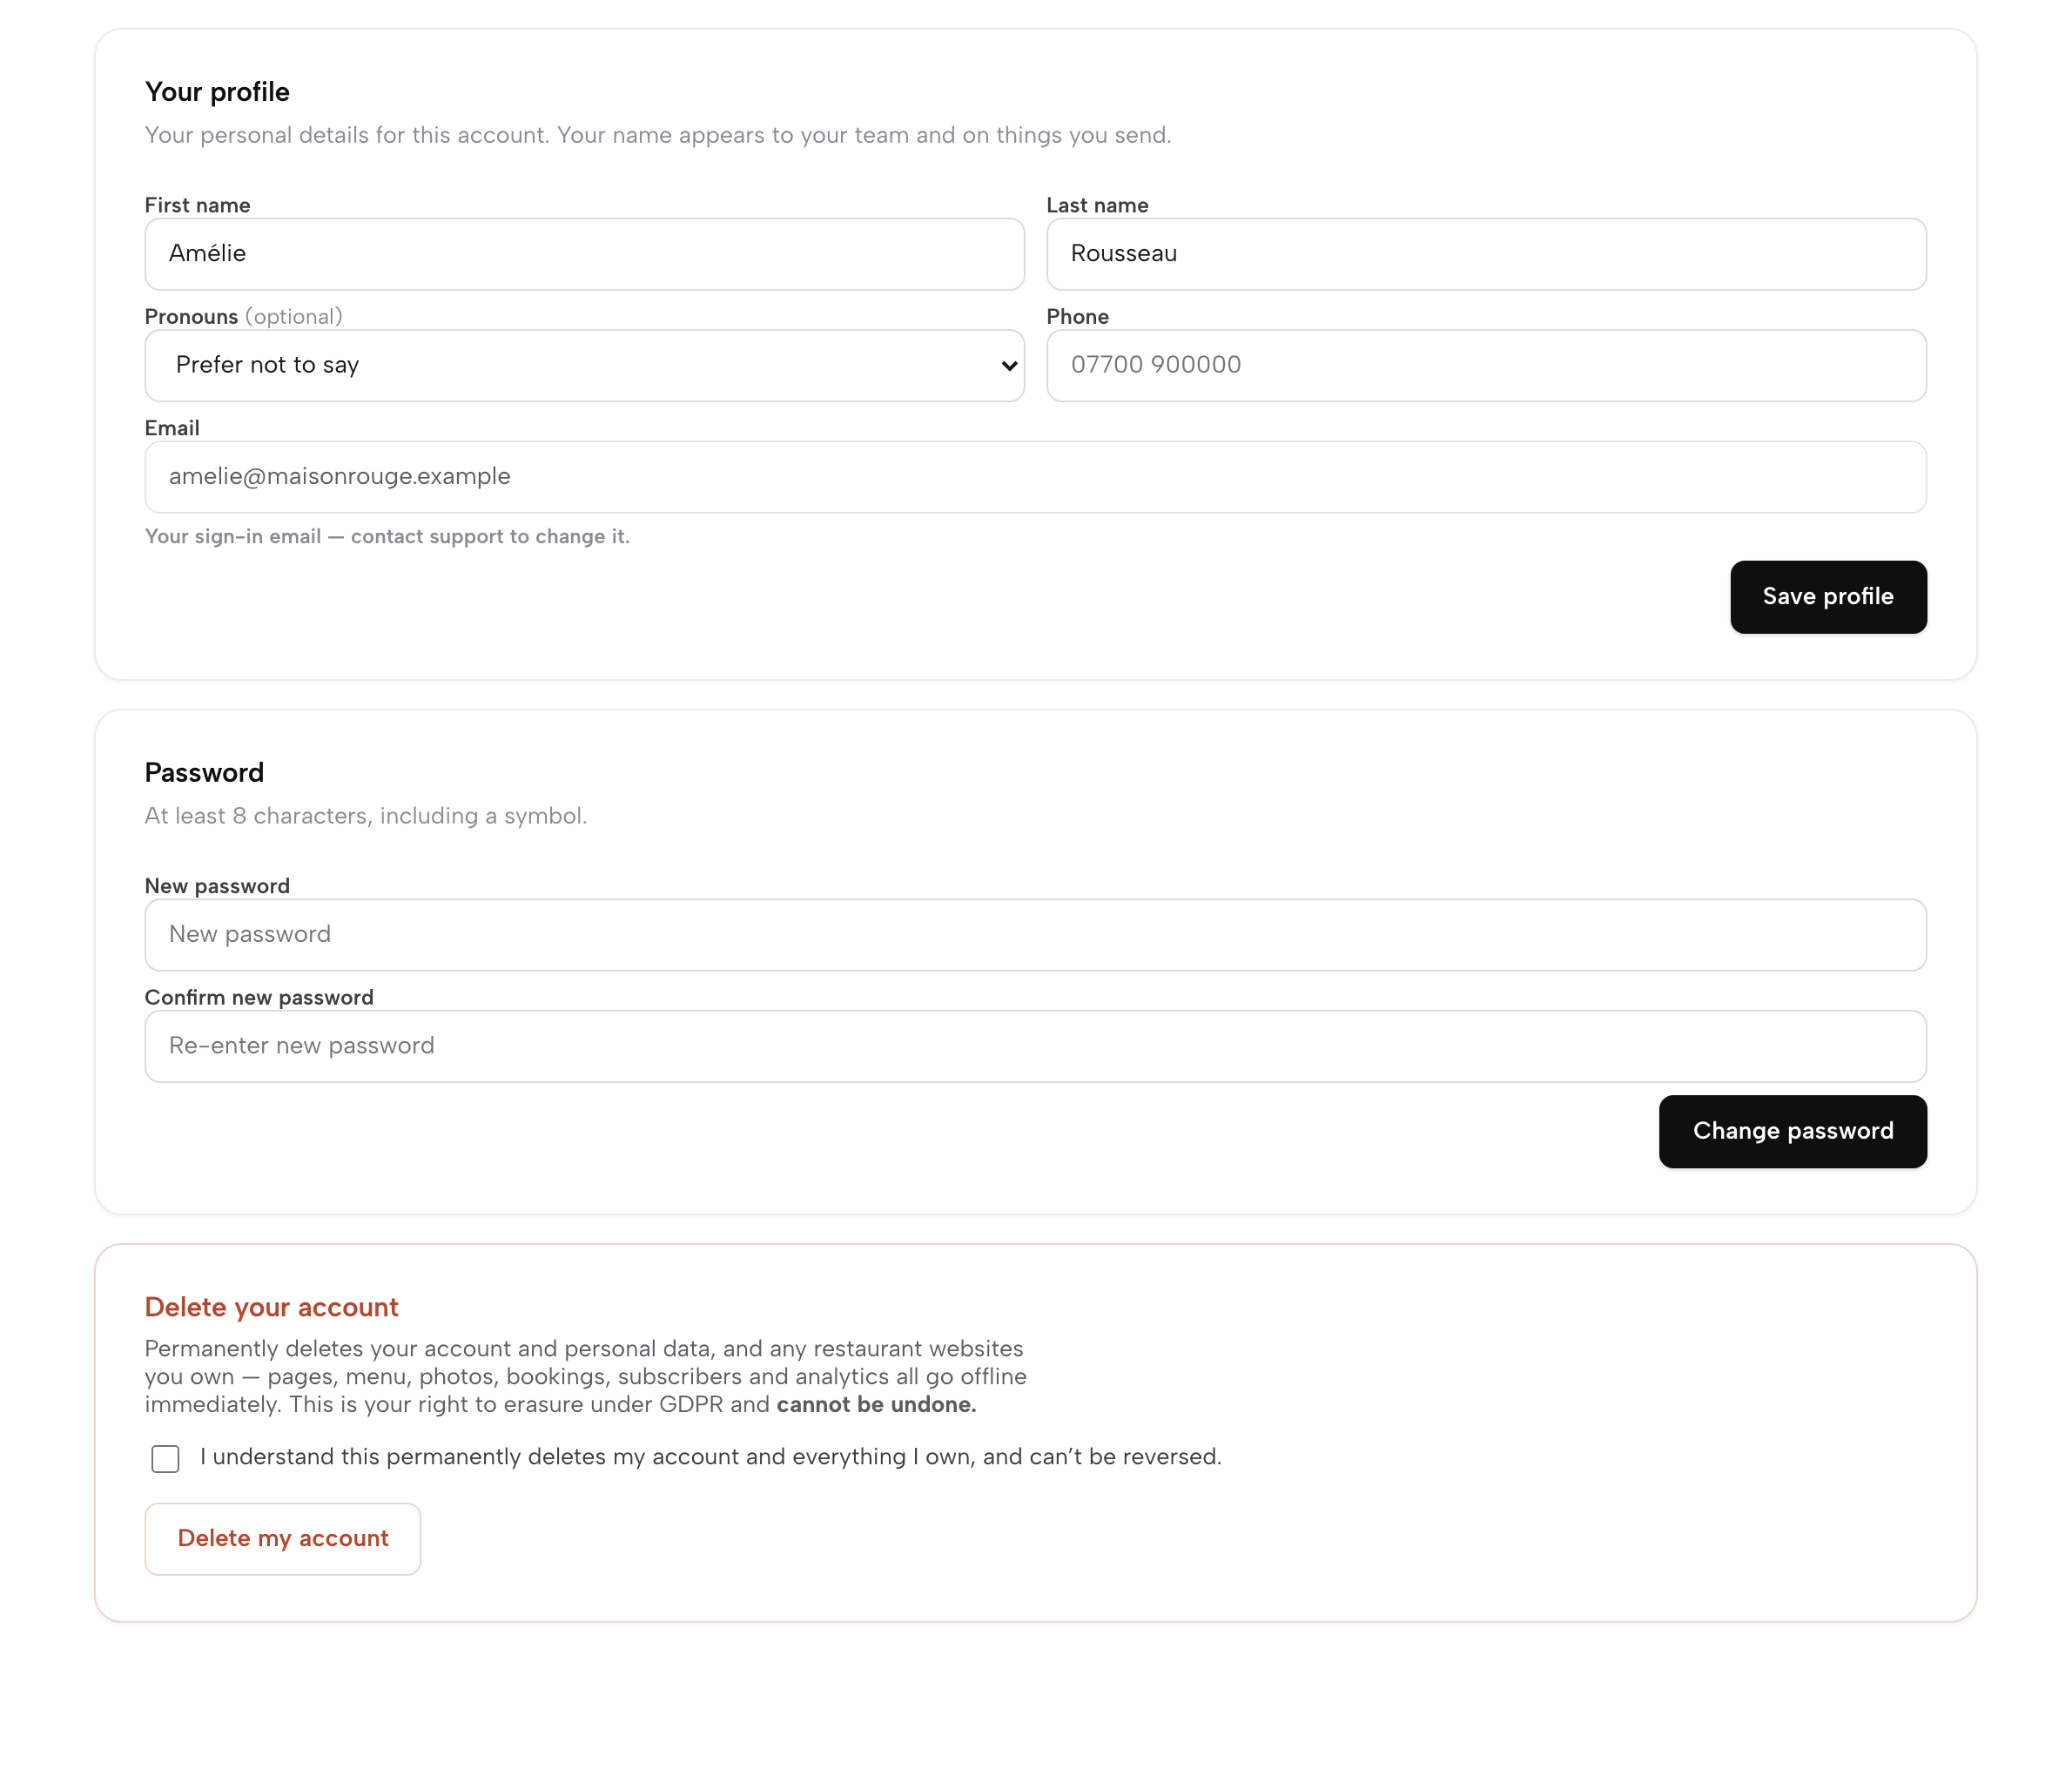
Click Settings in the sidebar and the Settings menu opens on the left — Your account, Security, General, Domain, Email, Footer, SEO, Opening hours, Team, Kitchen printer, Payments, Card readers and Plan & billing. Open Your account — separate from your restaurant's own details (those live under General), this is about you. The Your profile card holds your first name, last name, pronouns (optional) and phone; your sign-in email is shown but locked, since changing it needs support. Fill it in and press Save profile.
The Password card sets a new one (at least 8 characters, including a symbol) with Change password. Further down, Delete your account is where you can permanently erase your account, your personal data, and any restaurant sites you own — pages, menu, photos, bookings, subscribers and analytics all go offline immediately. TableSpark frames this plainly as your right to erasure under GDPR: tick the confirmation box, then press Delete my account.
Plan & billing
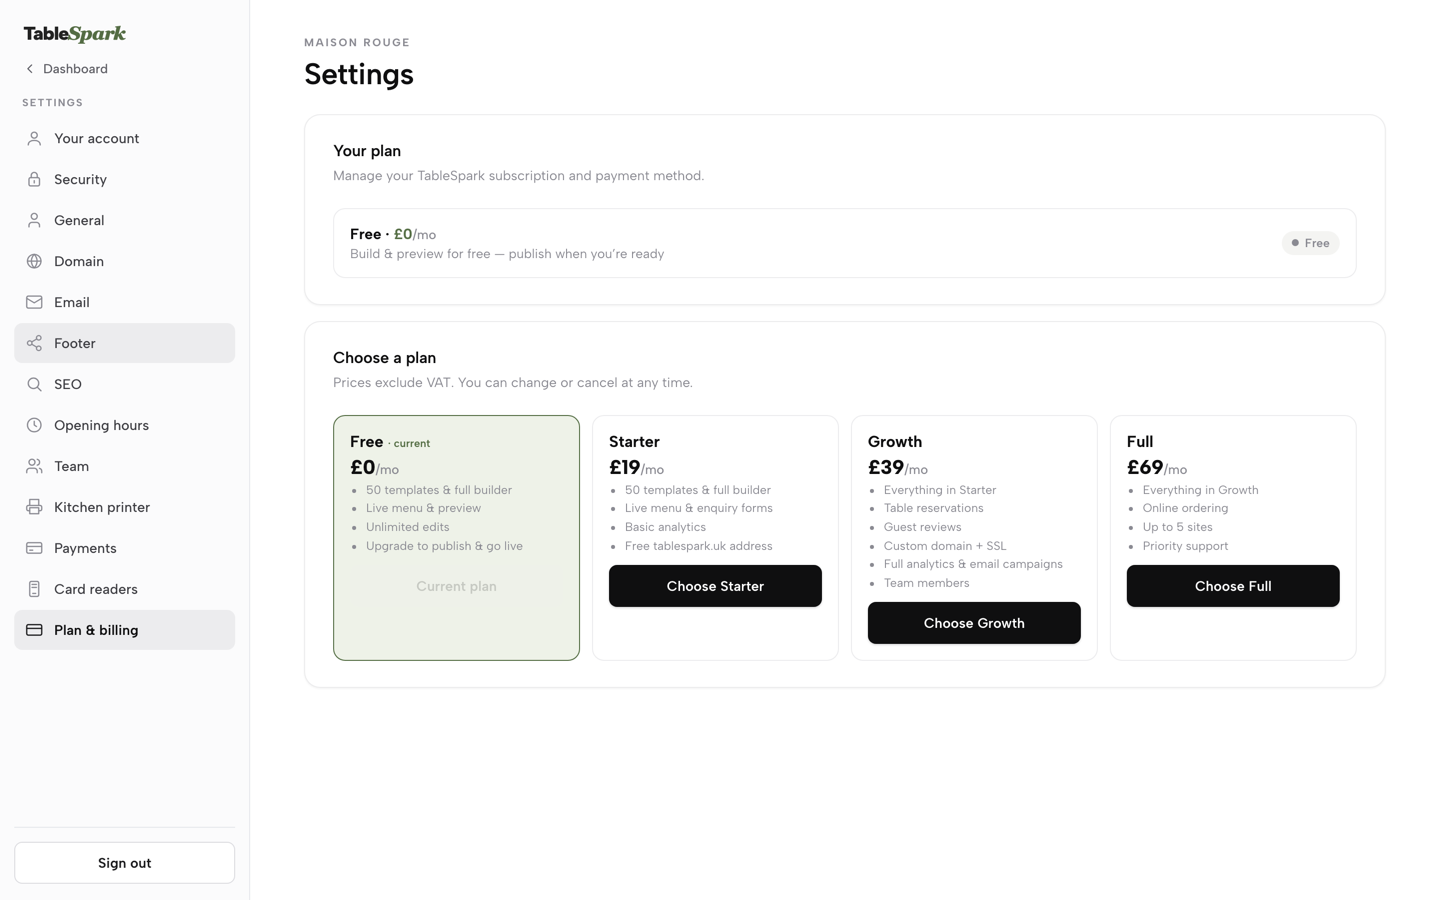
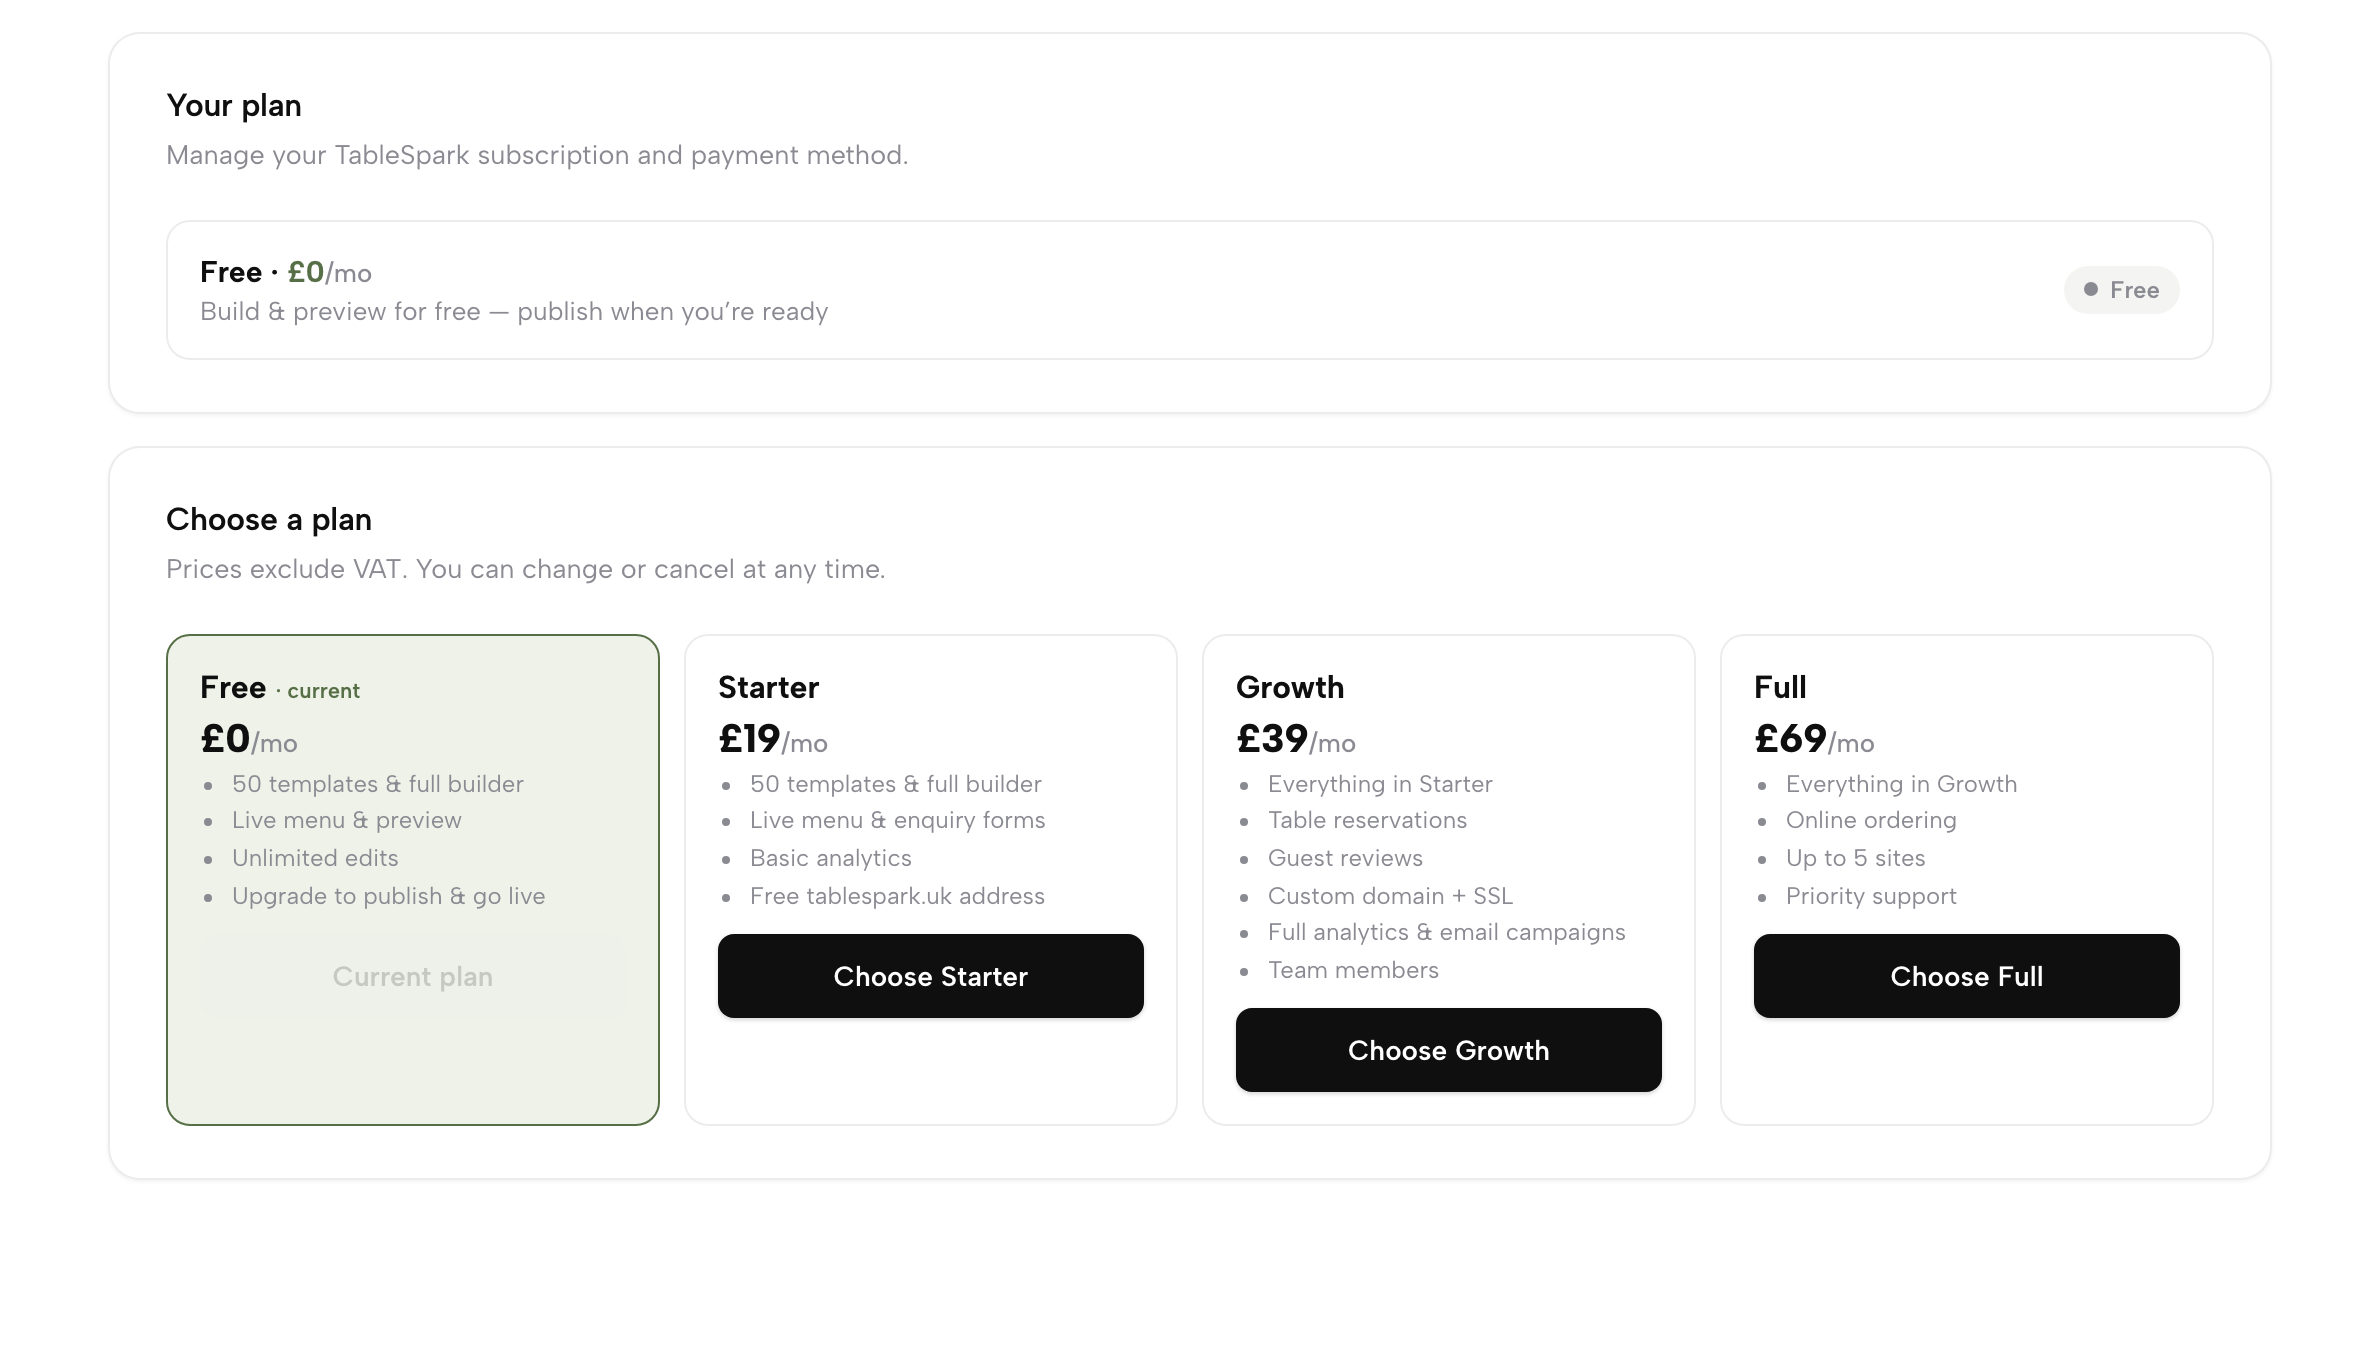
Open Settings → Plan & billing and the Your plan card shows your current plan, its price, a one-line description of what it gets you, and a status pill. Once you're on a paid plan, the same card also shows a renewal date and two more buttons: Manage billing & card, which opens a secure Stripe portal to update your card or download invoices, and Cancel subscription — cancelling always keeps your access until the period you've already paid for ends, never mid-period.
Underneath, Choose a plan compares all four tiers side by side, with your current plan marked and its button reading Current plan. Free is £0 — build and preview with the full builder, publish when you're ready. Starter is £19/mo — your website, live menu and enquiry forms, basic analytics, and a free tablespark.uk address. Growth is £39/mo — everything in Starter plus table reservations, guest reviews, a custom domain with SSL, full analytics, email campaigns and team members. Full is £69/mo — everything in Growth plus online ordering, up to 5 sites, and priority support. Prices exclude VAT, and you can change or cancel at any time. Press Choose Starter, Choose Growth or Choose Full to move to that plan — upgrades apply instantly and only charge the prorated difference; a downgrade takes effect at your next renewal, so you never lose what you've already paid for.
That's the whole dashboard: what's live, how the week went, what needs your attention, and where your own account and your plan sit — all reachable in a click or two from the same first screen.
Keep your sign-in safe
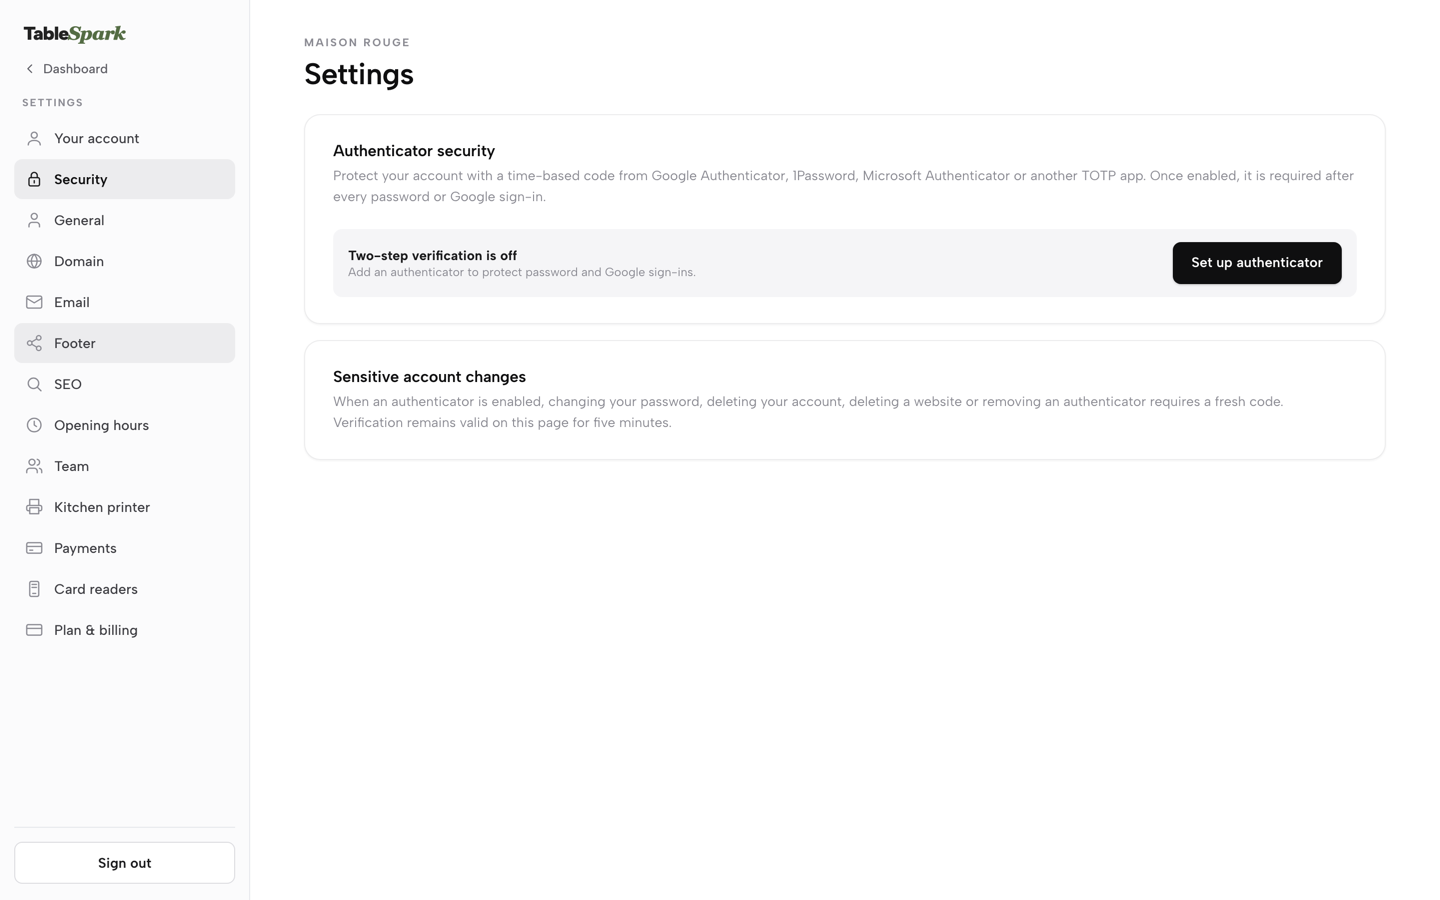
Open Settings → Security — a separate page from Your account, dedicated entirely to how you prove it's really you. The Authenticator security card adds two-step verification with a time-based code from Google Authenticator, 1Password, Microsoft Authenticator or any other TOTP app: press Set up authenticator, scan the QR code (or type the setup secret shown underneath if scanning isn't an option), then enter the current 6-digit code and press Enable authenticator. Until then the card reads “Two-step verification is off.” Once one is enabled, a status banner reads “Two-step verification is enabled,” and a code is required after every future password or Google sign-in. You can add more than one authenticator with Add another — each is listed with its name, when it was added, and a Remove button — useful for a shared phone or a backup device.
The Sensitive account changes card explains the payoff: once an authenticator is enabled, changing your password, deleting your account, deleting a website or removing an authenticator all ask for a fresh code first, and that verification stays valid on the page for five minutes — so one code covers a short run of changes without asking again for every click.
Your whole restaurant, one login
Never lose track of your own site
The dashboard, Alerts and Settings are free to explore the moment you sign up — you only choose a plan when you're ready to publish.
Your social links and footer
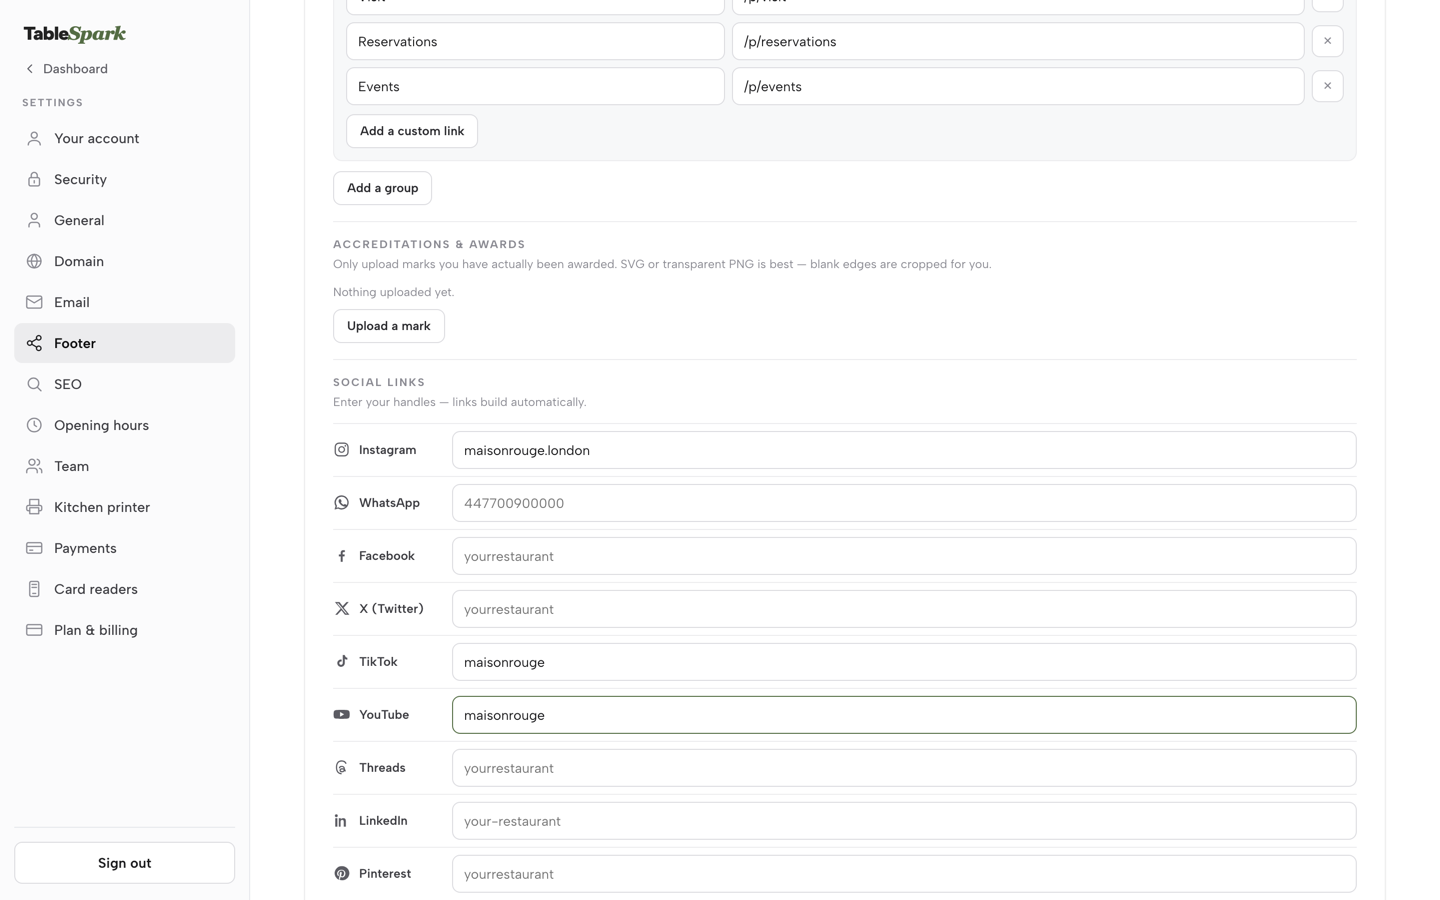
Open Settings → Footer and you're in the same footer editor that opens when you click your footer inside the Builder, with a live preview at the top that updates as you type. Scroll to Social links (“Enter your handles — links build automatically”) and type just your handle or page name next to each platform — Instagram, WhatsApp (a phone number), Facebook, X (Twitter), TikTok, YouTube, Threads, LinkedIn, Pinterest, Snapchat, Telegram, Google Maps, Tripadvisor, Yelp and more — and the full profile link is built for you automatically; leave one blank and its icon simply doesn't show.
The same screen covers the rest of your footer: Layout & style picks an arrangement (Centred, Columns, Band, Split or One line), a colour (Dark, Light or Accent), an alignment and an icon style (Circle, Square or Plain); Logo and Content hold your footer logo, brand name, tagline, address, phone, email and small print, with show/hide toggles; Newsletter sign-up controls the sign-up band; Link groups build themselves from your pages until you customise them, up to four groups; and Accreditations & awards takes marks you have actually been awarded. Press Save changes at the bottom, and every change — social icons included — appears in the footer at the bottom of every page on your live site.