
Two paths, one menu: photograph a stack of printed pages and let TableSpark read the sections, dishes and prices, or build the same structure by hand, dish by dish. Both land on the same live Menu page, and neither one has a separate publish step — save a change and it is on the site.
Sidebar → MenuMedia library included
On the dashboard, click Menu in the left sidebar — your restaurant’s live menu opens, and saving a change there updates your website.
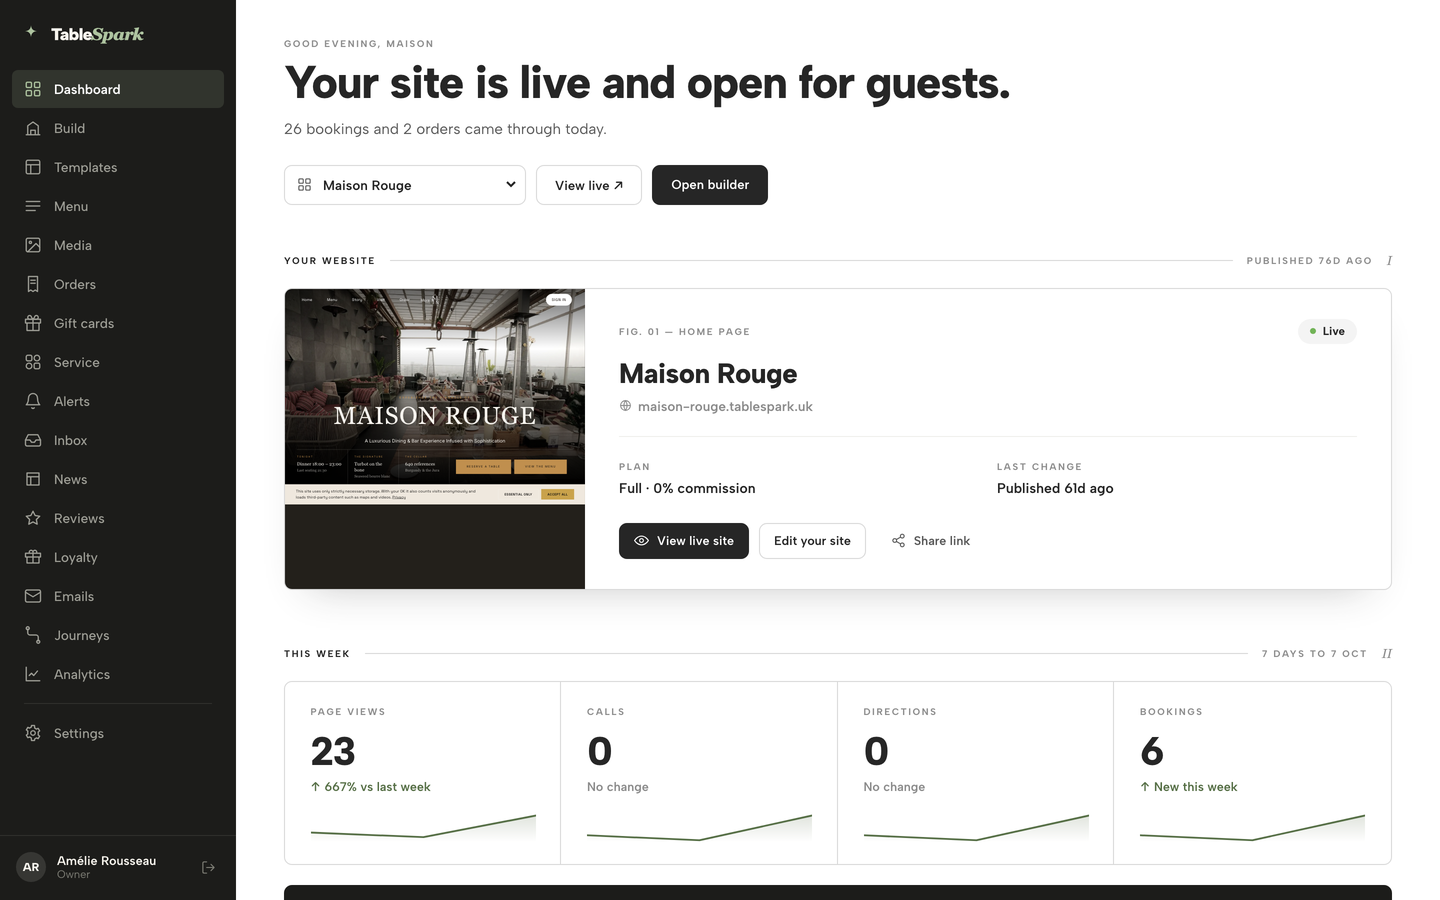
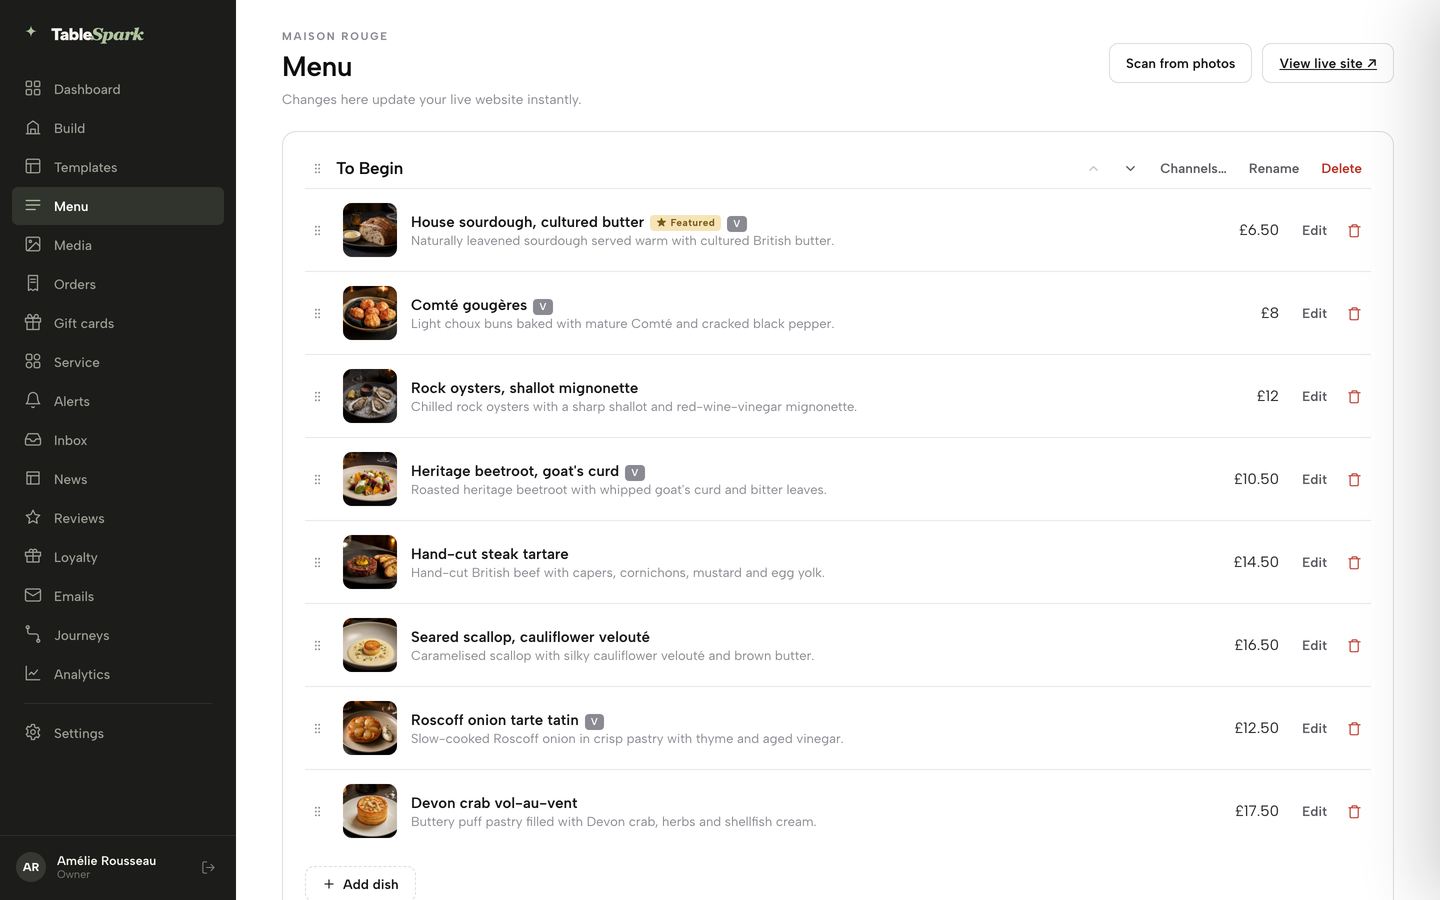
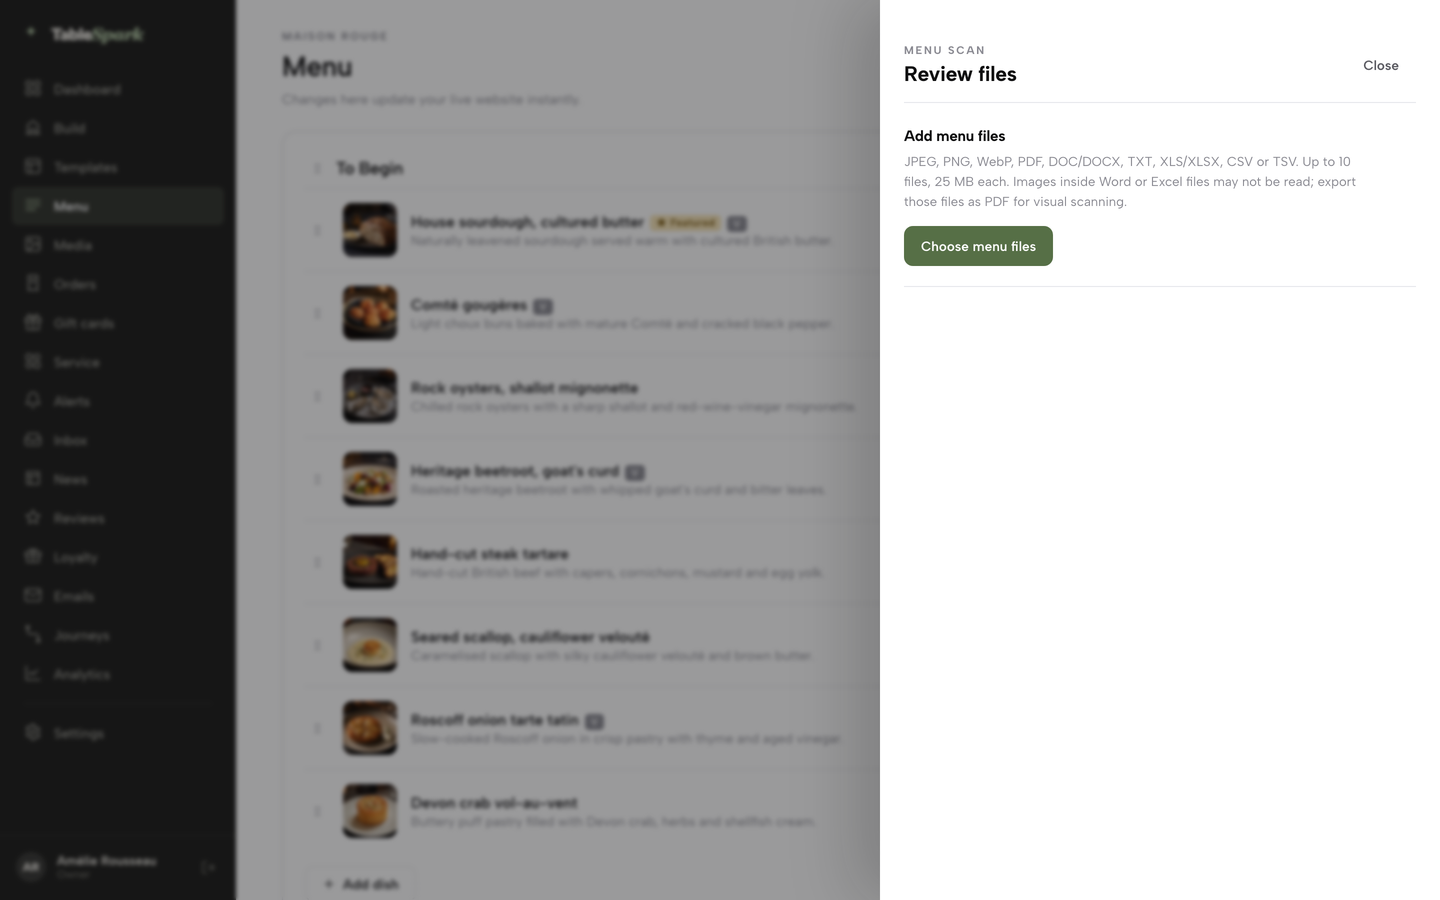
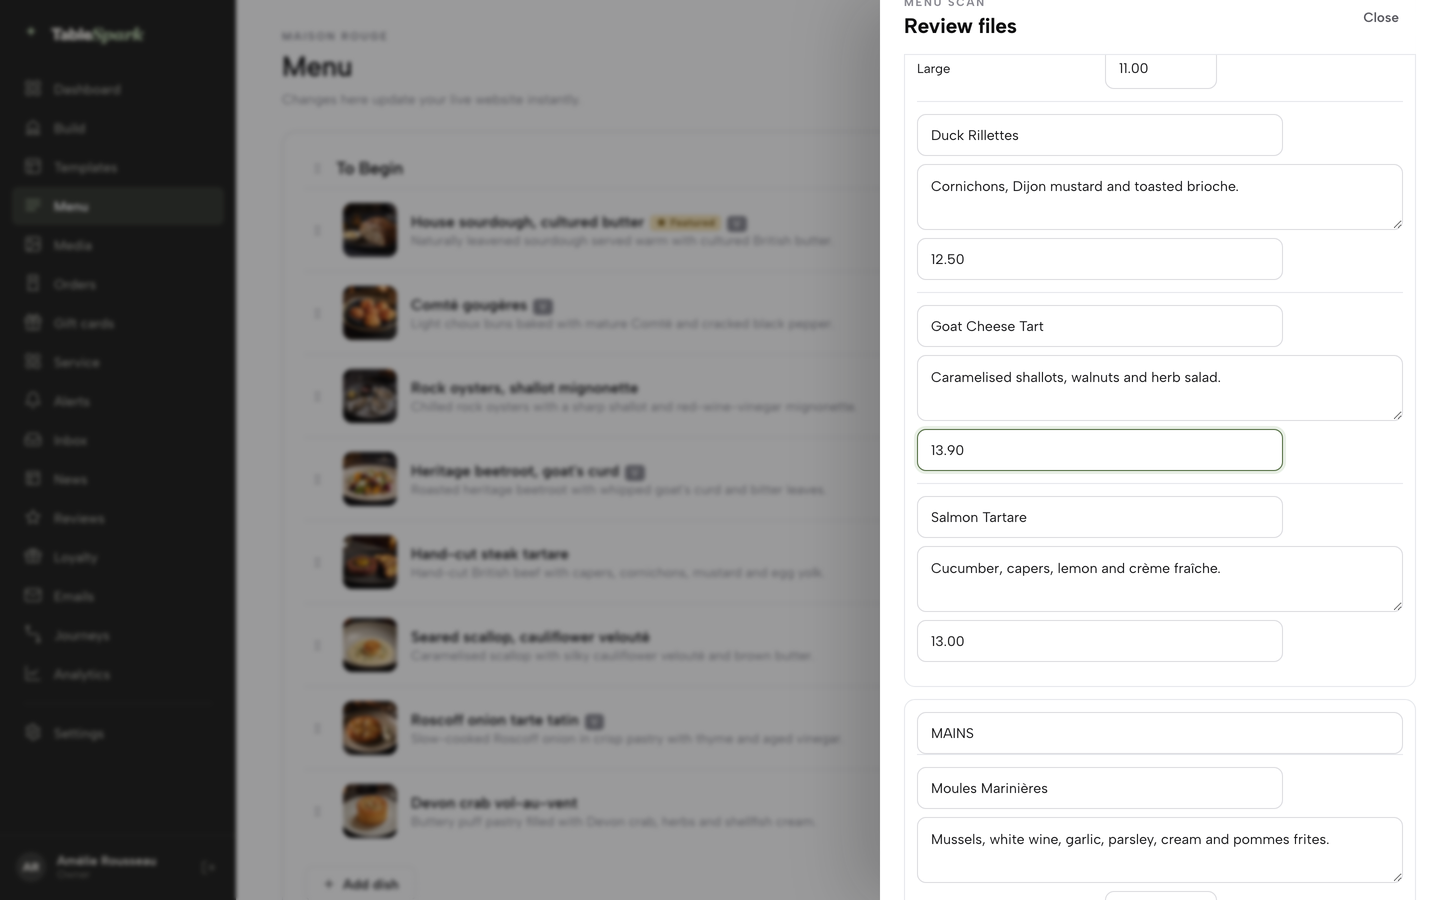
Menu scanned, checked and ready to apply, a dish built by hand with its allergens and photo, dishes reordered and marked sold out, and your table QR codes one click from export.
- WHAT YOU NEED
- Your paper menu & a phone camera
- TIME
- About 10 minutes
- HOW HARD?
- If you can text a photo, you can do this
- CAN I BREAK IT?
- No — nothing saves until you approve it
IN PLAIN WORDS / TAP A TERM
What’s a “section”?
Just a heading on your menu — Starters, Mains, Desserts. Dishes live inside sections, exactly like on the paper.
What does “publish” mean here?
Nothing extra — that’s the point. On the Menu page, saving IS publishing: change a price, and the website shows the new price straight away.
What’s the “scan” actually doing?
It reads the photo of your menu the way a person would — finds the headings, the dish names, the prices — and types them up as a draft for you to check. It never guesses silently: anything it’s unsure about is flagged for your eyes.
What’s an “allergen” field for?
The UK’s 14 named allergens (nuts, gluten, milk…). Tick what a dish contains and the website shows it to guests — one less thing to answer on the phone.
Open your Menu page
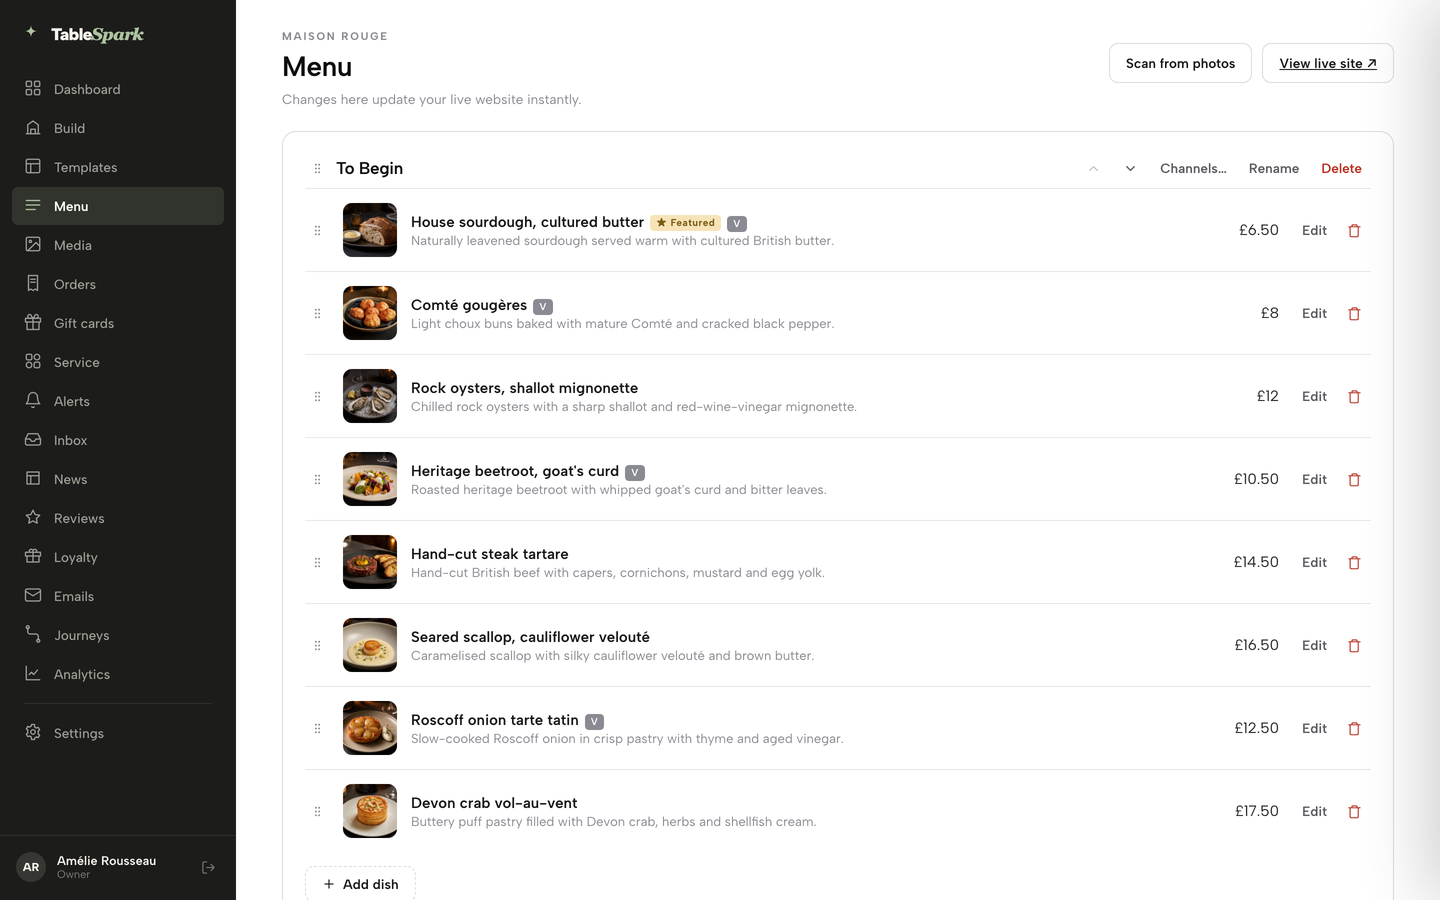
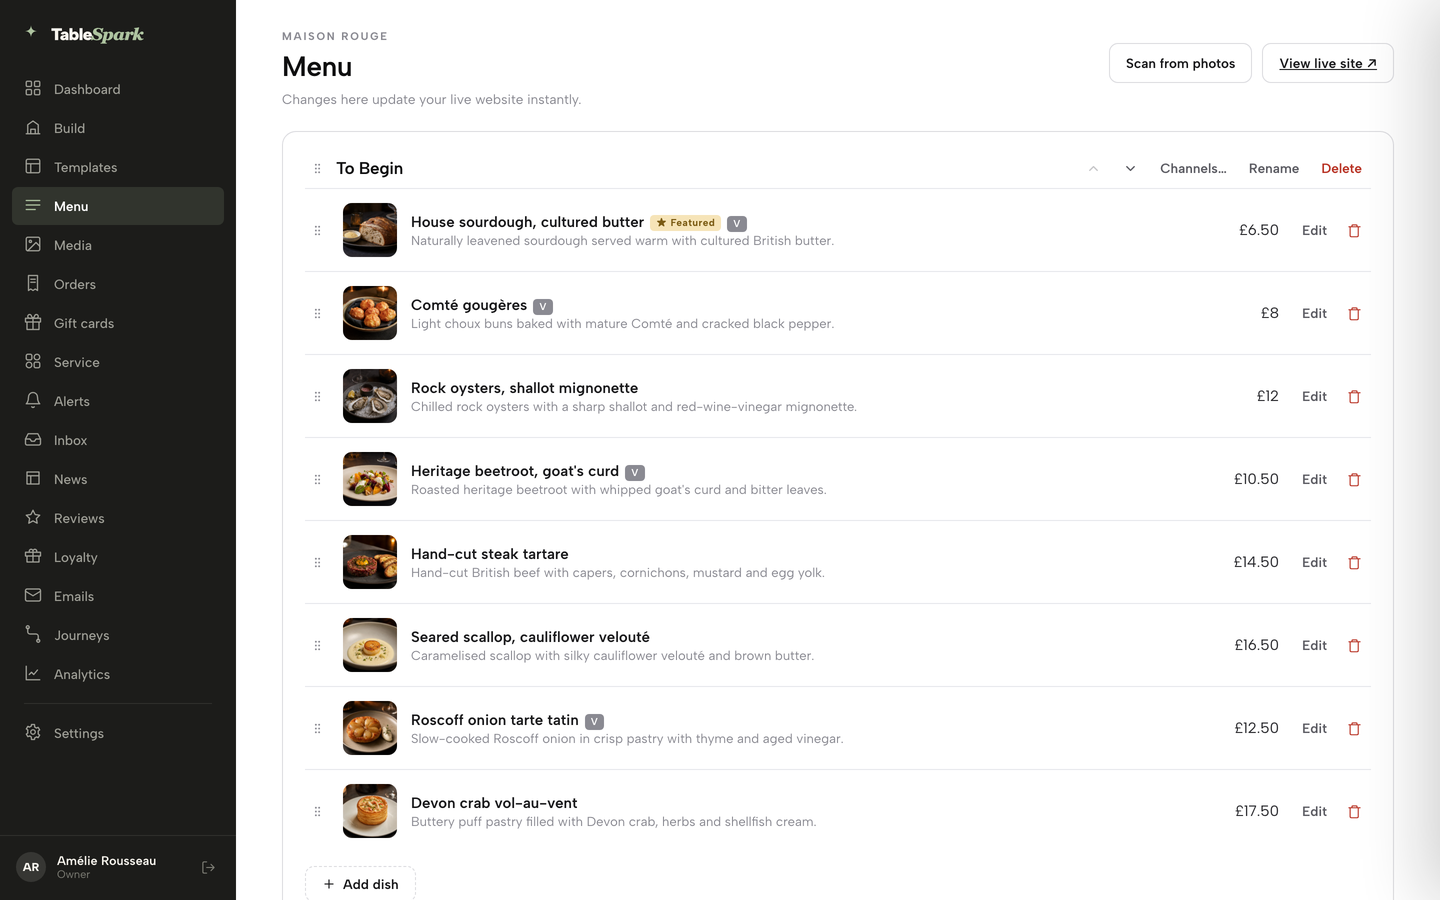
Open Menu in the left sidebar — the address is /app/menu. At the top you will see your restaurant’s name, then the “Menu” heading, and directly under it the line the product states plainly: “Changes here update your live website instantly.” There is no separate publish button for a section or a dish — save the change and it is live. Two buttons sit in the header: Scan from photos, which starts the AI menu scan, and View live site ↗, which opens your published tenant site in a new tab so you can see exactly what a guest sees. Below the header, every section you have built renders as a stacked card, each holding its own list of dishes.

Scan your menu from photos
Click Scan from photos at the top of the Menu page — or, if you have not built a menu yet, the green Scan from photos button inside the empty “Build your menu” card. Either click opens the Menu scan drawer in place, sliding in from the right; nothing navigates you away from the Menu page underneath it.
The accepted files, quoted exactly from the product: “JPEG, PNG, WebP, PDF, DOC/DOCX, TXT, XLS/XLSX, CSV or TSV. Up to 10 files, 25 MB each. Images inside Word or Excel files may not be read — export those files as PDF for visual scanning.” Click Choose menu files and pick photos of your printed menu, or a PDF of it.
Each file appears as its own row with a live status — an “extracting” row shows a moving progress track and the label “Reading dishes and prices.” If a file fails or needs another look, use its own Retry or Remove control rather than restarting the whole batch, and Cancel scan stops everything at any point.

Check the languages, dishes and prices
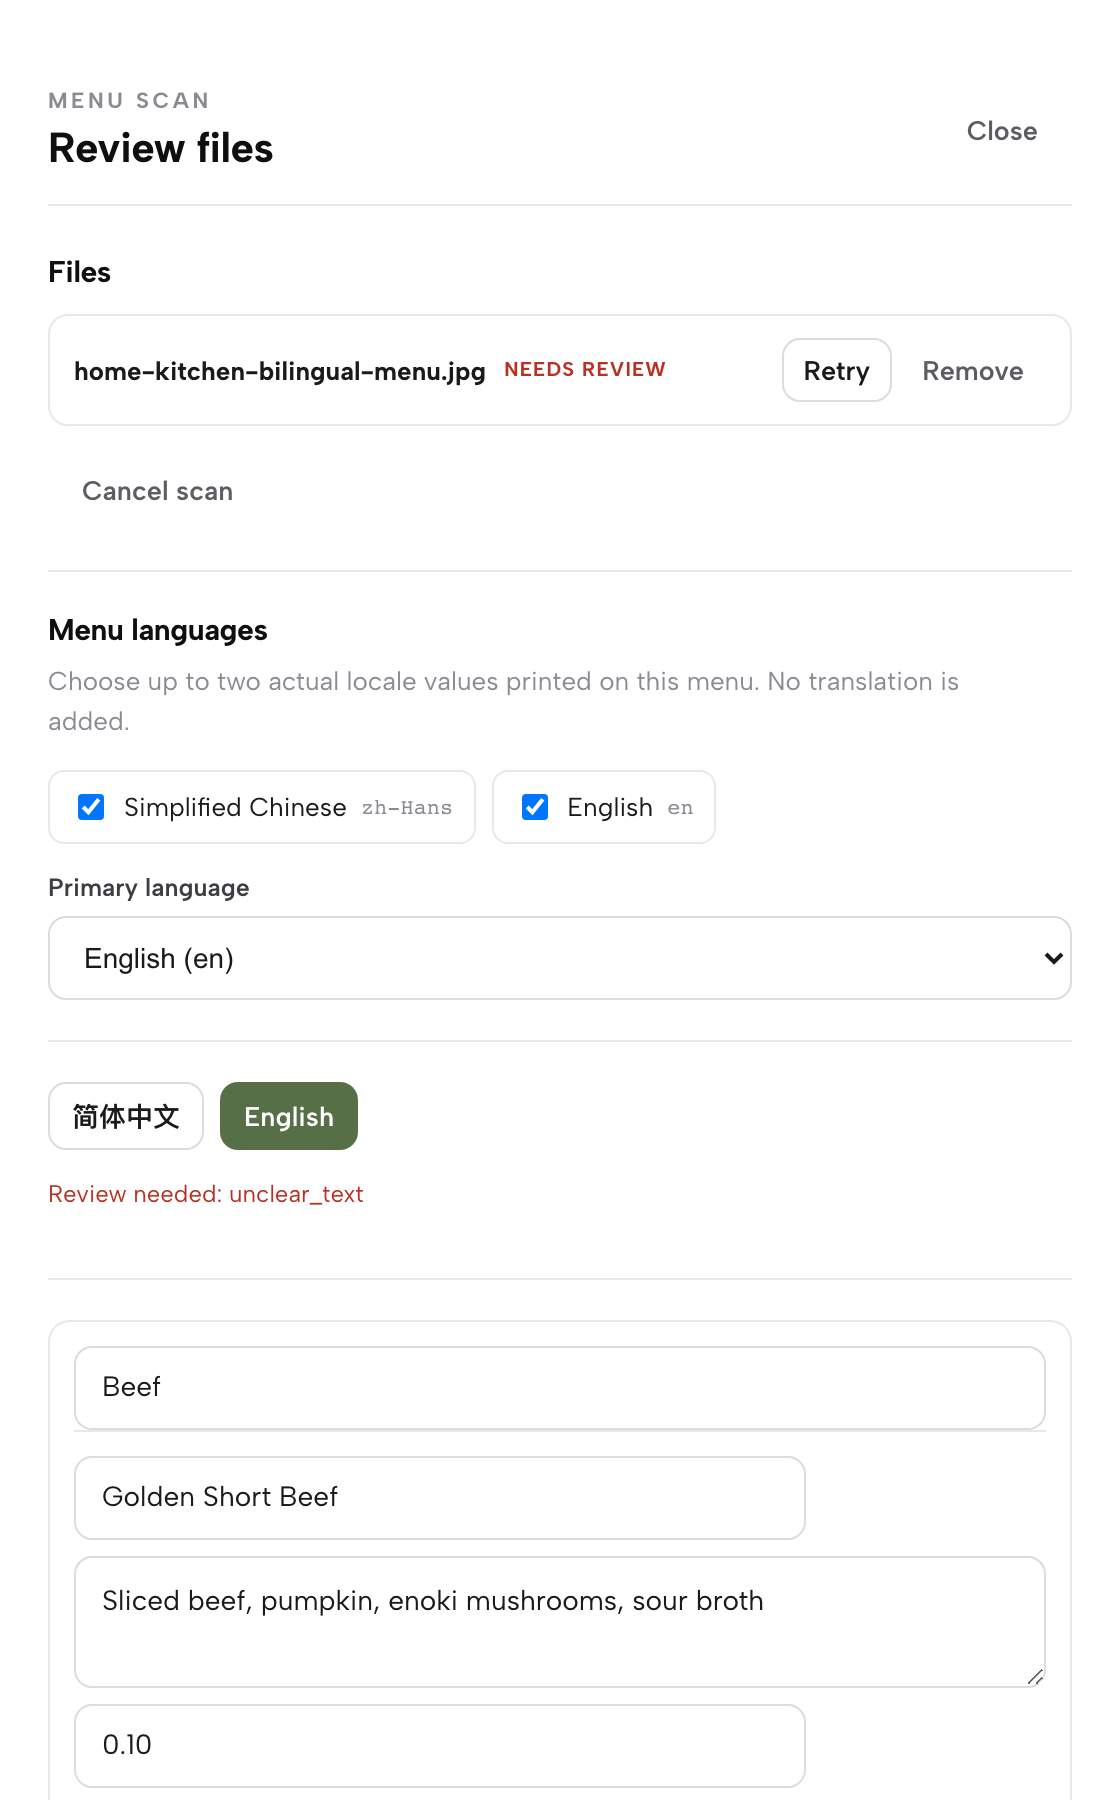
If your files use more than one language, a Menu languages picker appears first — choose up to two locales actually printed on the menu and set a Primary language. The product’s own line here is exact: “No translation is added.” TableSpark transcribes what is printed; it does not invent a translation for you.
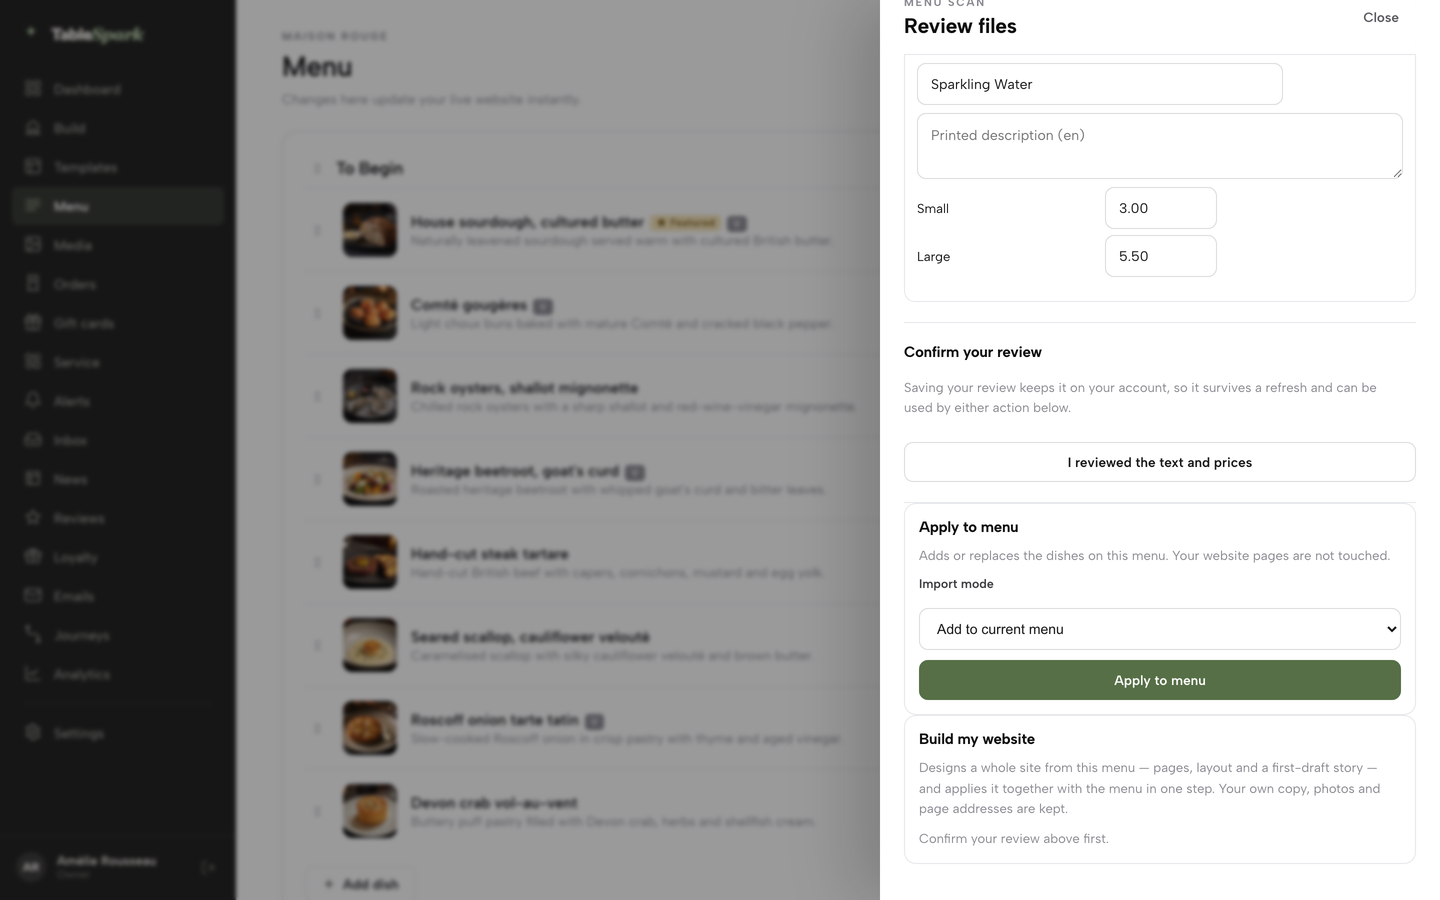
Below that, every section the scan detected becomes its own editable card: a Section name field, then one row per dish with Dish name, Printed description, and Price — or, for a dish sold in more than one size, a separate price field per size. Every one of those fields is a live input, so fixing a misread name or a smudged price is a click, not a re-scan. Anything the scan was not confident about carries a visible “Review needed” flag naming the reason.
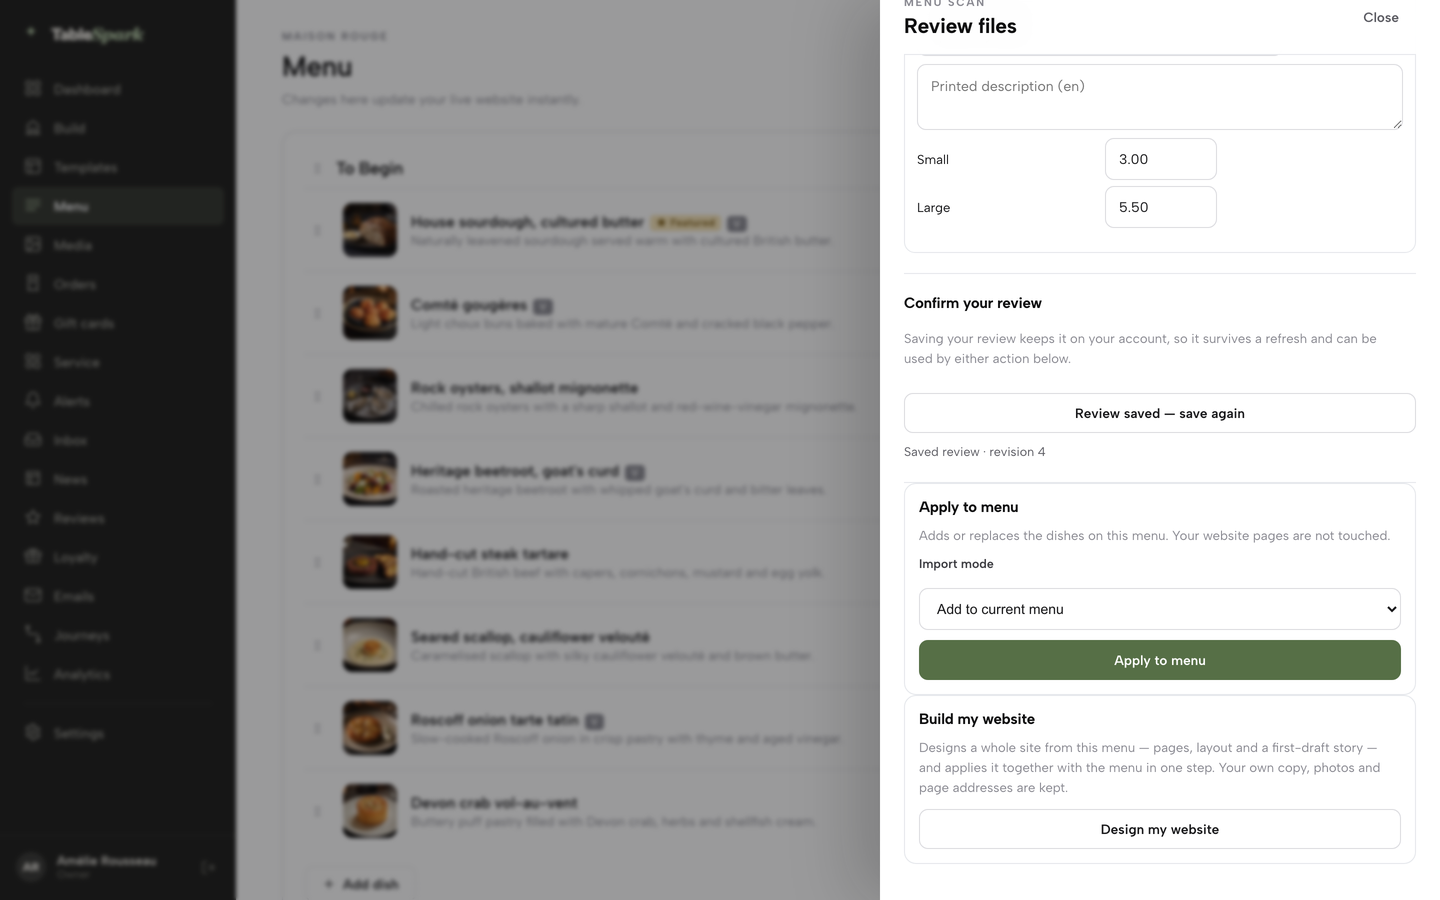
With two languages on the menu, a tab per language sits above the list, so you can check each language’s text and prices in turn. Once everything reads correctly, click “I reviewed the text and prices.” The button changes to “Review saved — save again” and a line beneath it reads “Saved review · revision” with a number. Saving the review keeps it on your account, so it survives a page refresh and stays ready for either action in the next step.
Apply the scan — to your menu, or your website
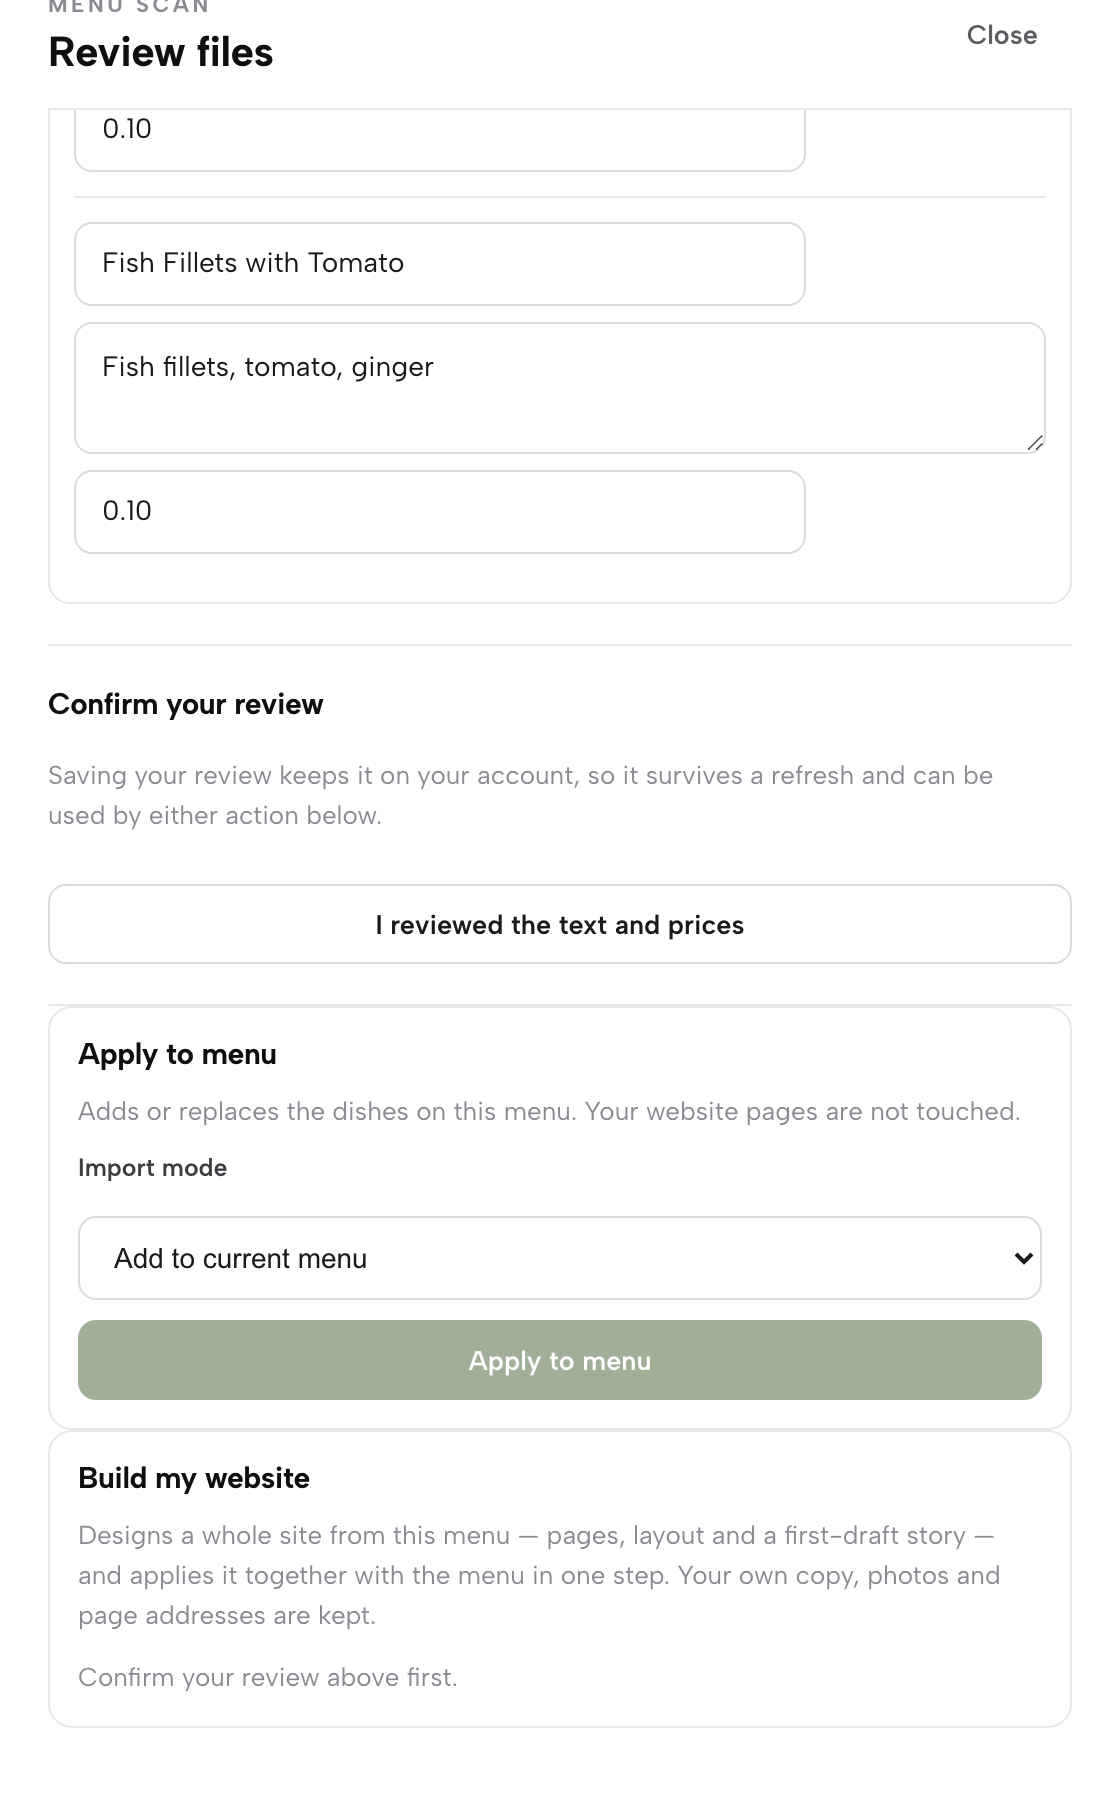
A completed review gives you two separate actions, deliberately kept on two separate cards so one click never changes more than you meant.
- Apply to menu — pick an Import mode, either “Add to current menu” or “Replace current menu contents,” then click Apply to menu. This only changes the sections and dishes on the Menu page; your website pages are untouched.
- Build my website — click Design my website to generate a full first-draft site — pages, layout, an opening story — from the reviewed menu, then preview it. Click “Use this design and build my site” to apply the website and the menu together in one step. Your own copy, photos and page addresses are kept.
Once a website is applied this way, TableSpark says so plainly: open the builder to check the AI-written copy before publishing. That review-and-publish step lives in Build a restaurant website.
Build and rearrange your menu by hand
Everything the scan gives you, you can also build with your own hands, on the same page. Click Add a section at the foot of the menu to start a new one. Every section card carries a grip handle for drag-reordering (or use the arrow keys), up and down arrows to move the section a place, plus Channels…, Rename and Delete buttons. Channels… sets which order channels — Dine in, Collection, Delivery — a section is offered on by default; any dish can still override its section’s setting on its own. Inside a section, + Add dish adds a new dish, and the Edit or trash icon on any existing row opens it or removes it. Dish rows drag-reorder the same way, with their own grip handle.
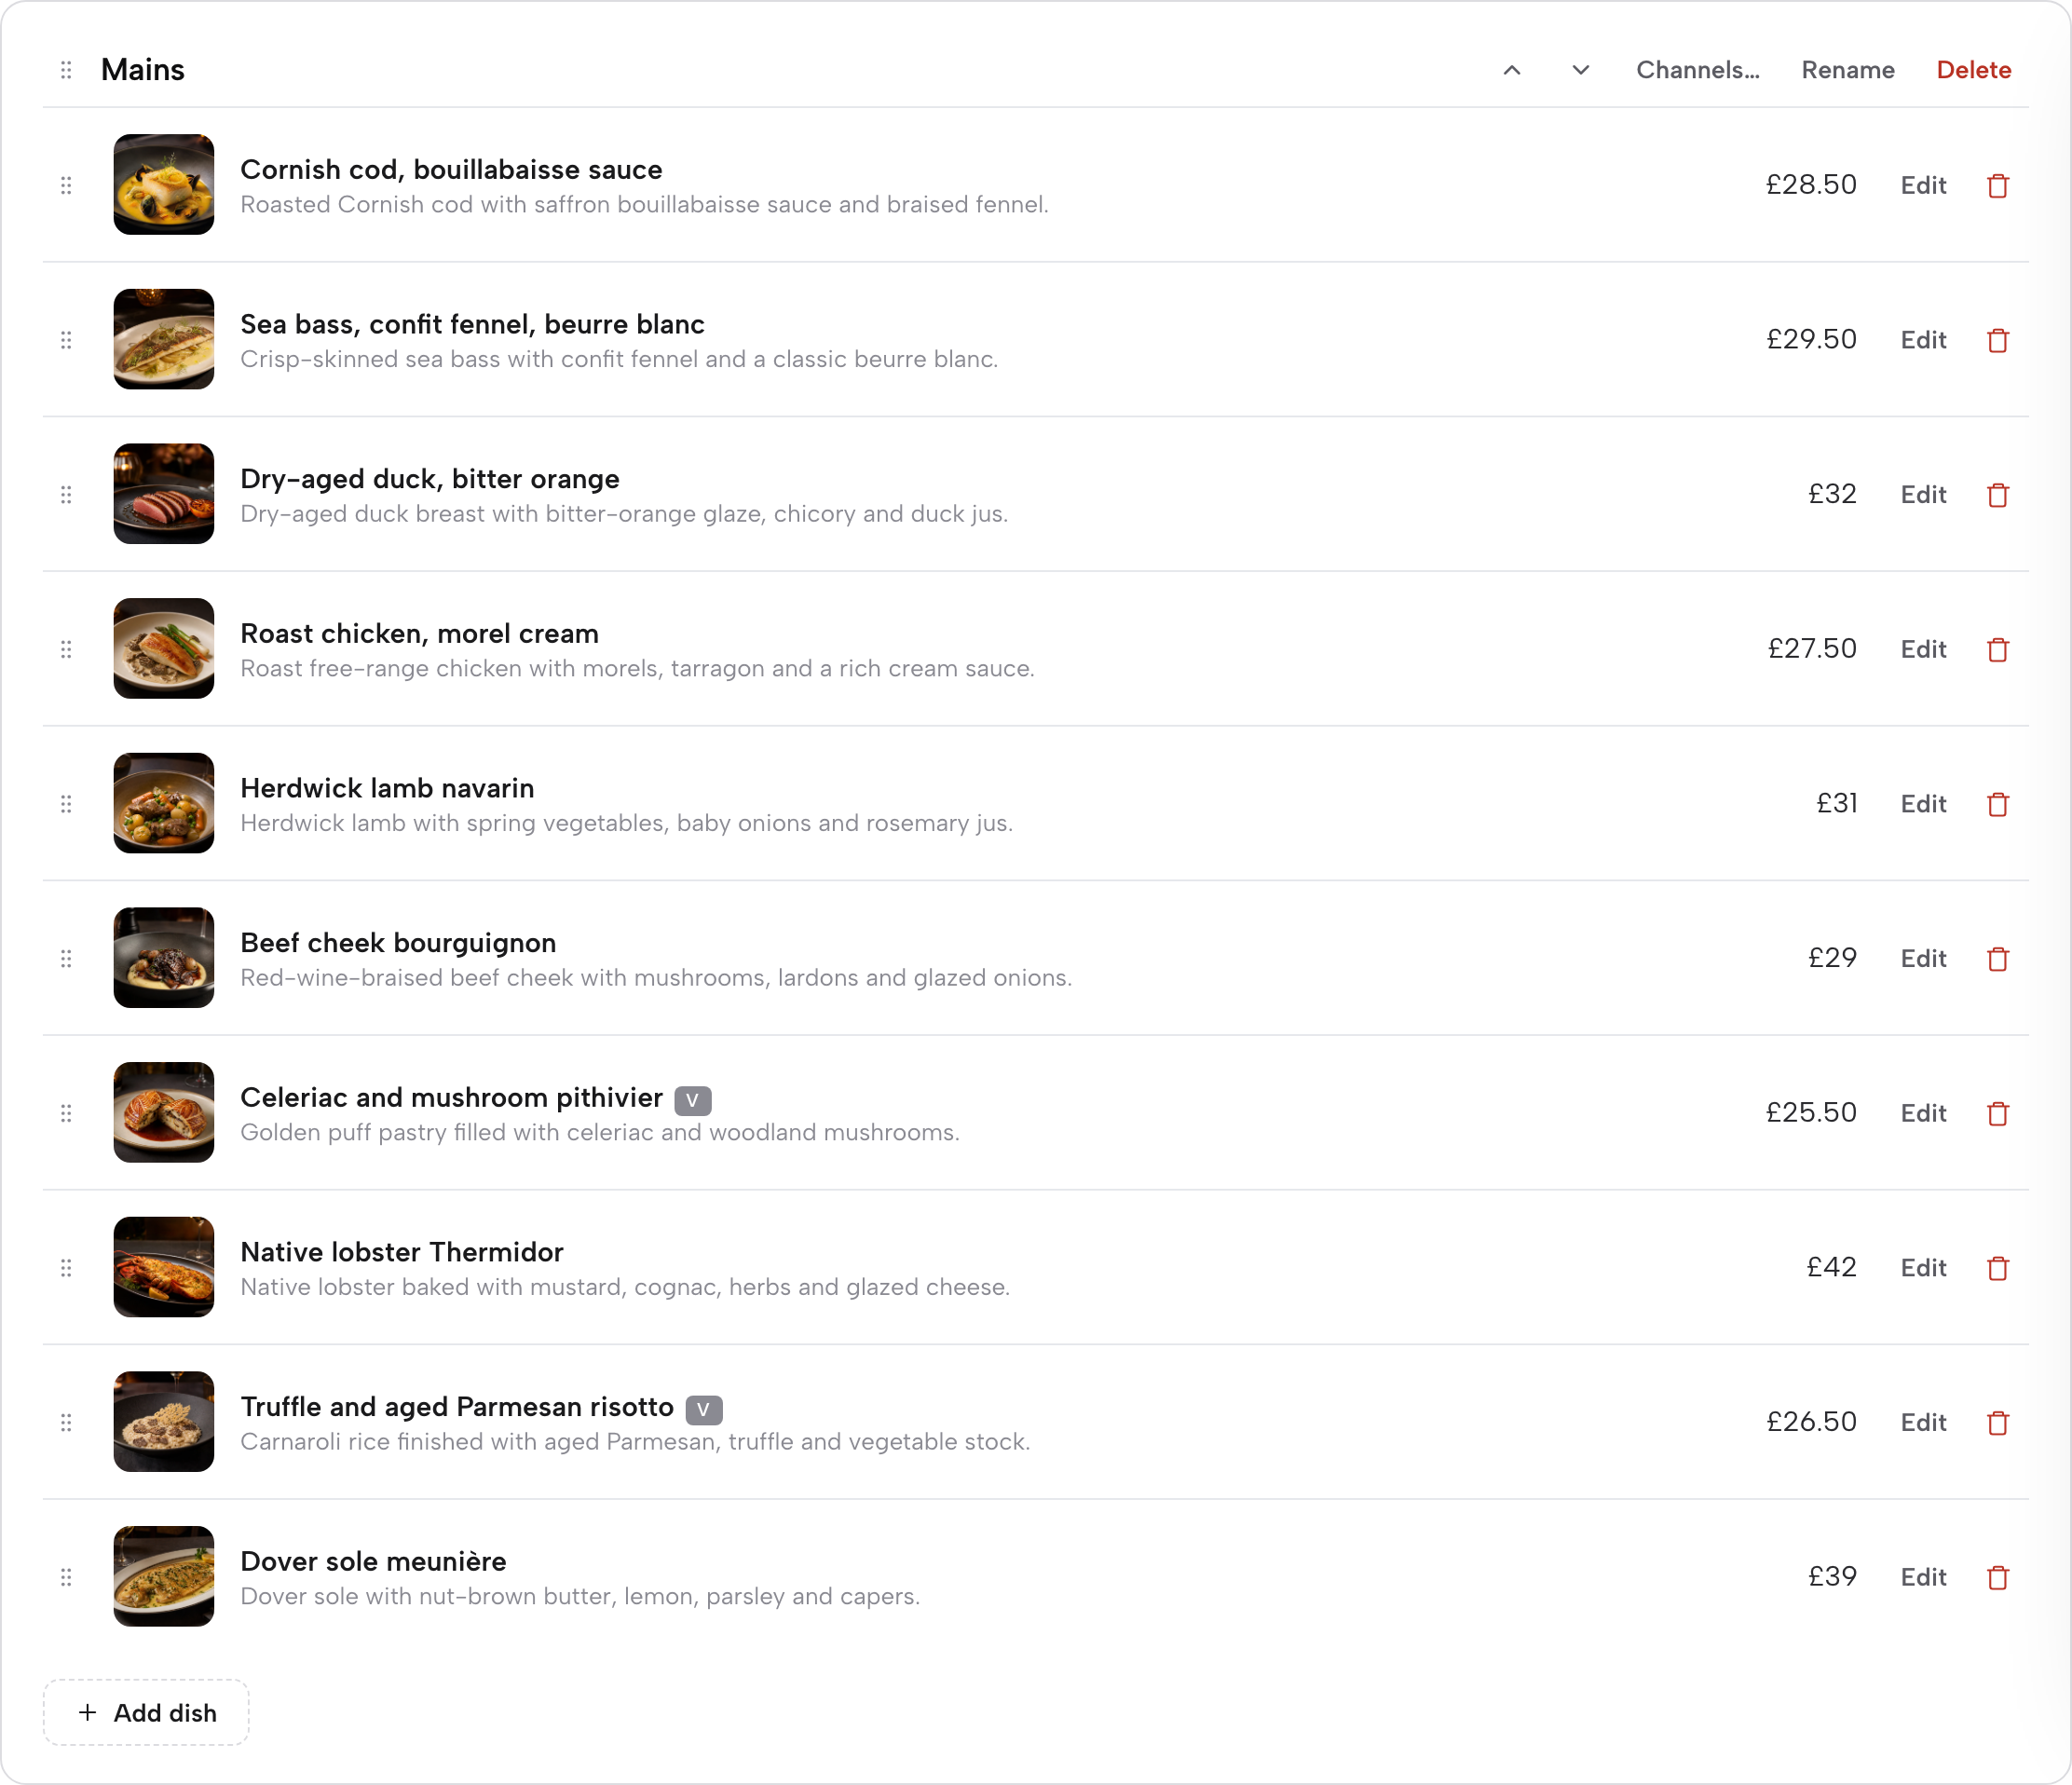
Everything one dish can carry
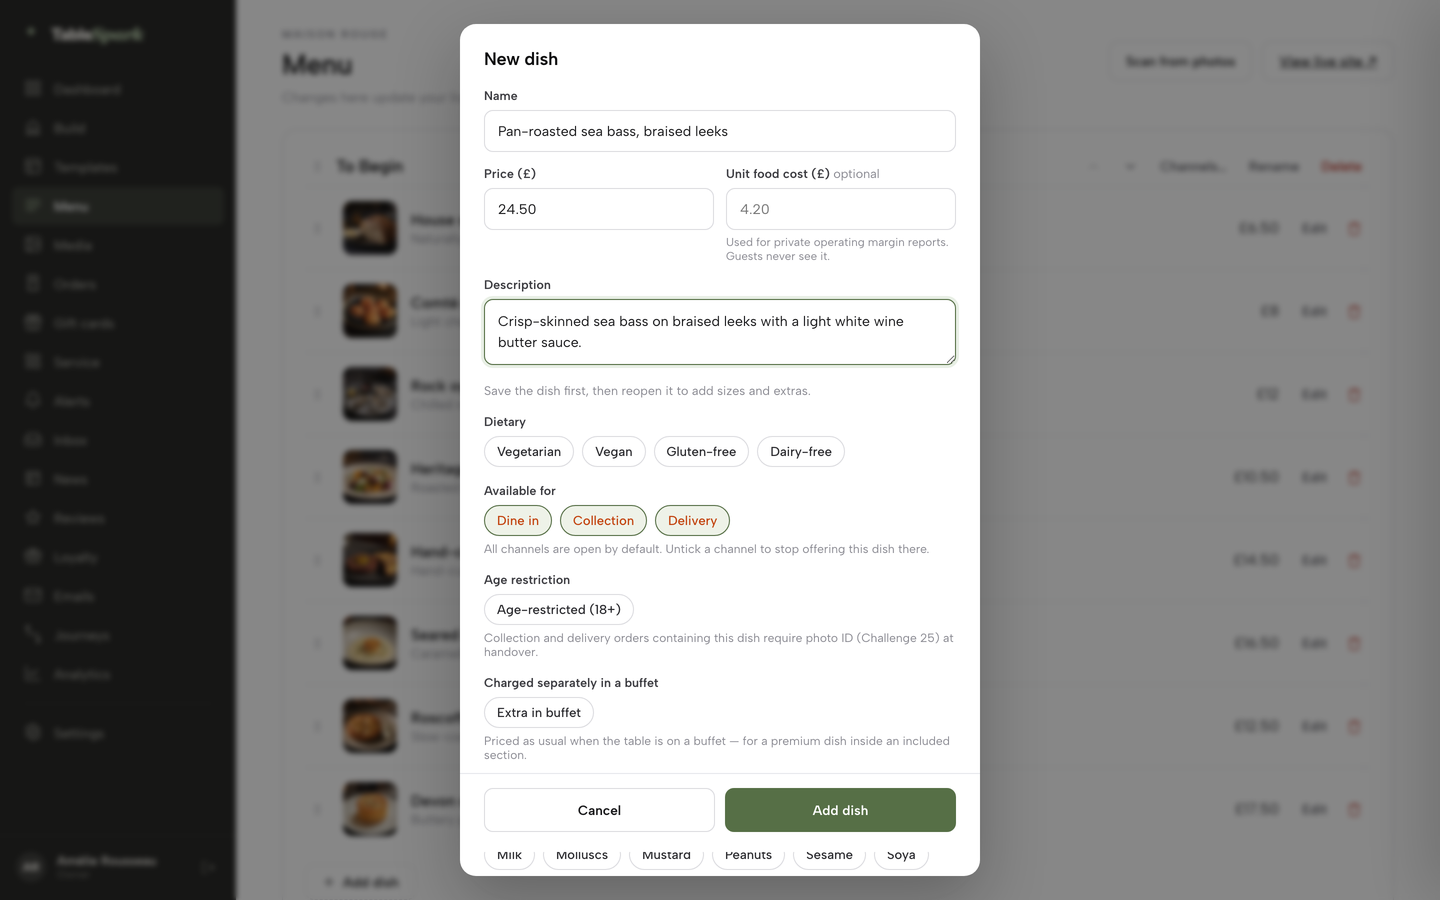
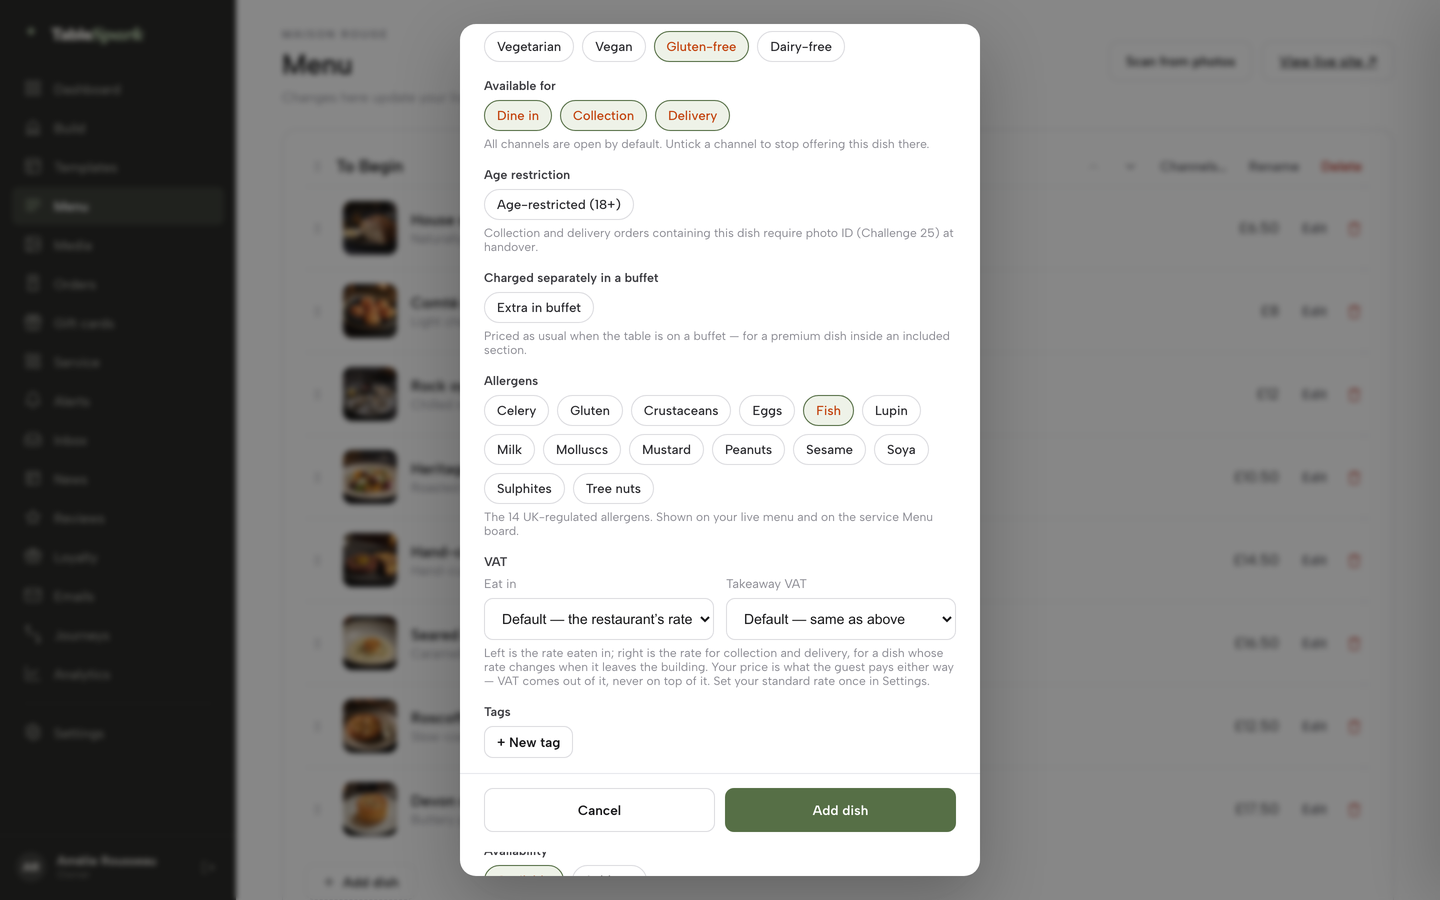
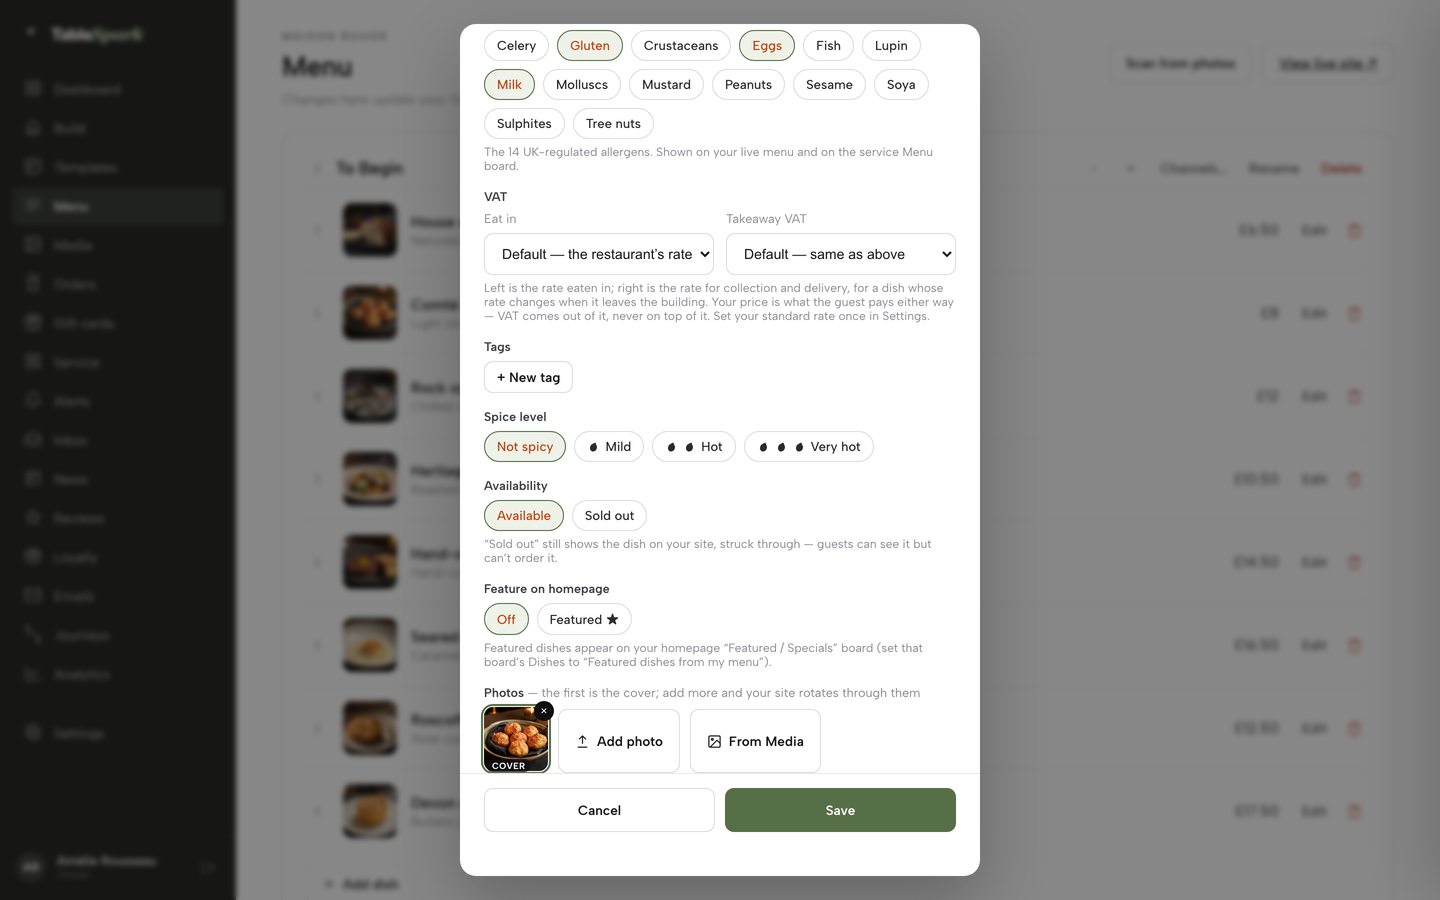
Opened by Edit on any dish row, or by + Add dish, the dish editor is where the real detail lives. Fields appear top to bottom:
- Name, Price — and an optional Unit food cost (£), “used for private operating margin reports; guests never see it.”
- Description — the write-up guests see on the site.
- Options & extras — sizes, paid add-ons, required choices; this unlocks once the dish is saved once, so a brand-new dish needs that first save before sizes and extras can be added.
- Dietary — Vegetarian, Vegan, Gluten-free and Dairy-free toggle chips.
- Available for — Dine in, Collection, Delivery toggle chips; “all channels are open by default,” untick one to stop offering the dish there.
- Age restriction — “Age-restricted (18+)”; collection and delivery orders carrying the dish require photo ID (Challenge 25) at handover.
- Charged separately in a buffet — an “Extra in buffet” chip: the dish is priced as usual when the table is on a buffet, for a premium dish inside an included section.
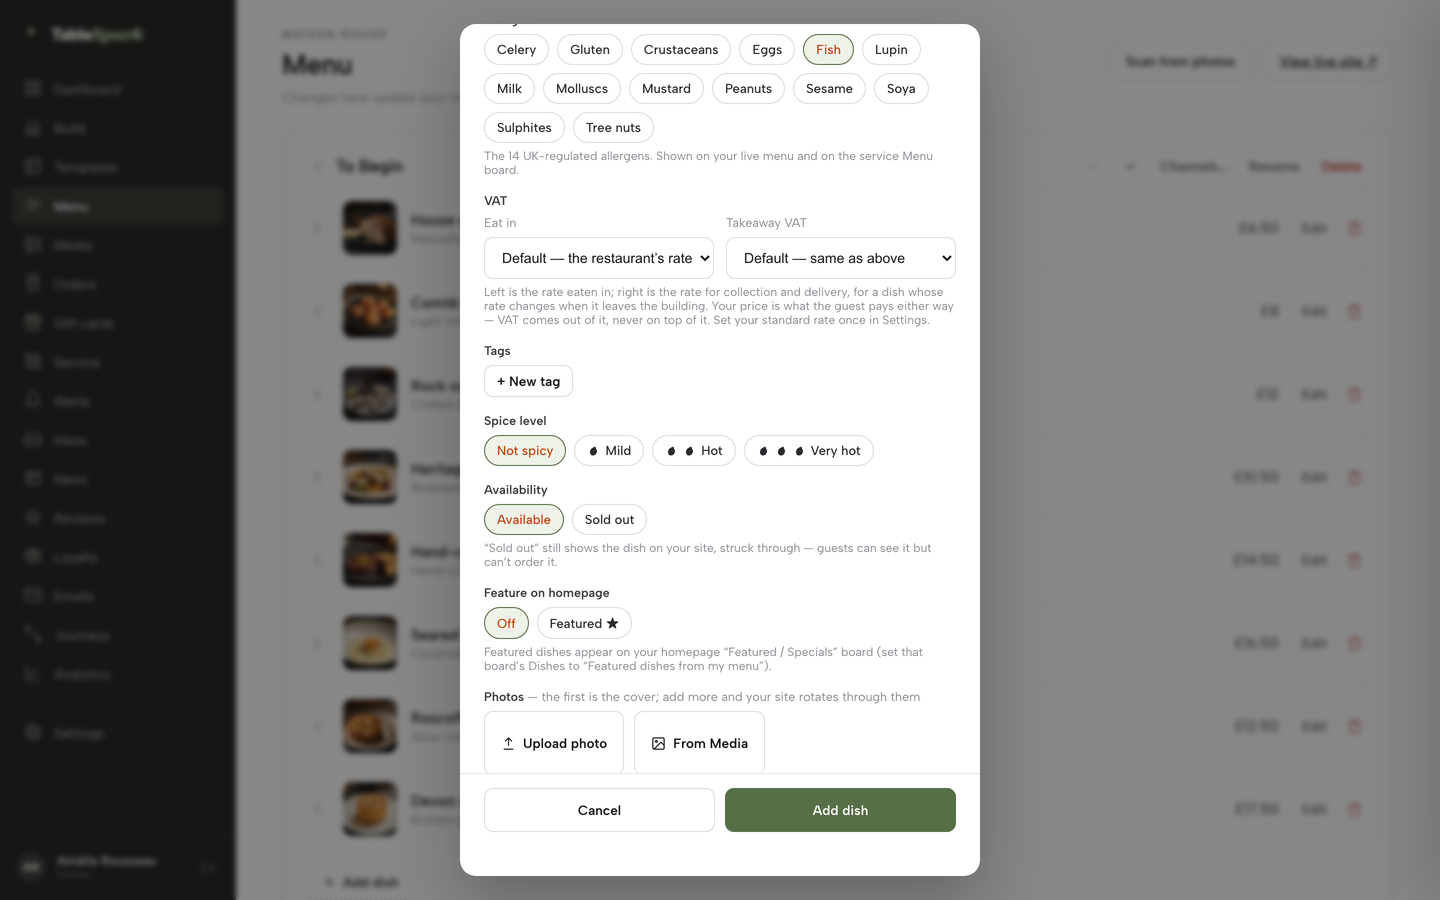
- Allergens — the 14 UK-regulated allergens as toggle chips, “shown on your live menu and on the service Menu board.”
- VAT — separate eat-in and takeaway rates, each defaulting to your restaurant’s standard rate from Settings; the price a guest pays is the same either way — VAT comes out of it, never on top.
- Tags, Spice level, Availability — custom tags, a 0–3 chilli-icon spice scale, and “Available” or “Sold out”, which still shows the dish on your site, struck through, but stops it being ordered.
- Feature on homepage — puts the dish on your homepage’s “Featured / Specials” board, once that board is set to show featured dishes.
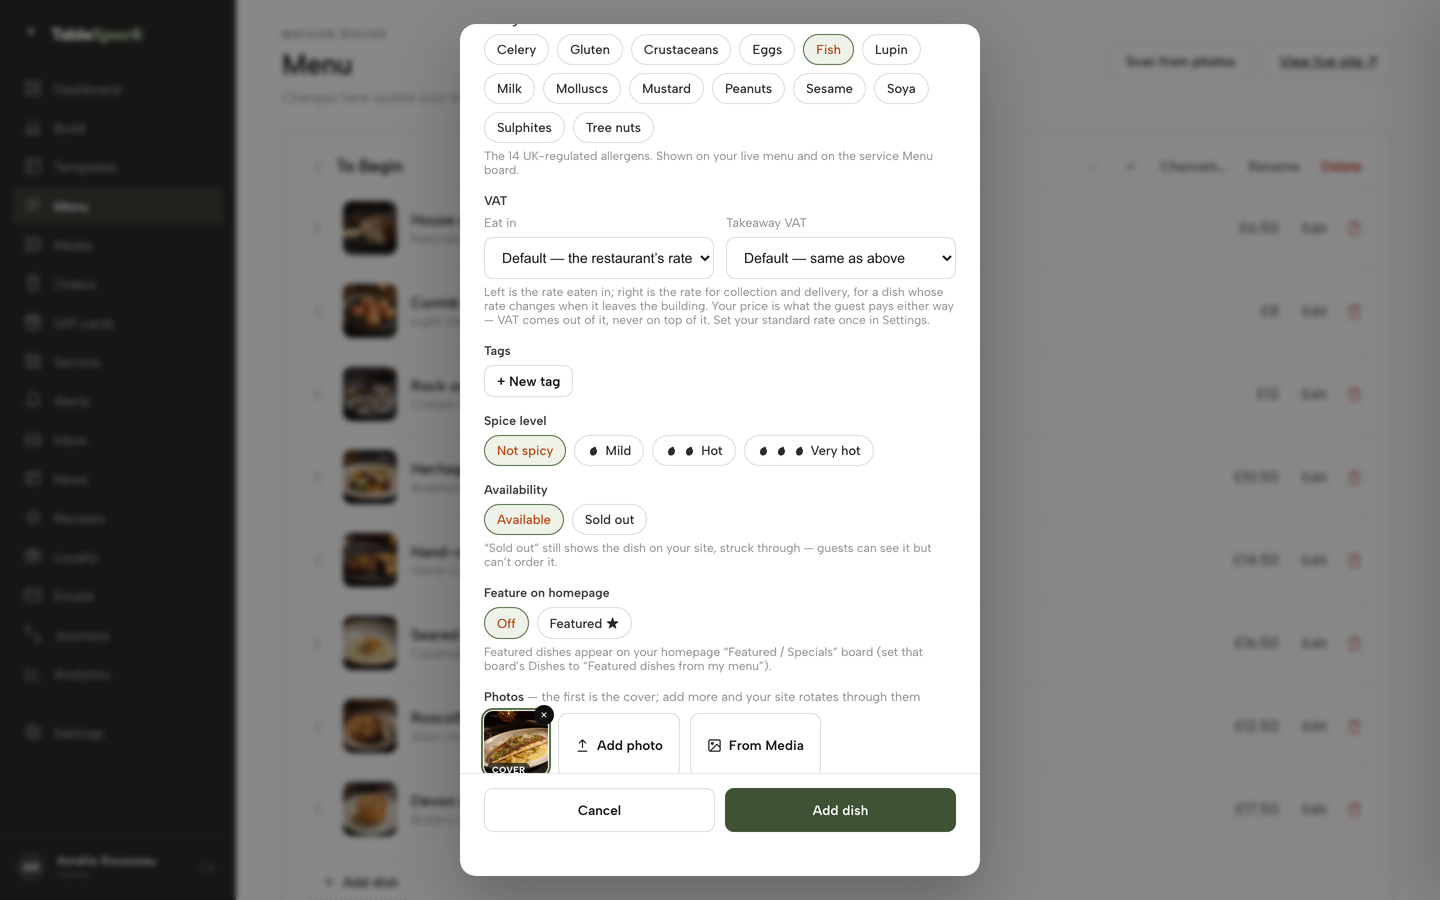
- Photos — the first photo becomes the cover; add up to eight more and your site rotates through them. Add a photo two ways: Upload photo from your device, or From Media, which reuses an asset already in the Media library with no second upload.
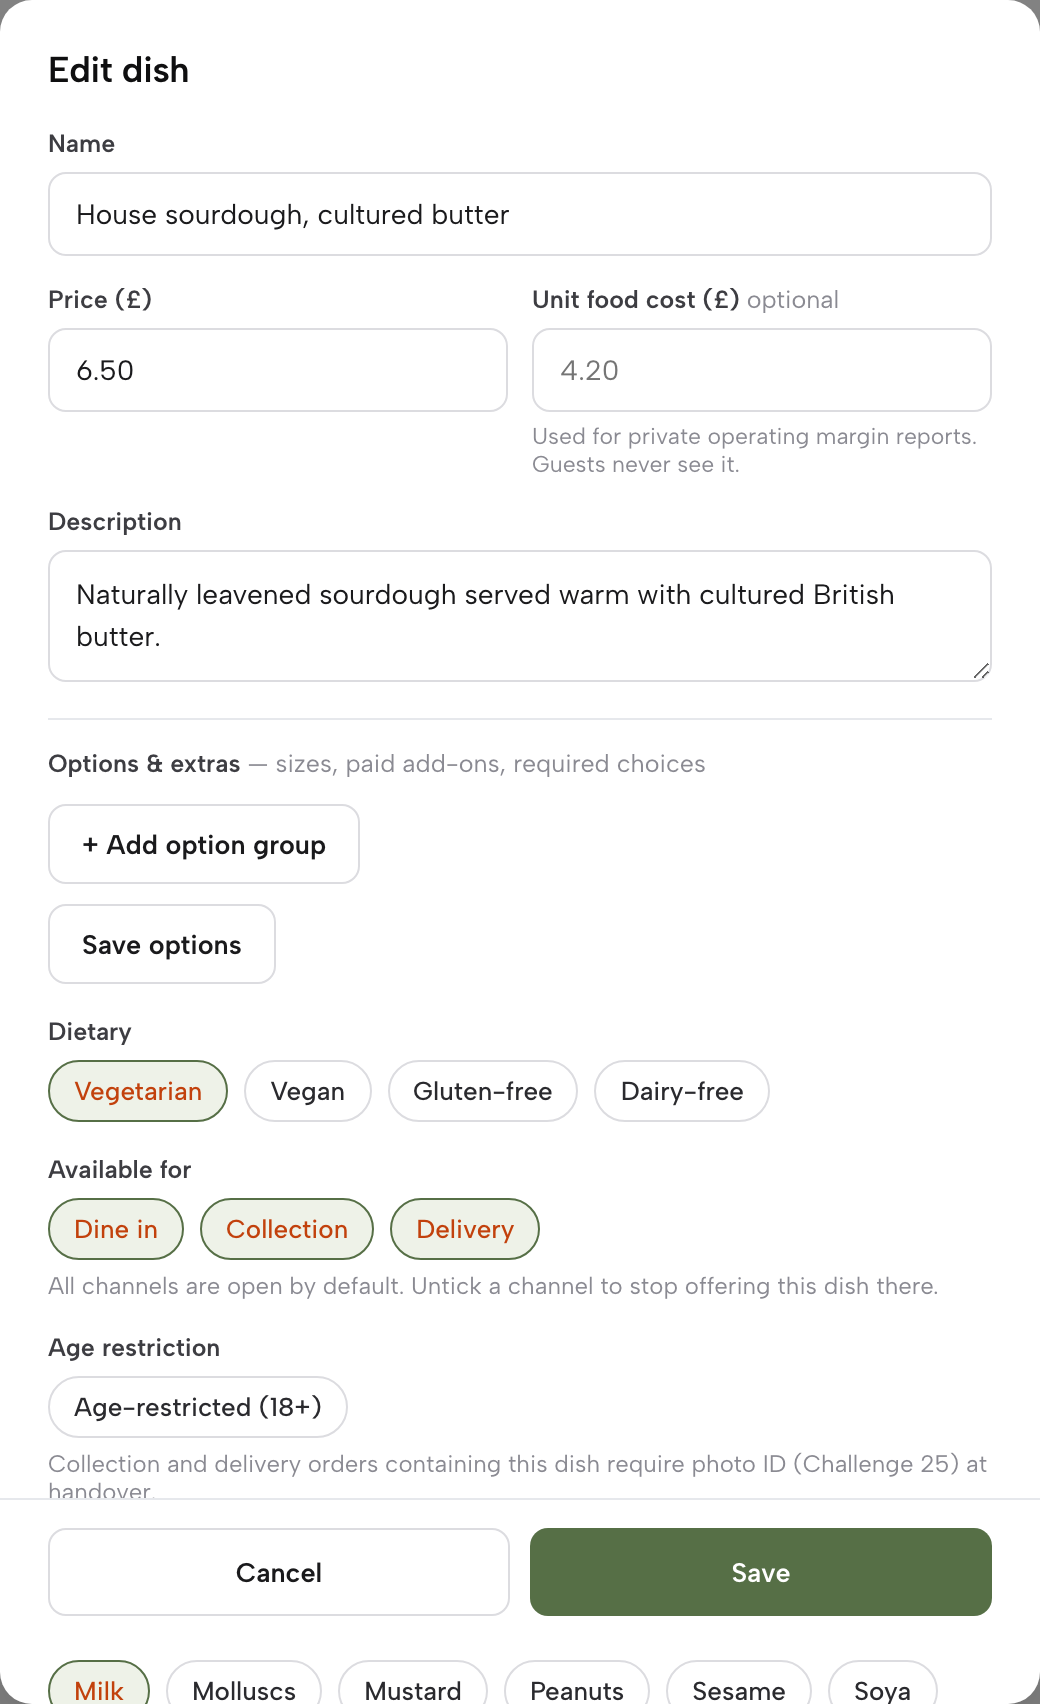
Save the dish and it is live on the menu immediately — the same rule as everything else on this page.
Use the Media library
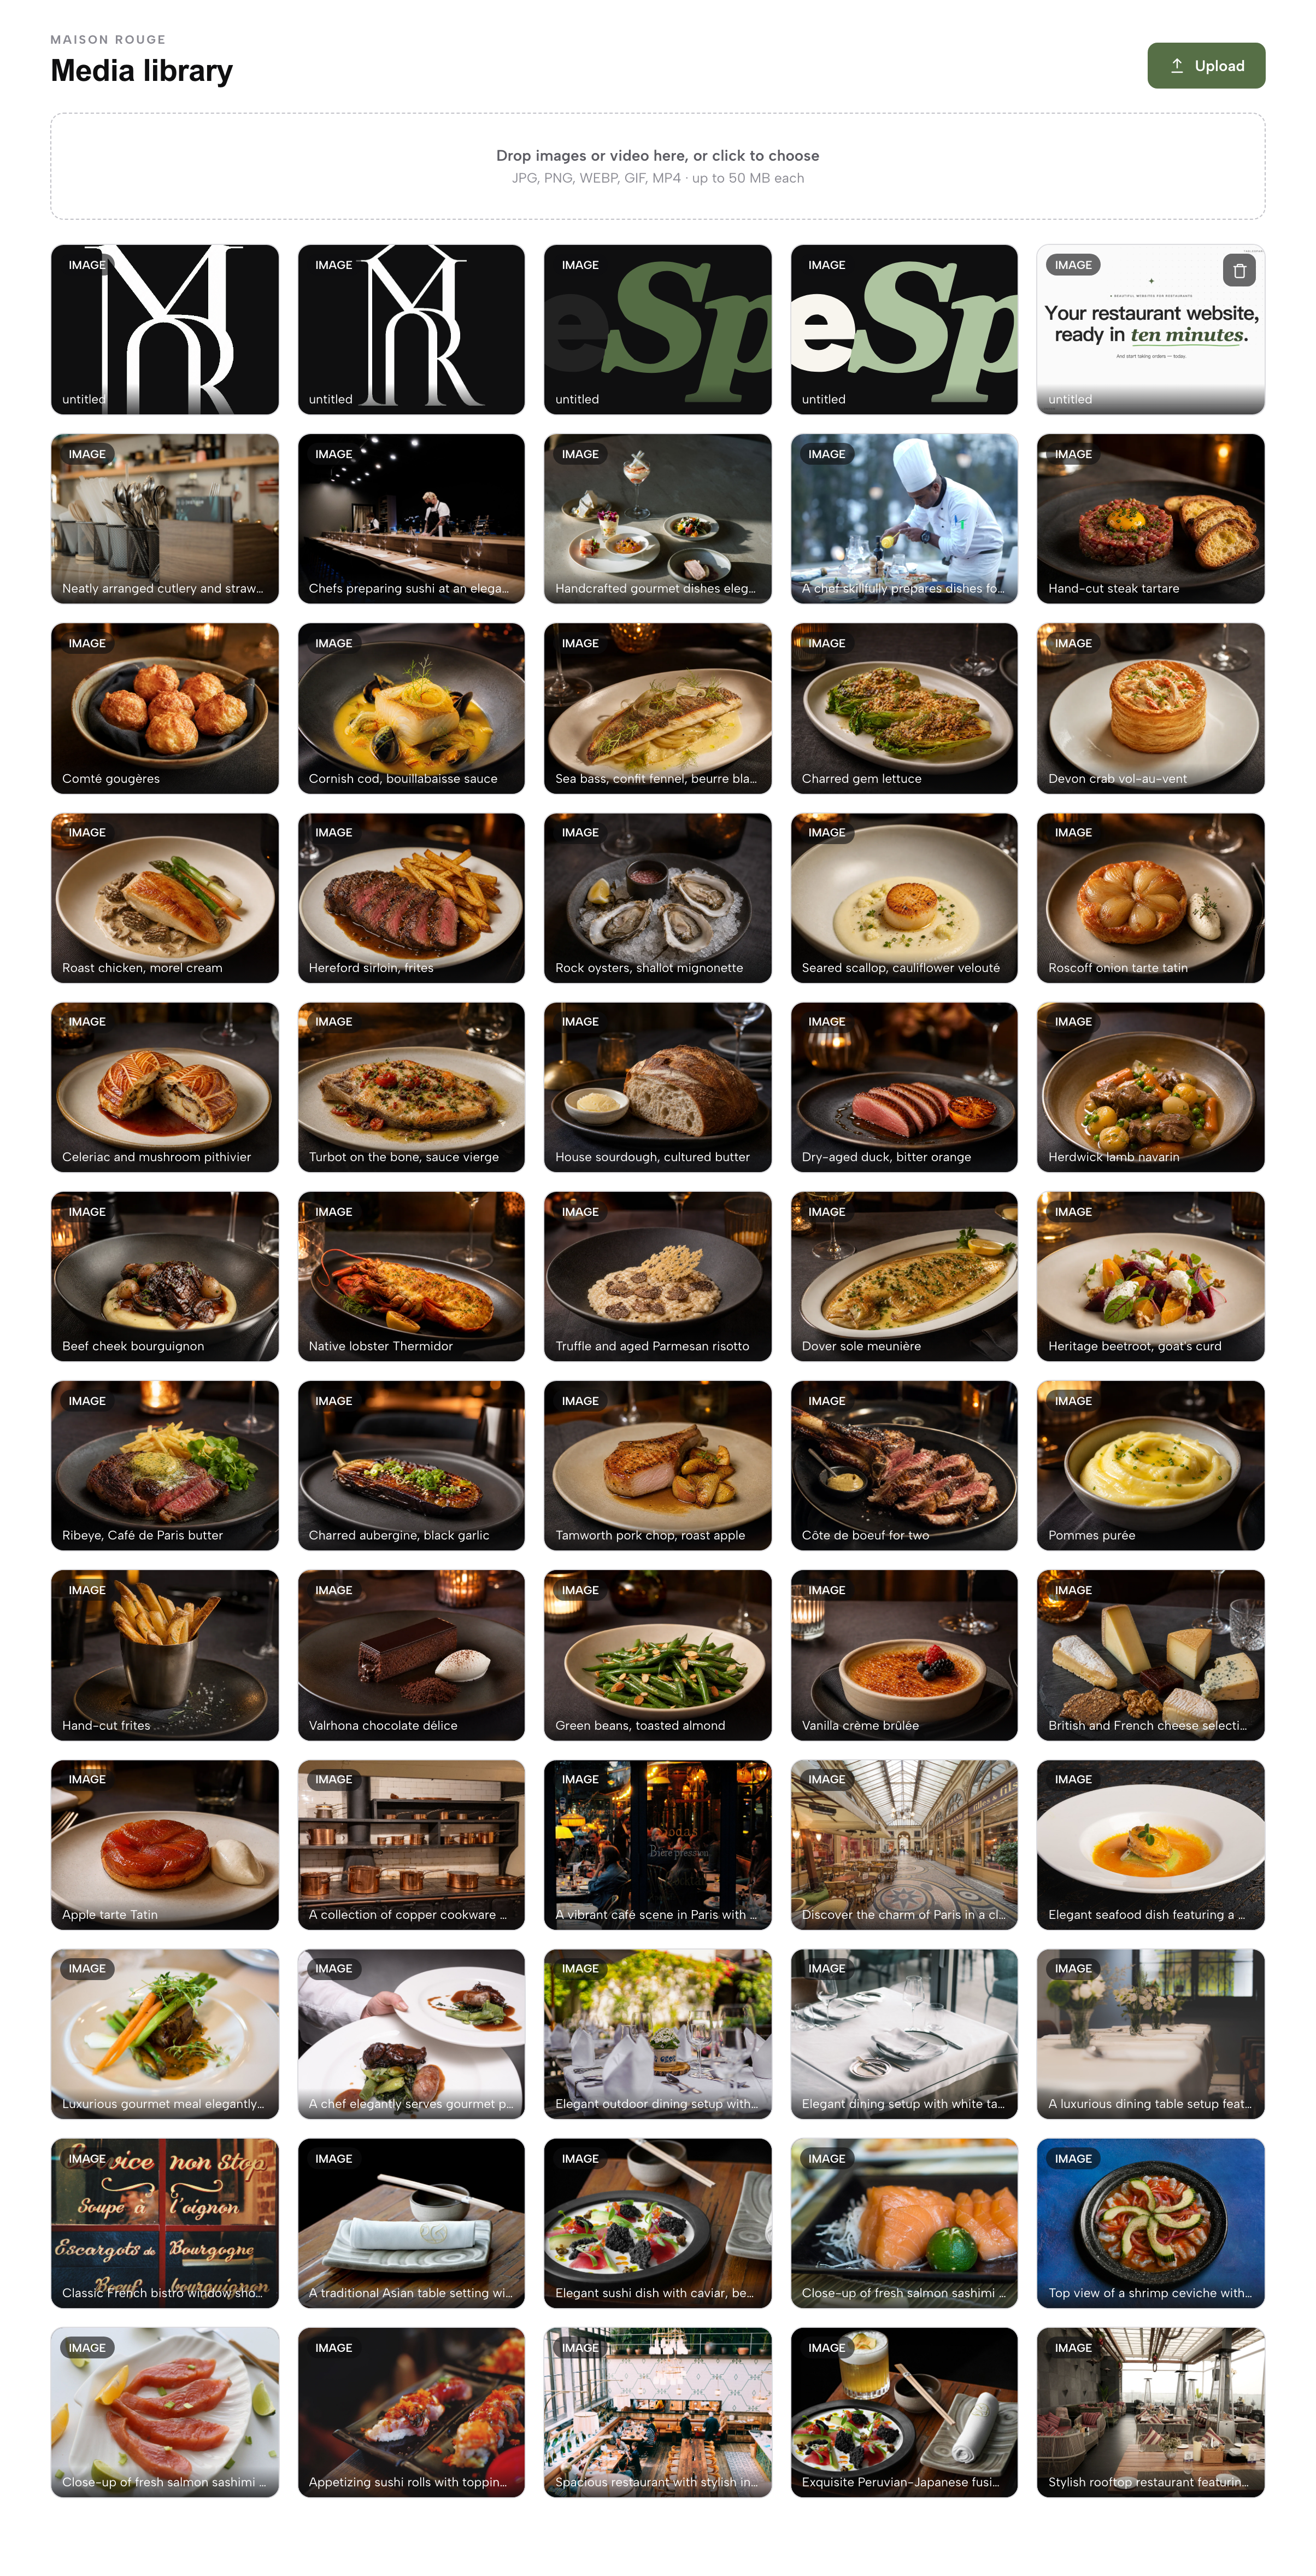
Every photo behind a dish, a page block or a gallery lives in one shared store: open Media in the sidebar — the address is /app/media. Drag images or video onto the drop zone, or click Upload — TableSpark accepts “JPG, PNG, WEBP, GIF, MP4 · up to 50 MB each.” Every uploaded asset appears in a grid with its filename or caption and a Delete action of its own.
The reciprocal link back to the dish editor is what makes this genuinely useful day to day: the “From Media” button in the dish photo picker reads from this same library, so one upload covers a dish, a page and a gallery without you ever uploading it twice.
Generate QR codes for your tables
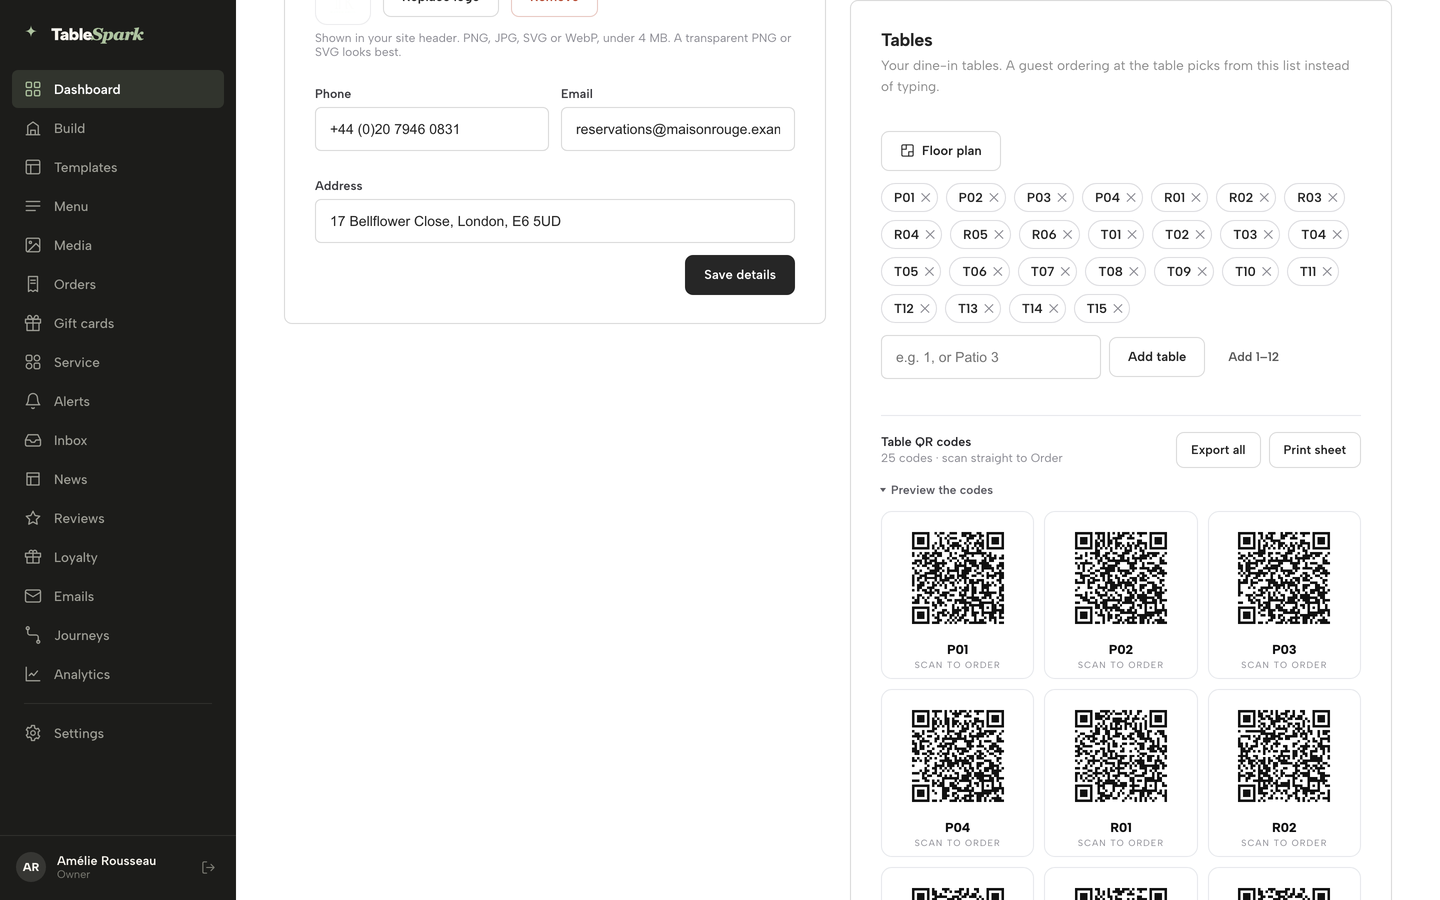
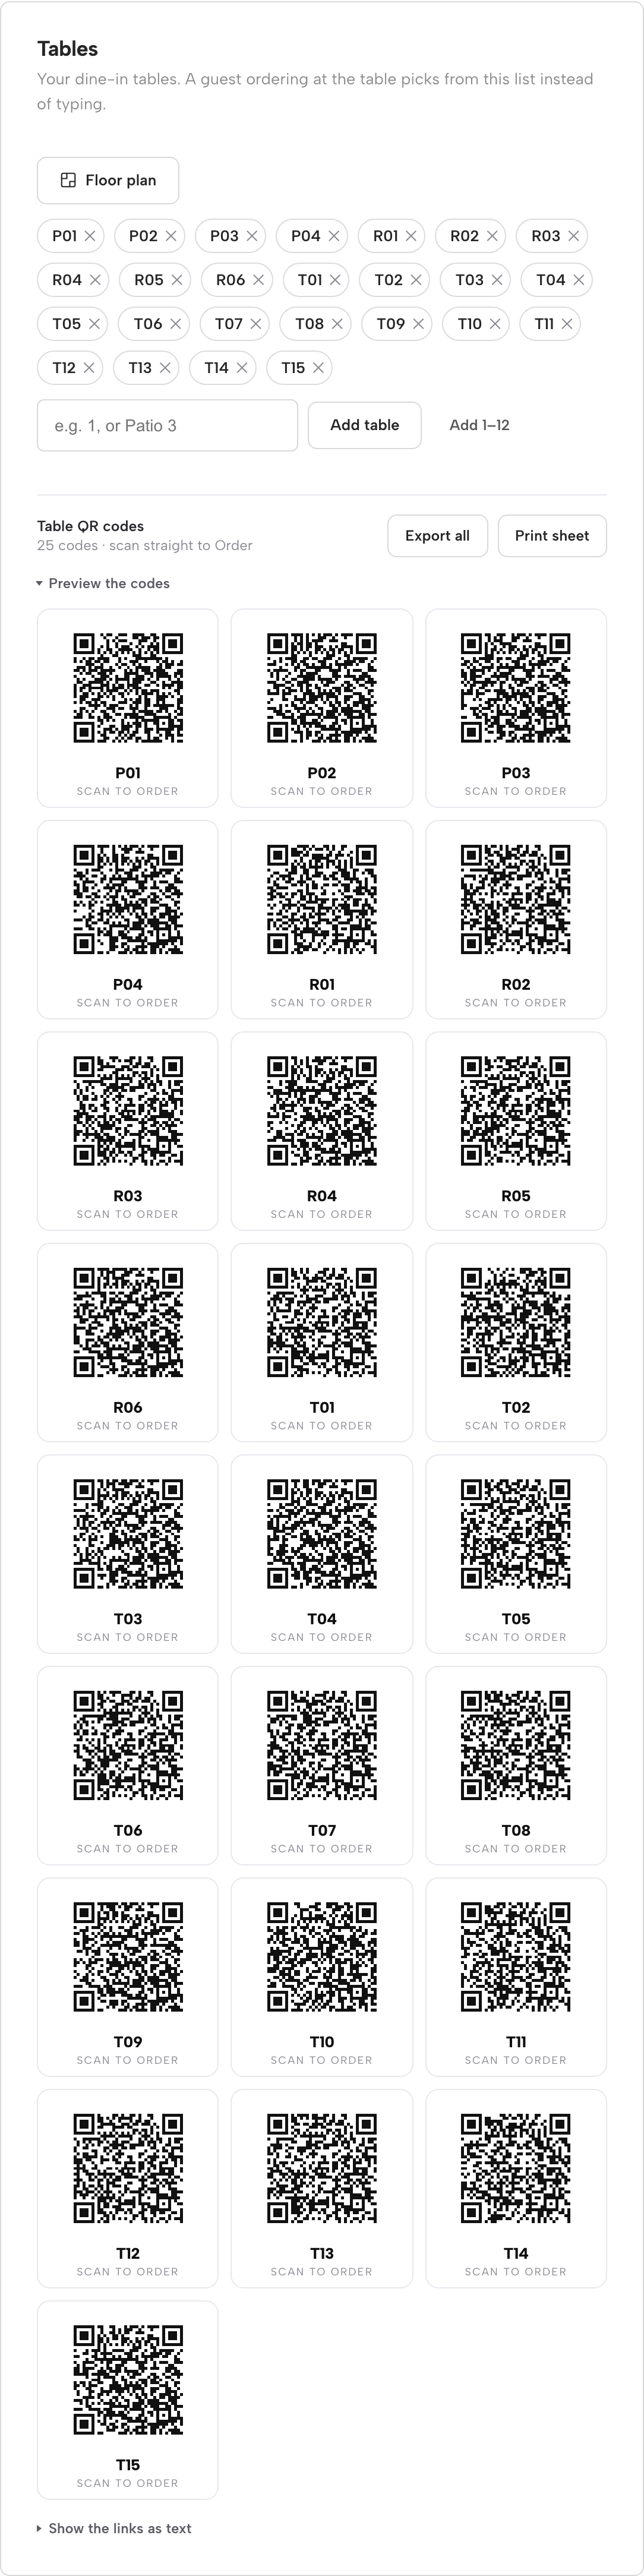
TableSpark generates a scannable QR code for every dine-in table, and each one opens straight to your live ordering page — so a printed table-tent code doubles as a menu and an ordering entry point in one. This lives on the Dashboard — the address is /app/dashboard — inside the Tables card, not the Menu page.
Add table numbers or names as chips, and once at least one table exists, a Table QR codes block appears beneath them, stating something like “25 codes · scan straight to Order.” Click ▸ Preview the codes to expand the full grid in place, Export all to download every code, and Print sheet to open a print-ready sheet for the whole floor. A “Show the links as text” disclosure lists the raw URL behind each table’s code, for anyone who wants to embed the link somewhere other than a printed code.
Every code is resolved to whichever page on your site actually carries the ordering block — not guessed — so switching ordering on is what makes the codes work end to end; see Take online orders for turning it on and the guest side of the widget these codes open.
However the menu started — scanned from a stack of printed pages or built dish by dish — it lives in one place, updates the live site the moment you save, and prints a QR code for every table the moment you add one.
Next · hours and booking
Next: set your opening hours
With the menu live, set the hours, sittings and party rules that decide when guests can actually book a table.