
One block turns your menu into an ordering site: dine-in, collection or delivery, paid by card or at the restaurant, with an all-you-can-eat buffet mode when you want one. A guest orders in a few taps and the ticket is on your Orders screen before they've put their phone down — sound on, notes and all, ready to move through preparing, ready and paid.
Build → Order from our menuFull plan
Click Build in the sidebar — the Builder opens on your pages.
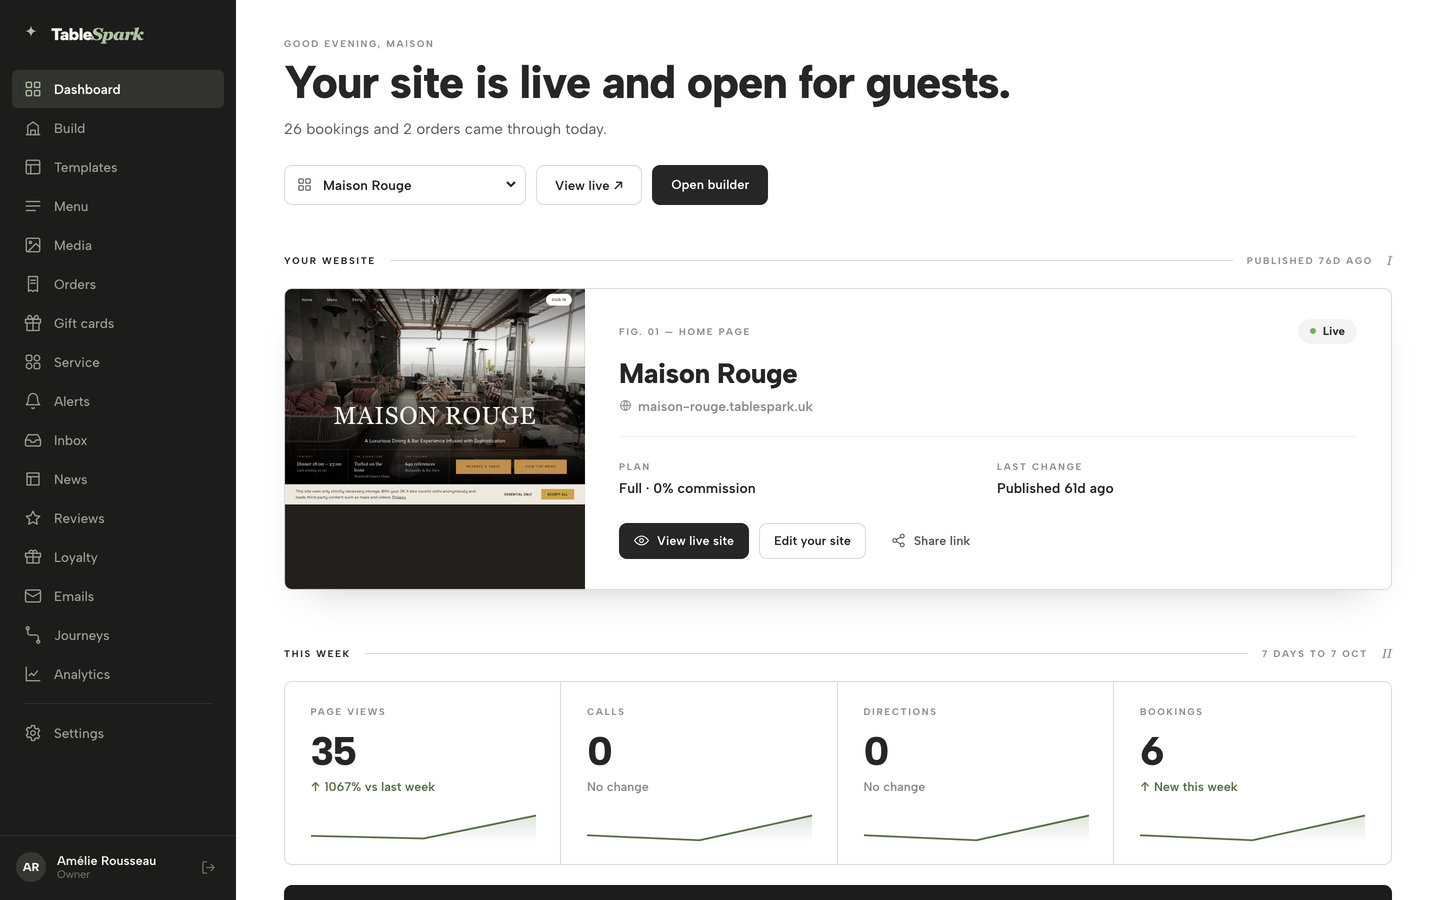
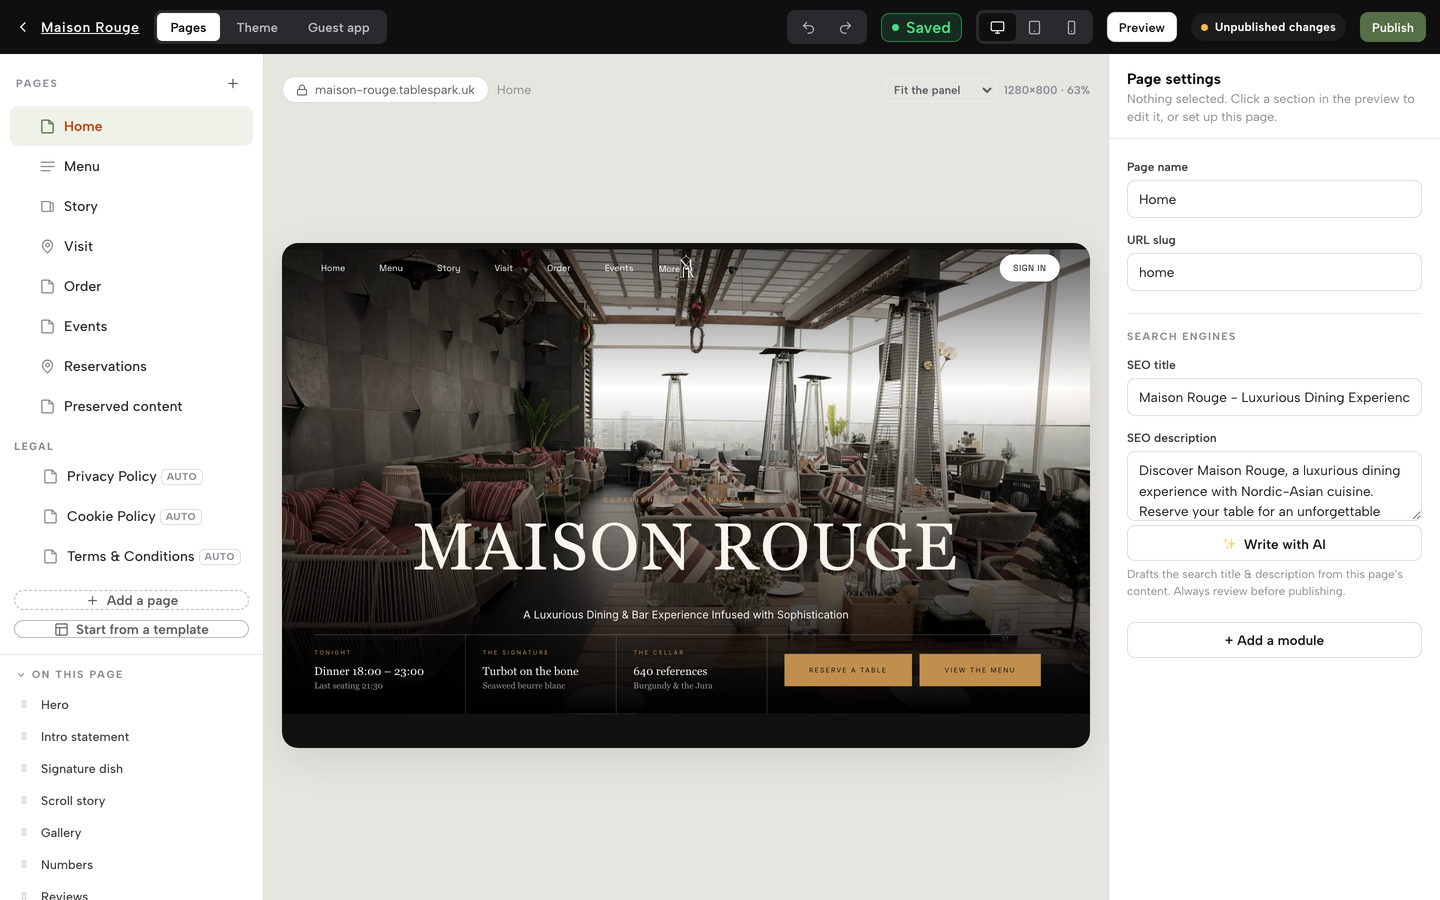
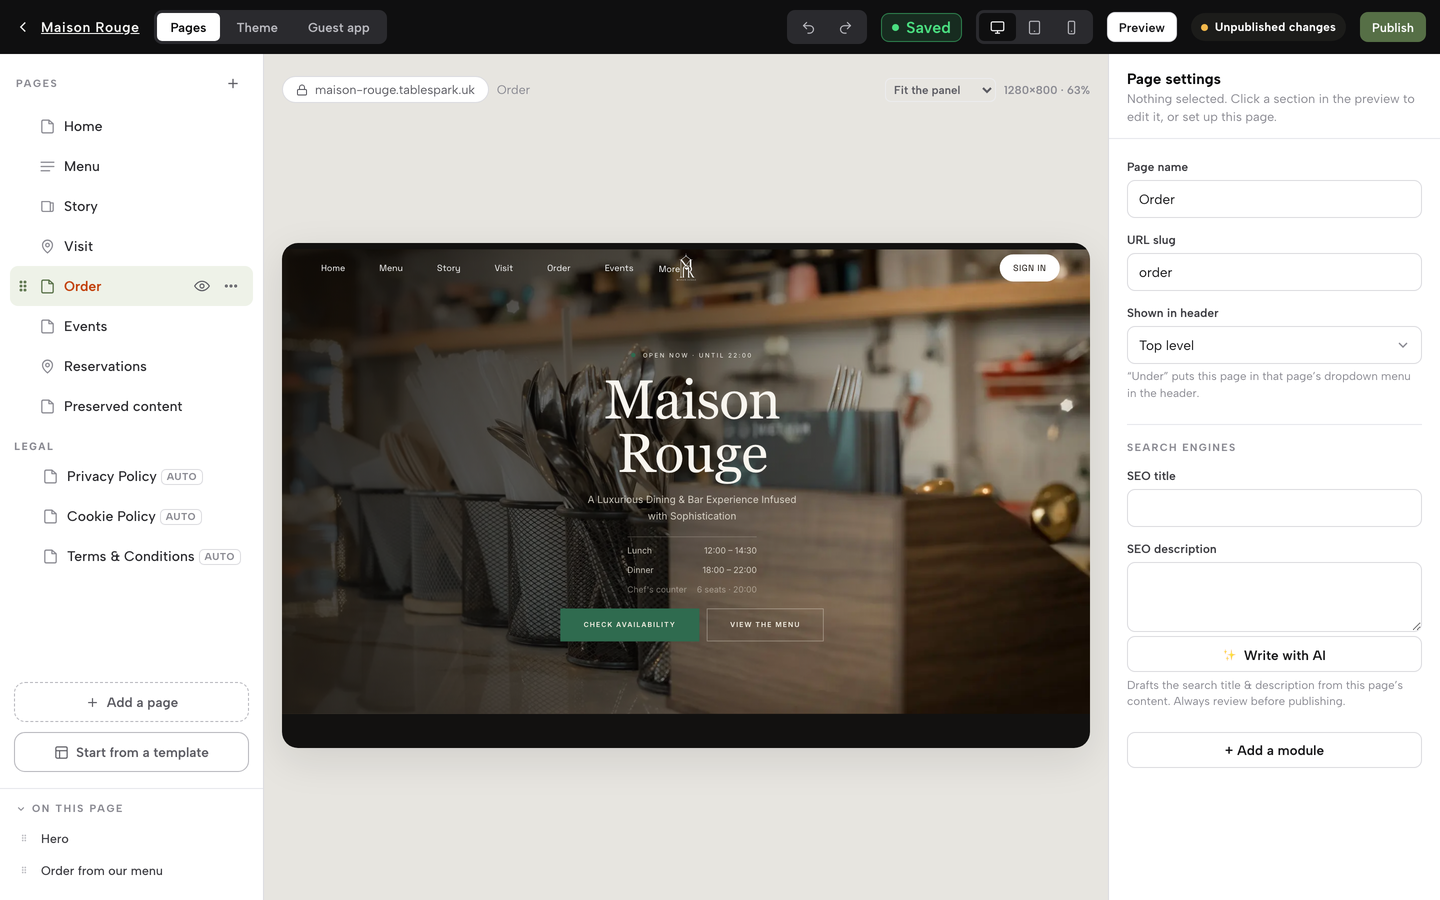
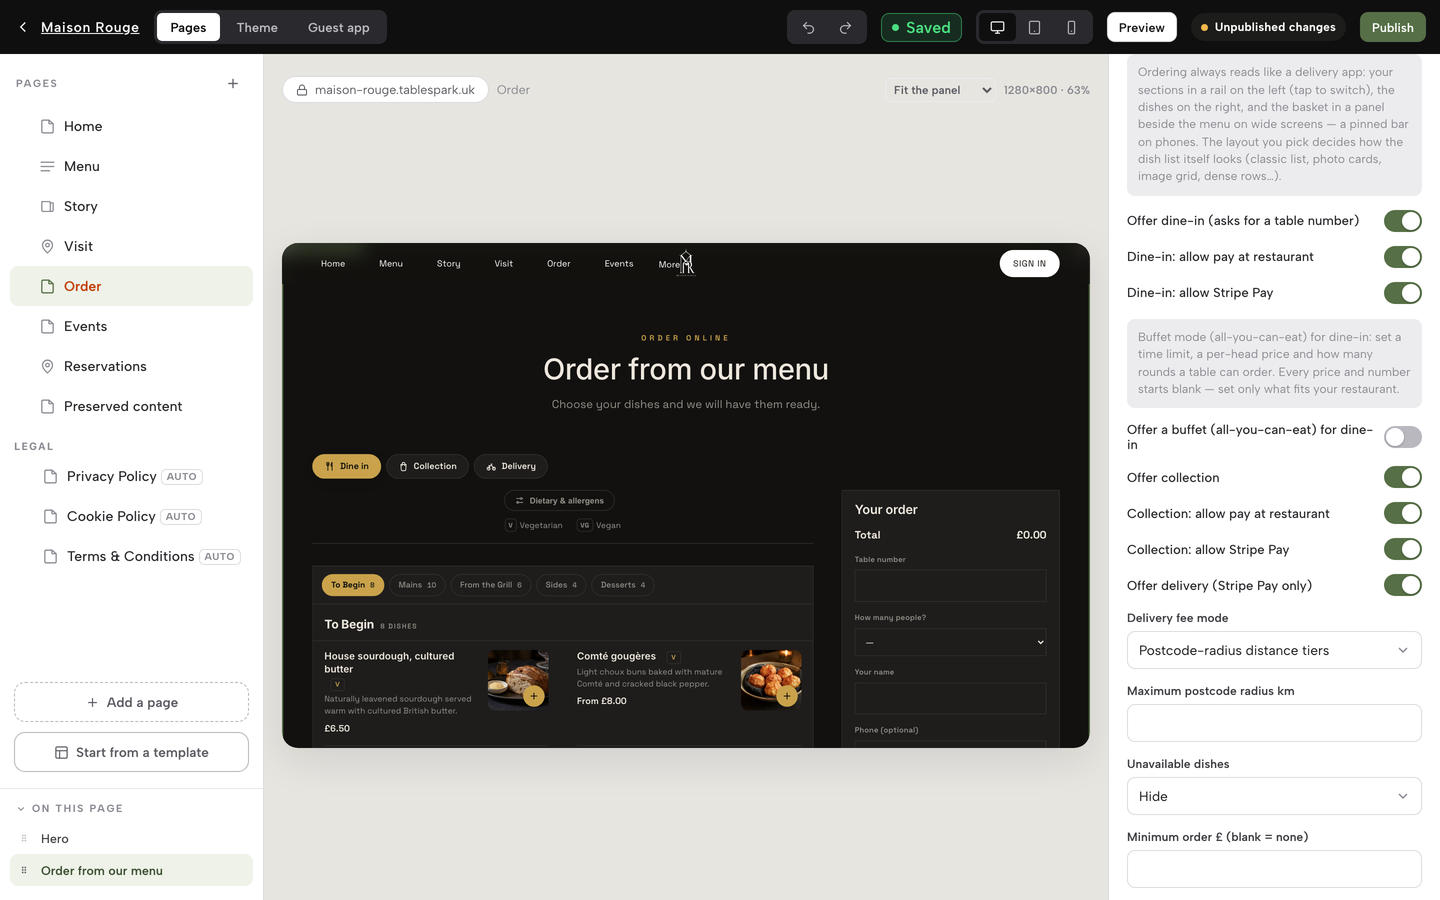
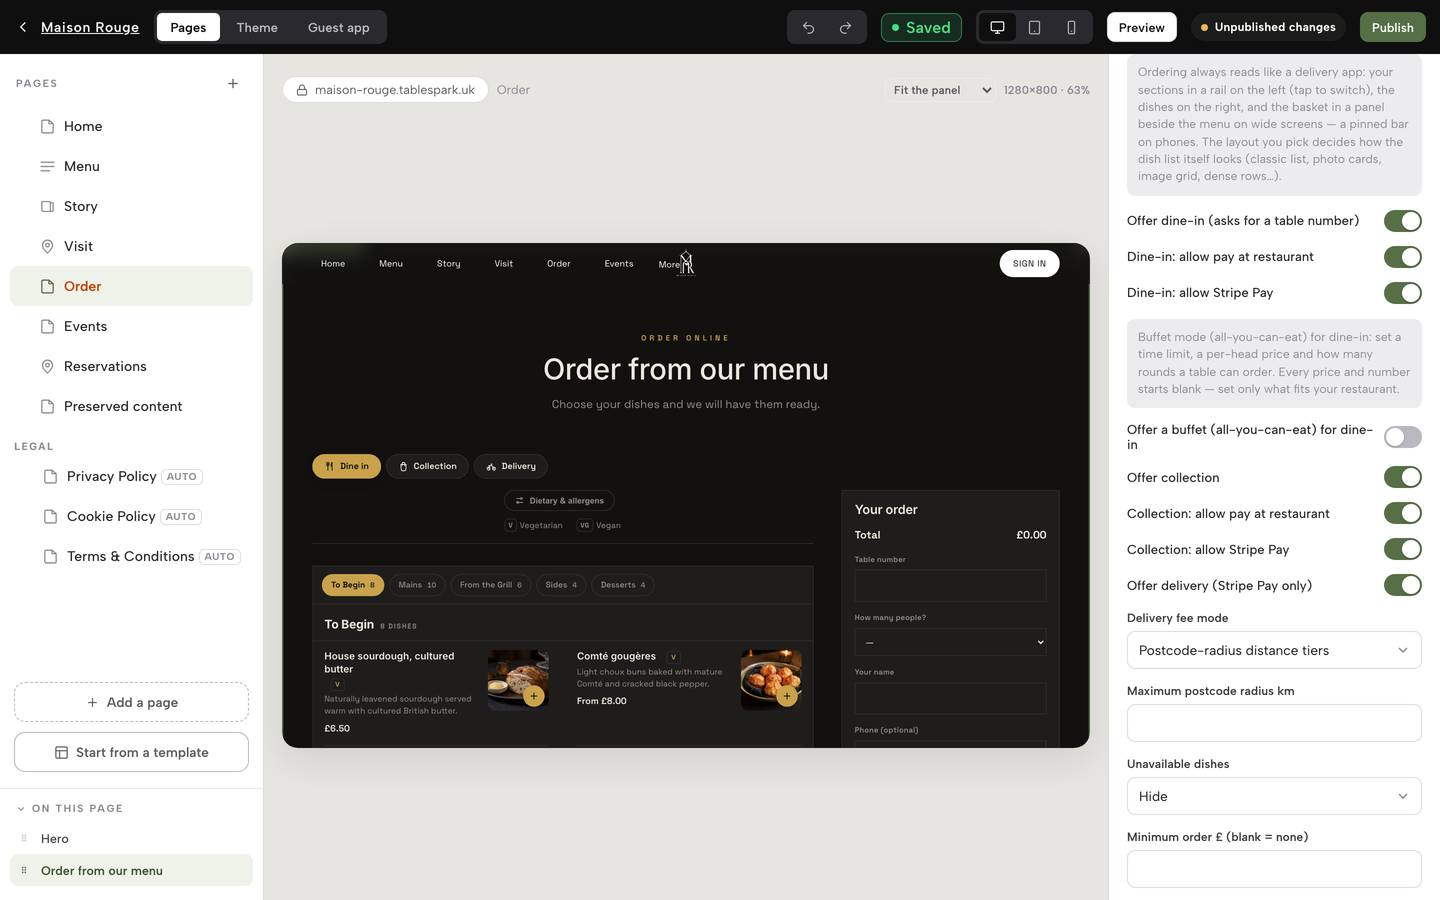
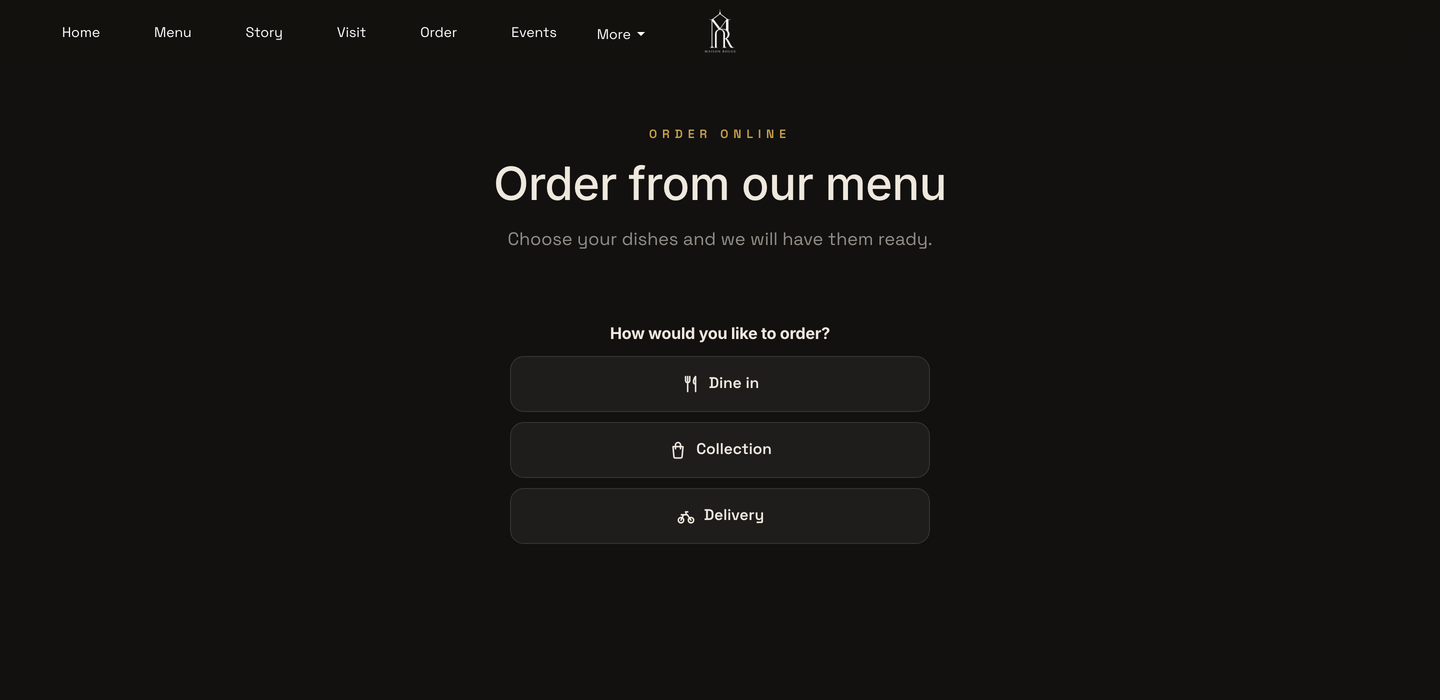
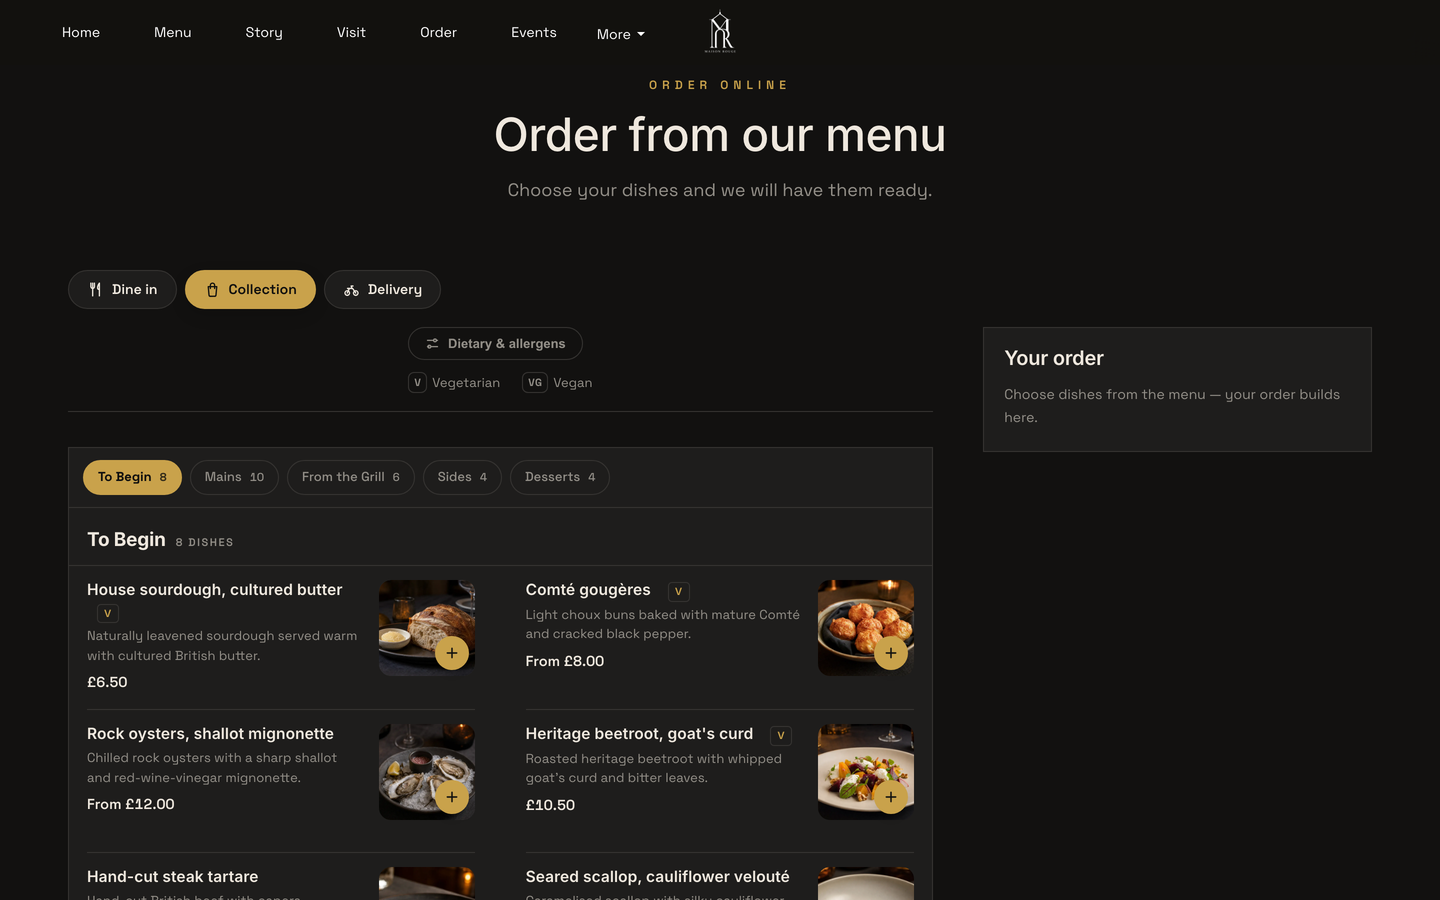
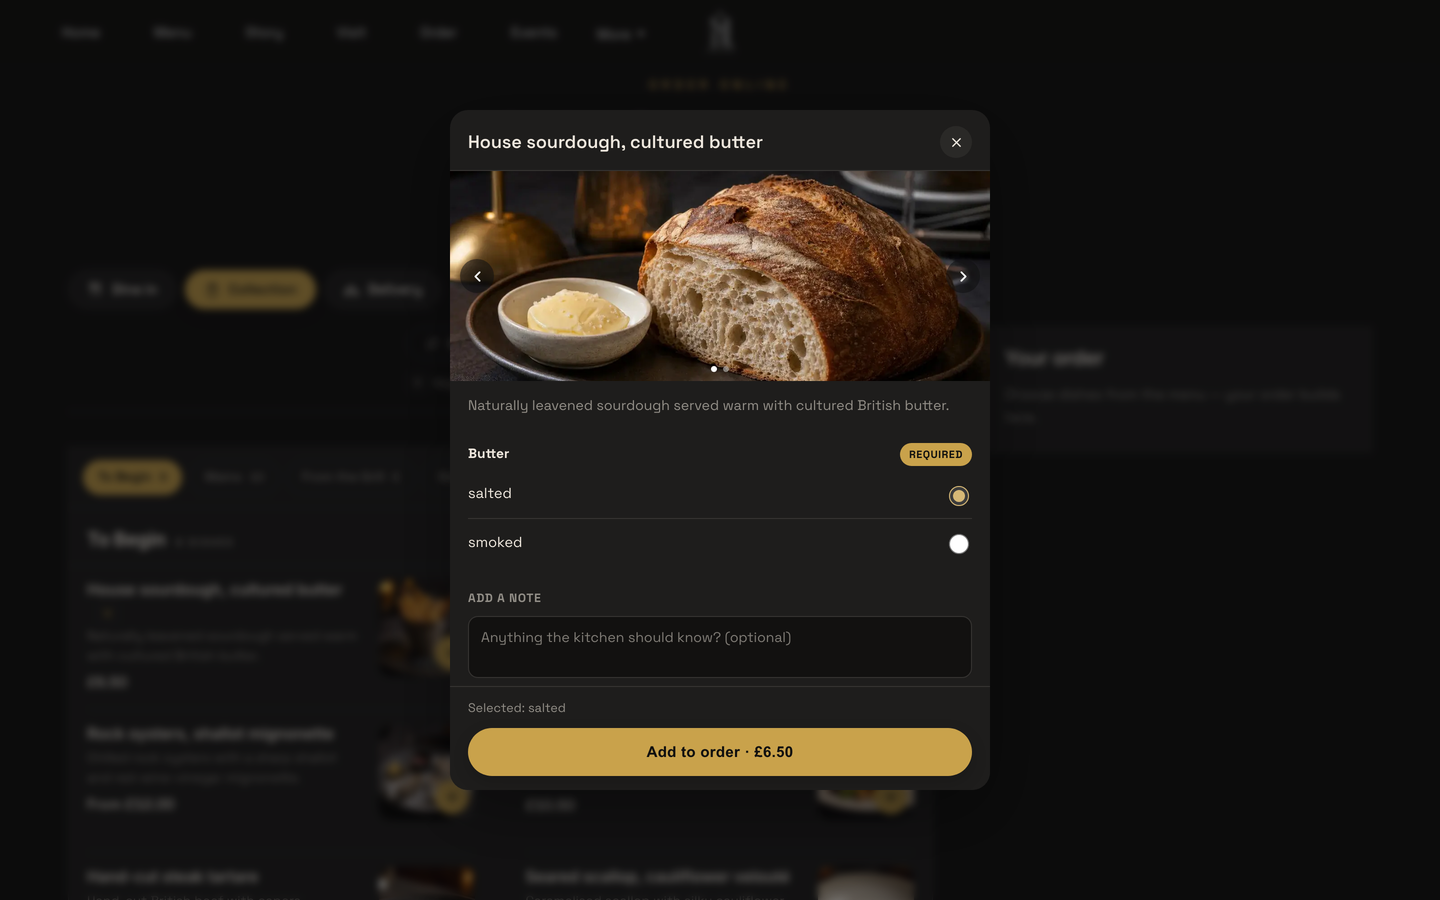
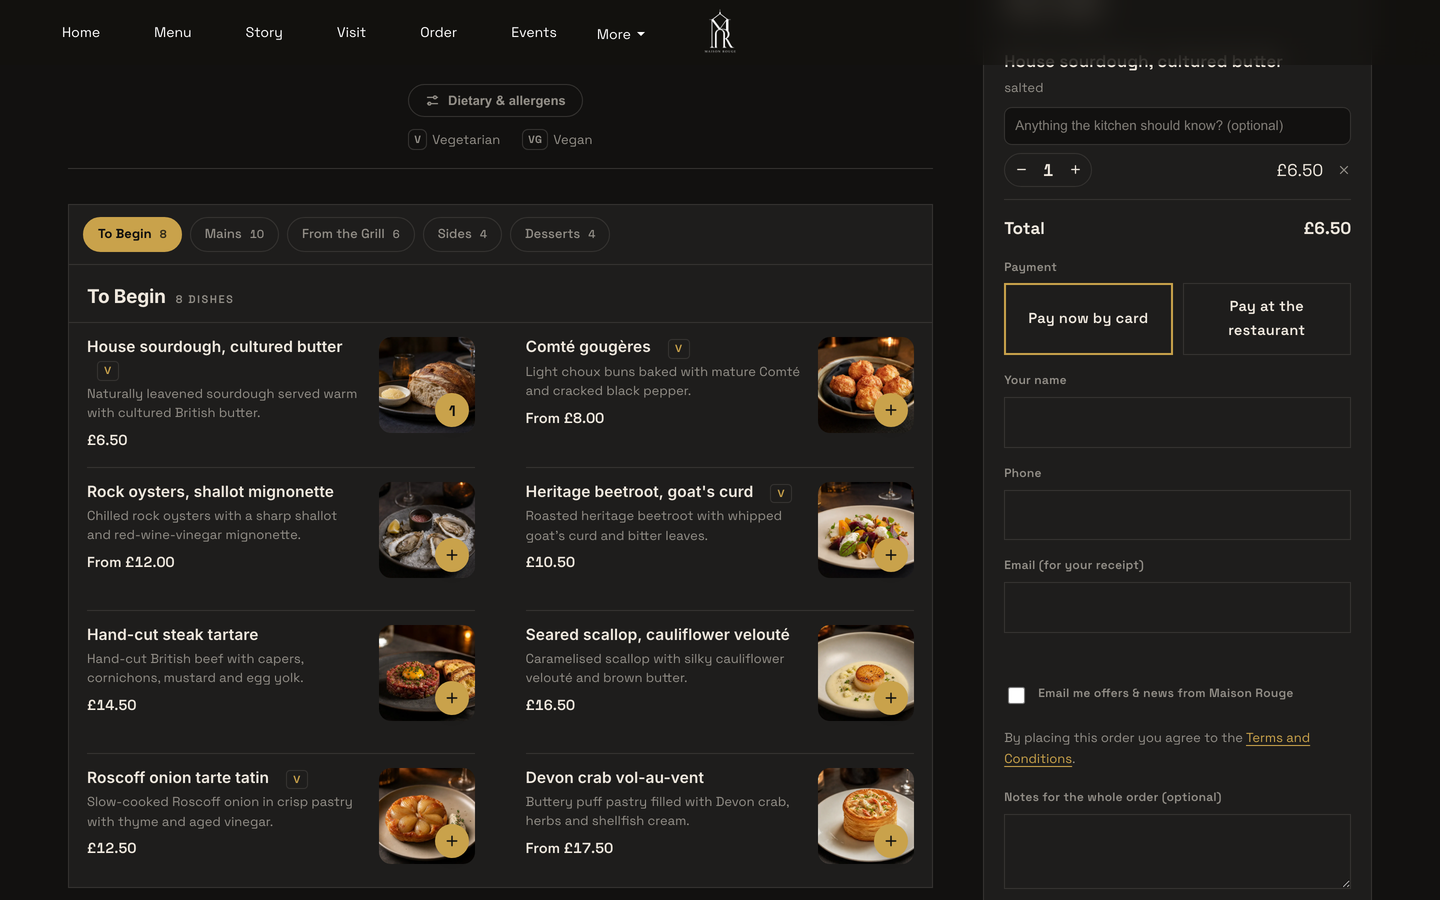
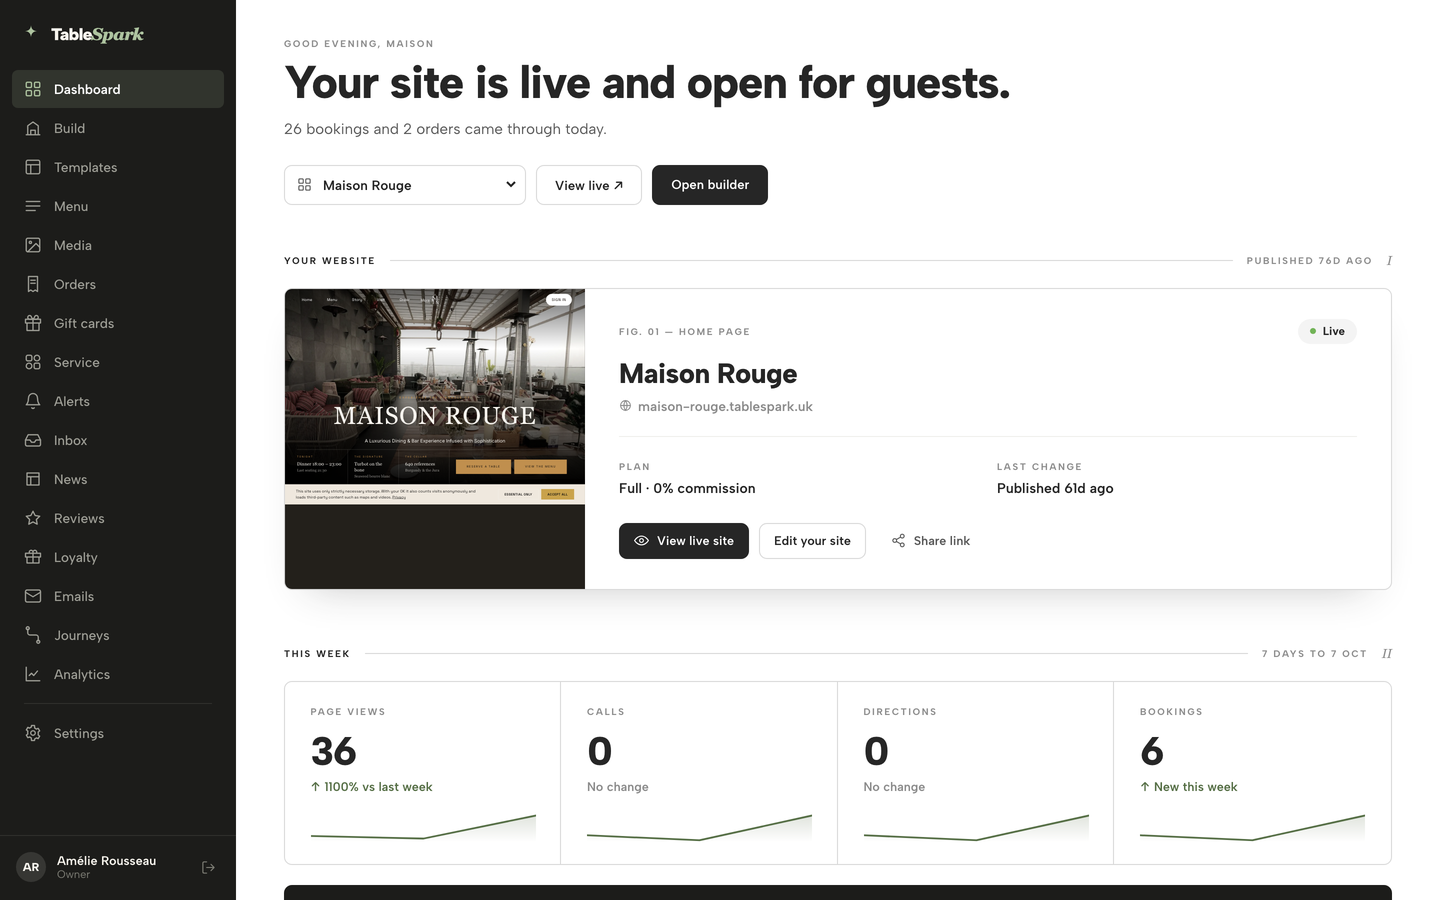
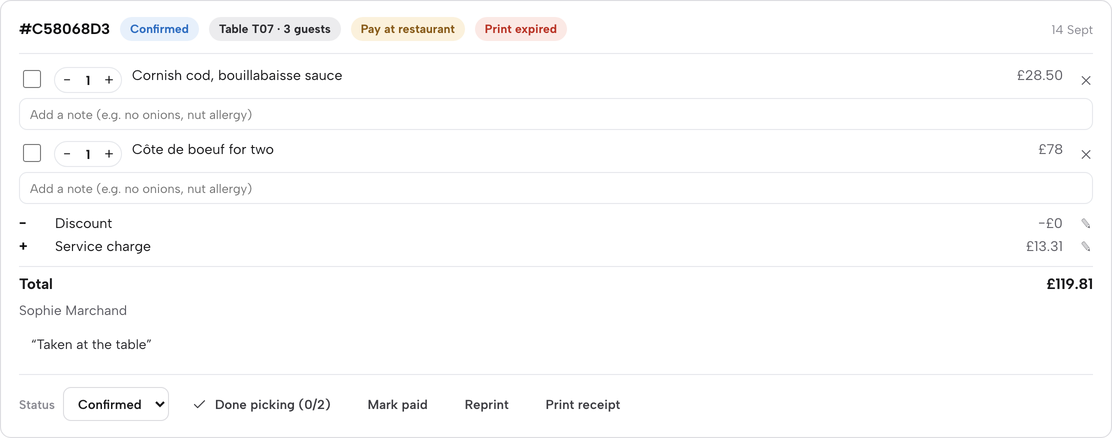
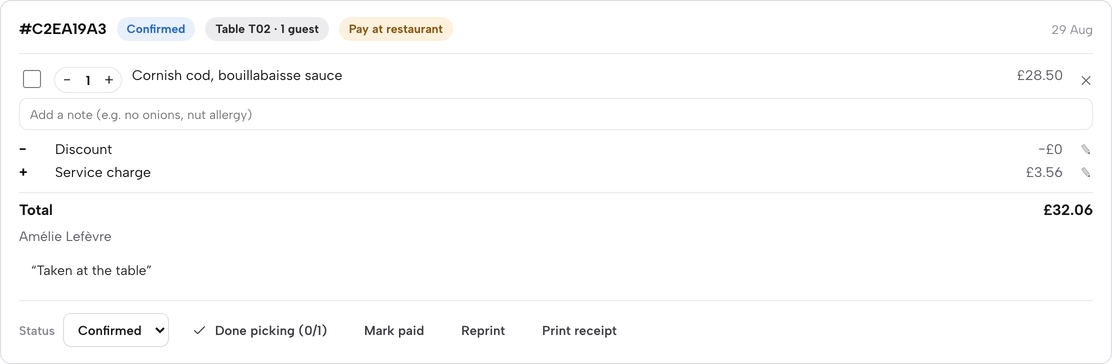
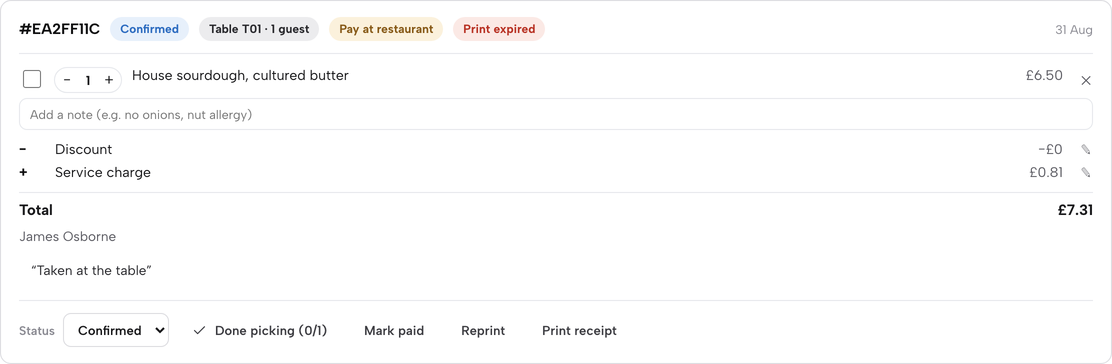
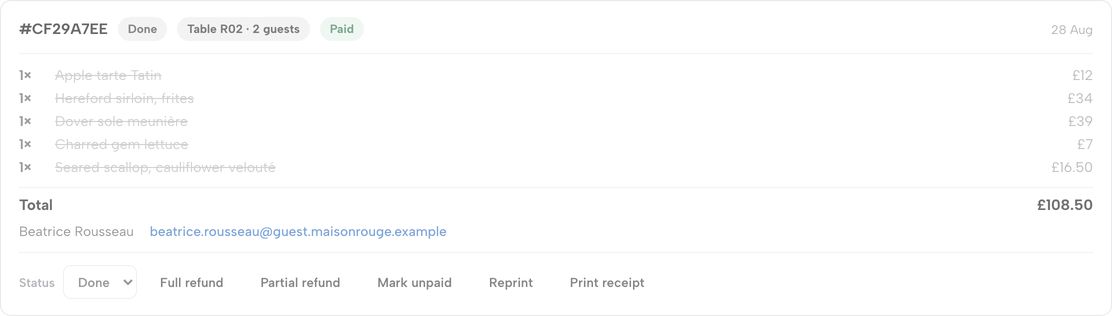
The ordering block opened and published from Build, a guest’s order built on your Order page with its payment choice, and the ticket followed on your Orders screen — Status, Done picking, Mark paid and, on a finished paid order, Full refund.
- WHAT YOU NEED
- The ordering block added & published
- TIME
- About 9 minutes
- HOW HARD?
- Like adding one page block toggles, not code
- CAN I BREAK IT?
- Mostly no double-check before a refund
IN PLAIN WORDS / TAP A TERM
What’s the “mode bar”?
The Dine in / Collection / Delivery choice a guest makes first. It pins to the top of the page once picked, so it’s always visible while they order.
What’s a “dish sheet”?
The panel that opens for a dish with sizes or required extras — photo, description, options, a note field. A plain dish skips it and goes straight into the basket.
What’s a “collection cut-off”?
How long before closing time you stop taking new collection orders — up to closing, or 15 to 60 minutes ahead, so the kitchen isn’t rushing the last ticket.
What does “Done picking” do?
Ticks every remaining dish on an order as prepared in one tap and sends it straight to Ready — quicker than ticking each line by hand when the whole order finishes at once.
What’s a “buffet round”?
One trip to the kitchen by a table on an all-you-can-eat buffet. Each round arrives on Orders as its own order, labelled Buffet and the round number.
Switch on ordering from your menu
Open Build and click the Order page in the Pages list. To add ordering to any page, click + Add a module, open the Conversion group and choose Order from our menu (the Order online card beside it is a simple links band; this is the native ordering block). Then click the block in the preview, or its row under On this page, and its settings open on the right.
The top of the inspector shapes what guests see: five Layout cards (Classic list, Photo tiles, Chip bar, Delivery app and Side categories), the Eyebrow, Heading, Intro text and Button label (it reads Place order until you change it), Which menu to sell from, and switches for Show dish photos, Show descriptions and the Dietary filter bar.
Below that, the channel switches decide exactly what a guest can do. Offer dine-in asks for a table number when it’s on. Offer collection and Offer delivery add those channels. Dine-in and collection each have allow pay at restaurant and allow Stripe Pay switches, so a channel can take either or both; delivery is Stripe Pay only. Turn delivery on and pick a Delivery fee mode — Fixed fee or Postcode-radius distance tiers — with a Maximum postcode radius. The dish-availability setting under it chooses whether sold-out dishes Grey out or Hide.
Further down: a Minimum order in pounds, a Collection cut-off before close (up to closing, or 15 minutes to 1 hour before) and a Ready-time note such as “Usually ready in ~20 min” that guests see once they’ve ordered. Changes save as you work (the chip at the top reads Saved); click Publish to put them on your live site.
You don't have to connect anything to start: dine-in and collection work immediately on pay-at-restaurant. Connect Stripe under Settings → Payments whenever you want guests to pay by card up front, or to switch delivery on — and every dish gets its own Available for chips (Dine in / Collection / Delivery) and an age-restriction flag in the dish editor, covered in Put your menu online → Everything one dish can carry. The cut-off and delivery windows read the same hours your bookings use — see Hours and booking rules → Set your weekly hours for where those live.
Offer a buffet (all-you-can-eat)
The same Order from our menu block carries a buffet mode for dine-in. Switch on Offer a buffet (all-you-can-eat) for dine-in, right under the dine-in switches from Step 01, and a full set of fields drops in beneath it: a What guests see title (for example “All you can eat”), an adult price per person, plus two optional tiers — a child price and a senior price, each with its own label. Add a time limit (up to 150 minutes) and a last-orders cut-off before the end (10 to 30 minutes), so the kitchen and the table both know exactly when the rounds stop. Max included items per person per round and Cooldown between rounds (3 to 15 minutes) pace the kitchen.
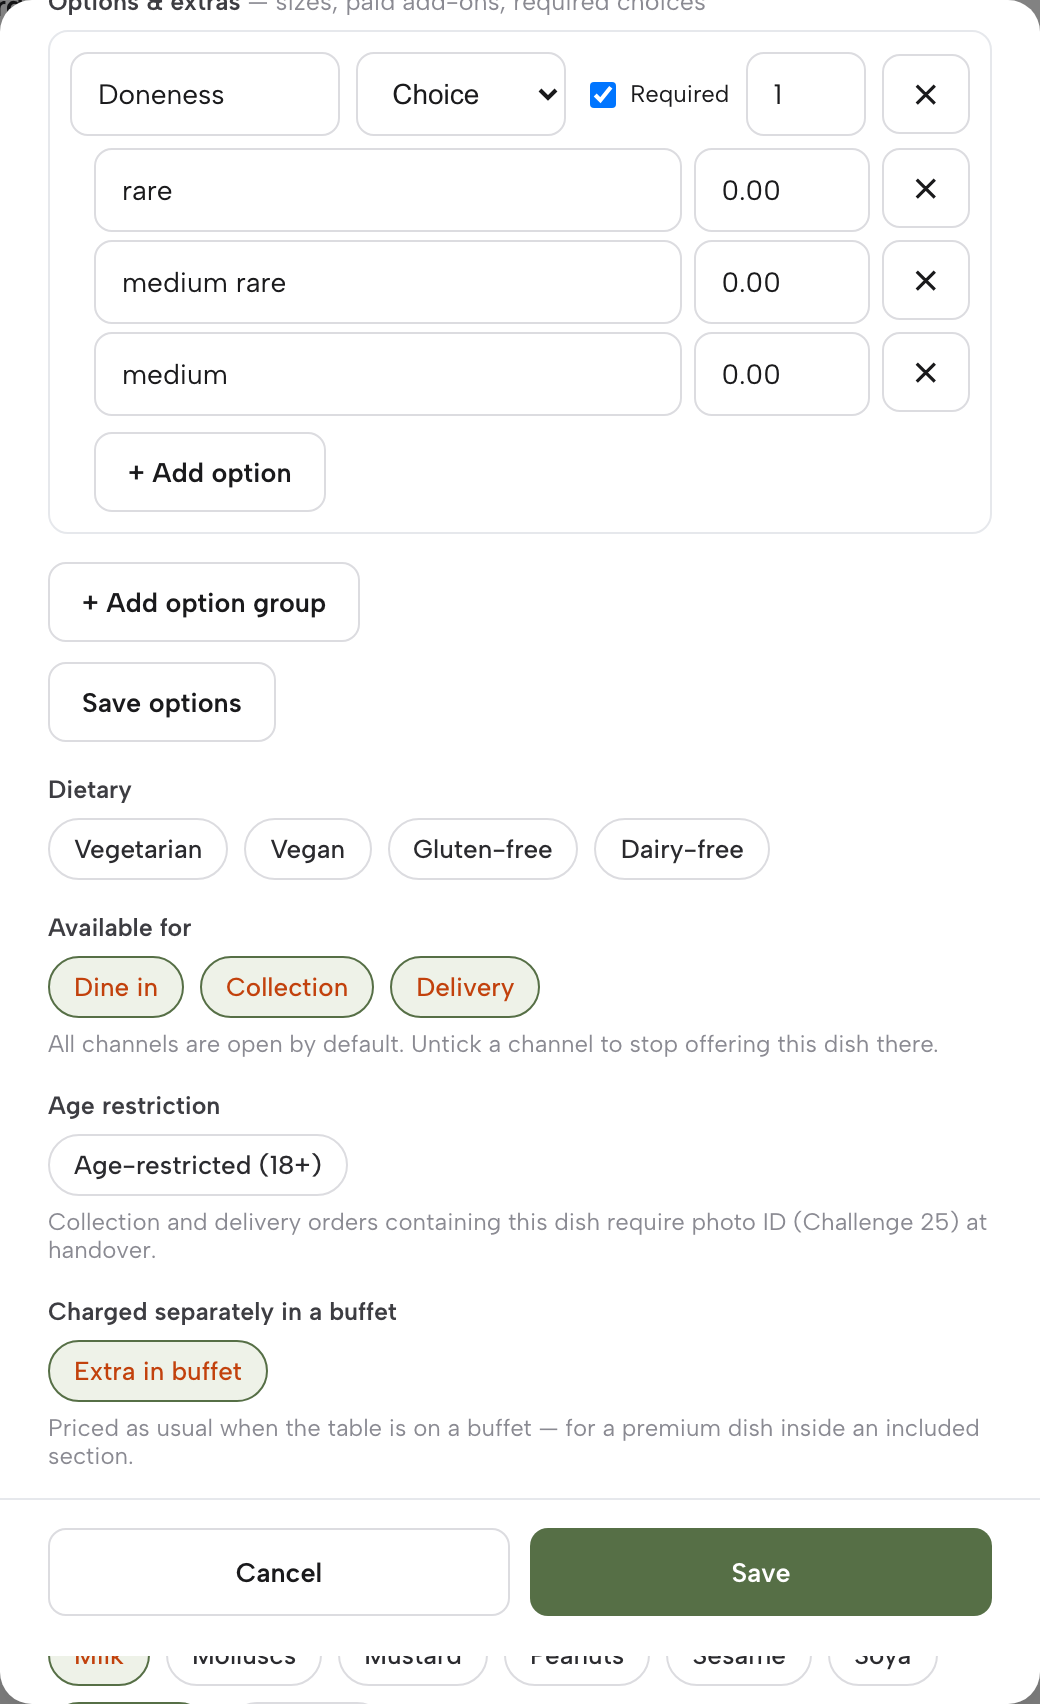
Below that, every menu section defaults to Included, with its own cap box (max per person per round); flip any section — a seafood board, drinks, desserts — to Charged separately and it prices exactly like any other dish instead of coming out of the buffet. A rules note prints above the menu, an extras note sits by the charged-separately sections, and a wastage note shows in the basket and on the kitchen ticket. A single dish inside an included section — a lobster, a wagyu cut — can be charged separately on its own from the Menu page: open the dish and switch on Extra in buffet under Charged separately in a buffet.
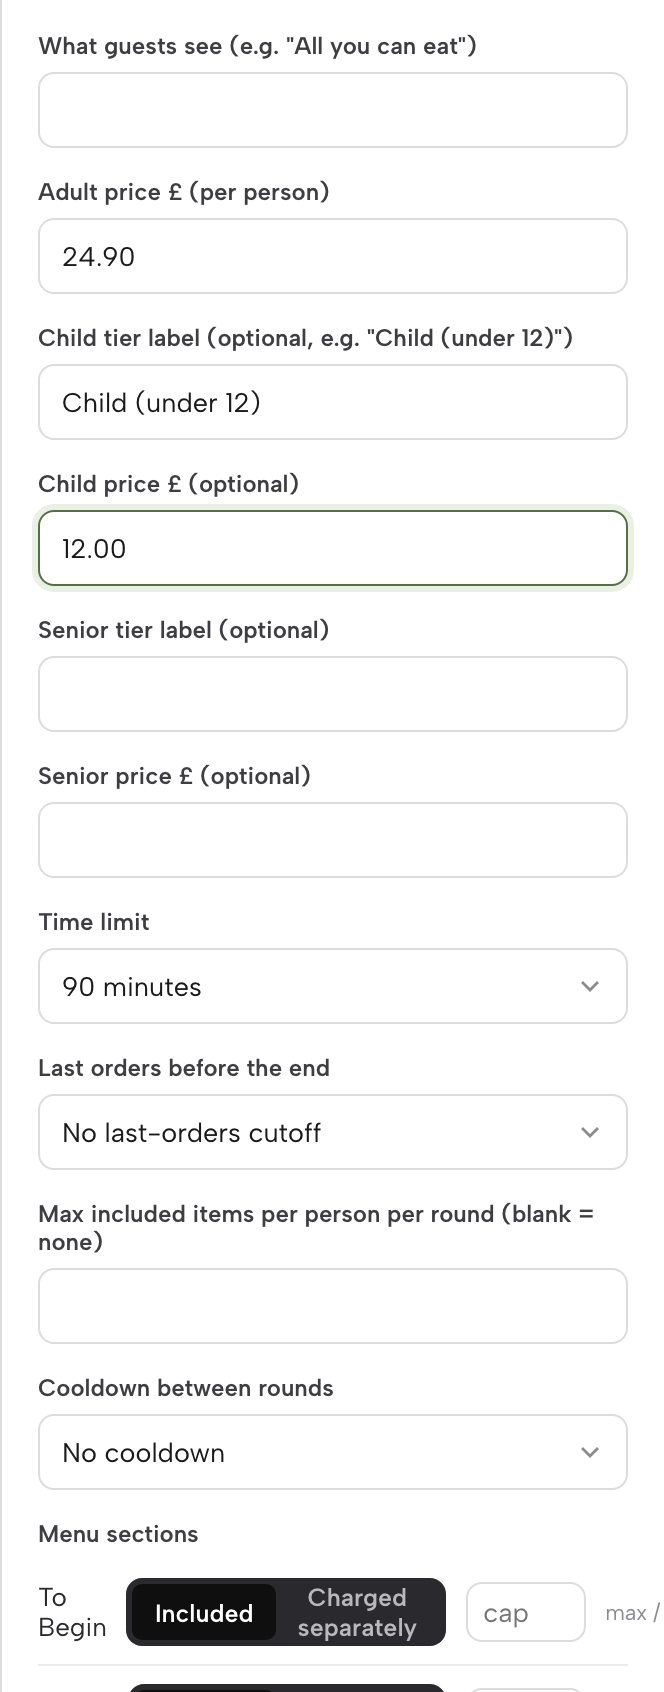
Every one of those numbers starts blank. The price, the time limit, the per-round cap, the cooldown between rounds — none of it is pre-filled toward a particular margin; it's entirely your call, and you can turn the whole thing off again from the same switch.
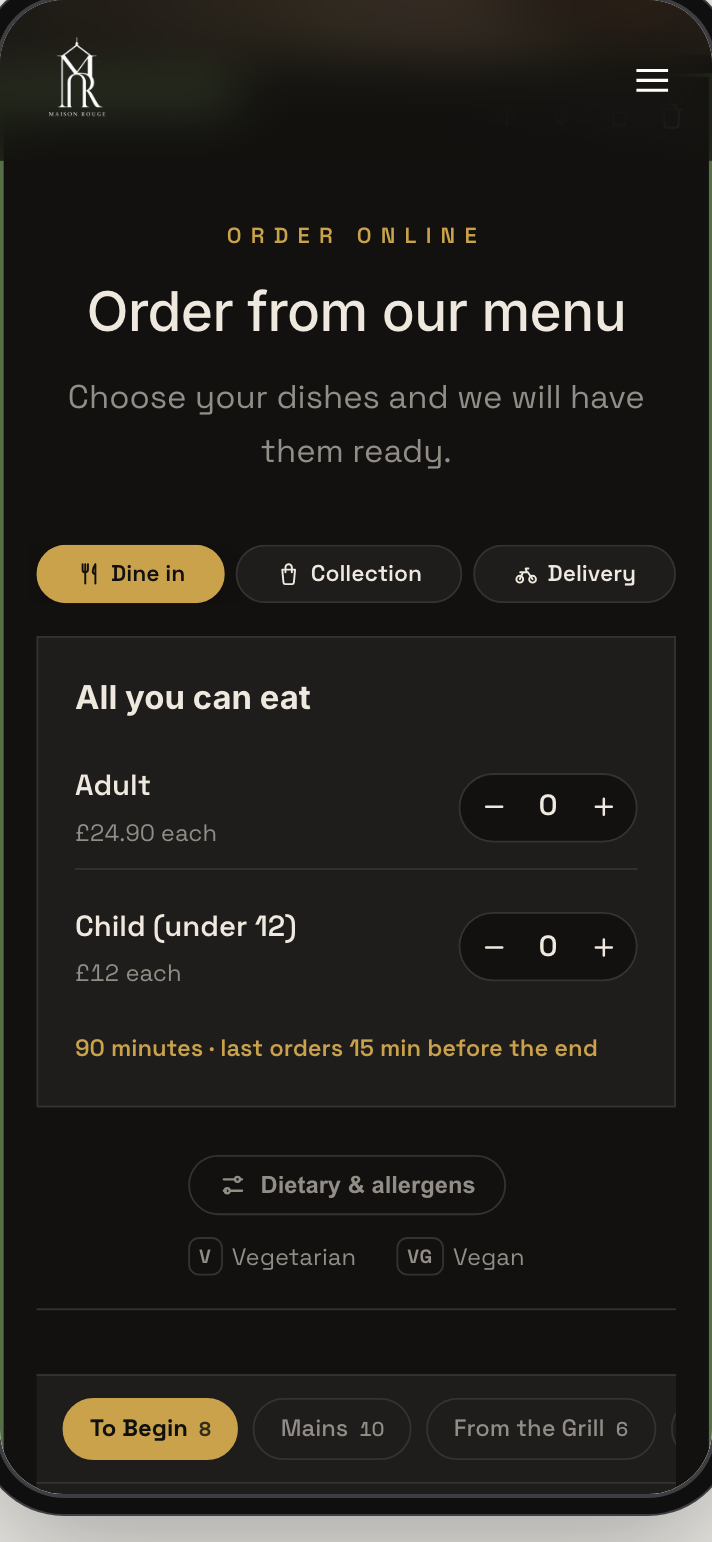
At a table locked to dine-in by its QR code, the ordering widget opens with the buffet panel first: a stepper for each tier — Adults, and Child or Senior where you've set them — the time limit and last-orders line, and your rules note. Dishes in included sections carry an Included badge and cost nothing in the basket; charged-separately sections keep their usual price. Guests order as many rounds as the cap and cooldown allow, and the whole table is billed once, paid at the restaurant, when they're done.
Charge a single dish separately
A premium dish inside an included section — a lobster, a wagyu cut — doesn't have to come free just because everything around it does. Open the dish on your Menu page, switch on Extra in buffet (under Charged separately in a buffet) in its editor, and click Save: from then on that one dish prices exactly as it always did, on any buffet the table is on, and it never counts toward its section's per-round cap.
The change shows on both sides of the counter straight away. Your item list marks the dish with an Extra in buffet tag next to its name, so nobody on the floor has to remember the exception by heart. Guests never see an Included badge on it — just its usual price, sitting in the buffet menu the same way a charged-separately section's dishes do.
How a buffet table orders in rounds
At a table locked to dine-in by its QR code, the ordering widget still opens on the buffet panel first — the tiers, the time limit, the last-orders line, your rules note — exactly as set out in Step 02, before anyone has ordered a thing. The table's first order is what opens the session: the panel swaps itself for Round 1 · 43 min left · last orders in 28 min, counting down against the time limit and last-orders cutoff you chose.
From the confirmation screen, guests get a plain way back in — tap Order another round, add whatever they want next, and send. Each round lands on Orders as its own order, carrying a Buffet · Round 2 of #…’s session line so nobody mistakes a second helping for a brand-new table. The same per-round caps from Step 02 apply every time, and once last orders has passed the panel says so instead of offering another round.
However many rounds it takes, the table settles one bill at the end, paid at the restaurant.
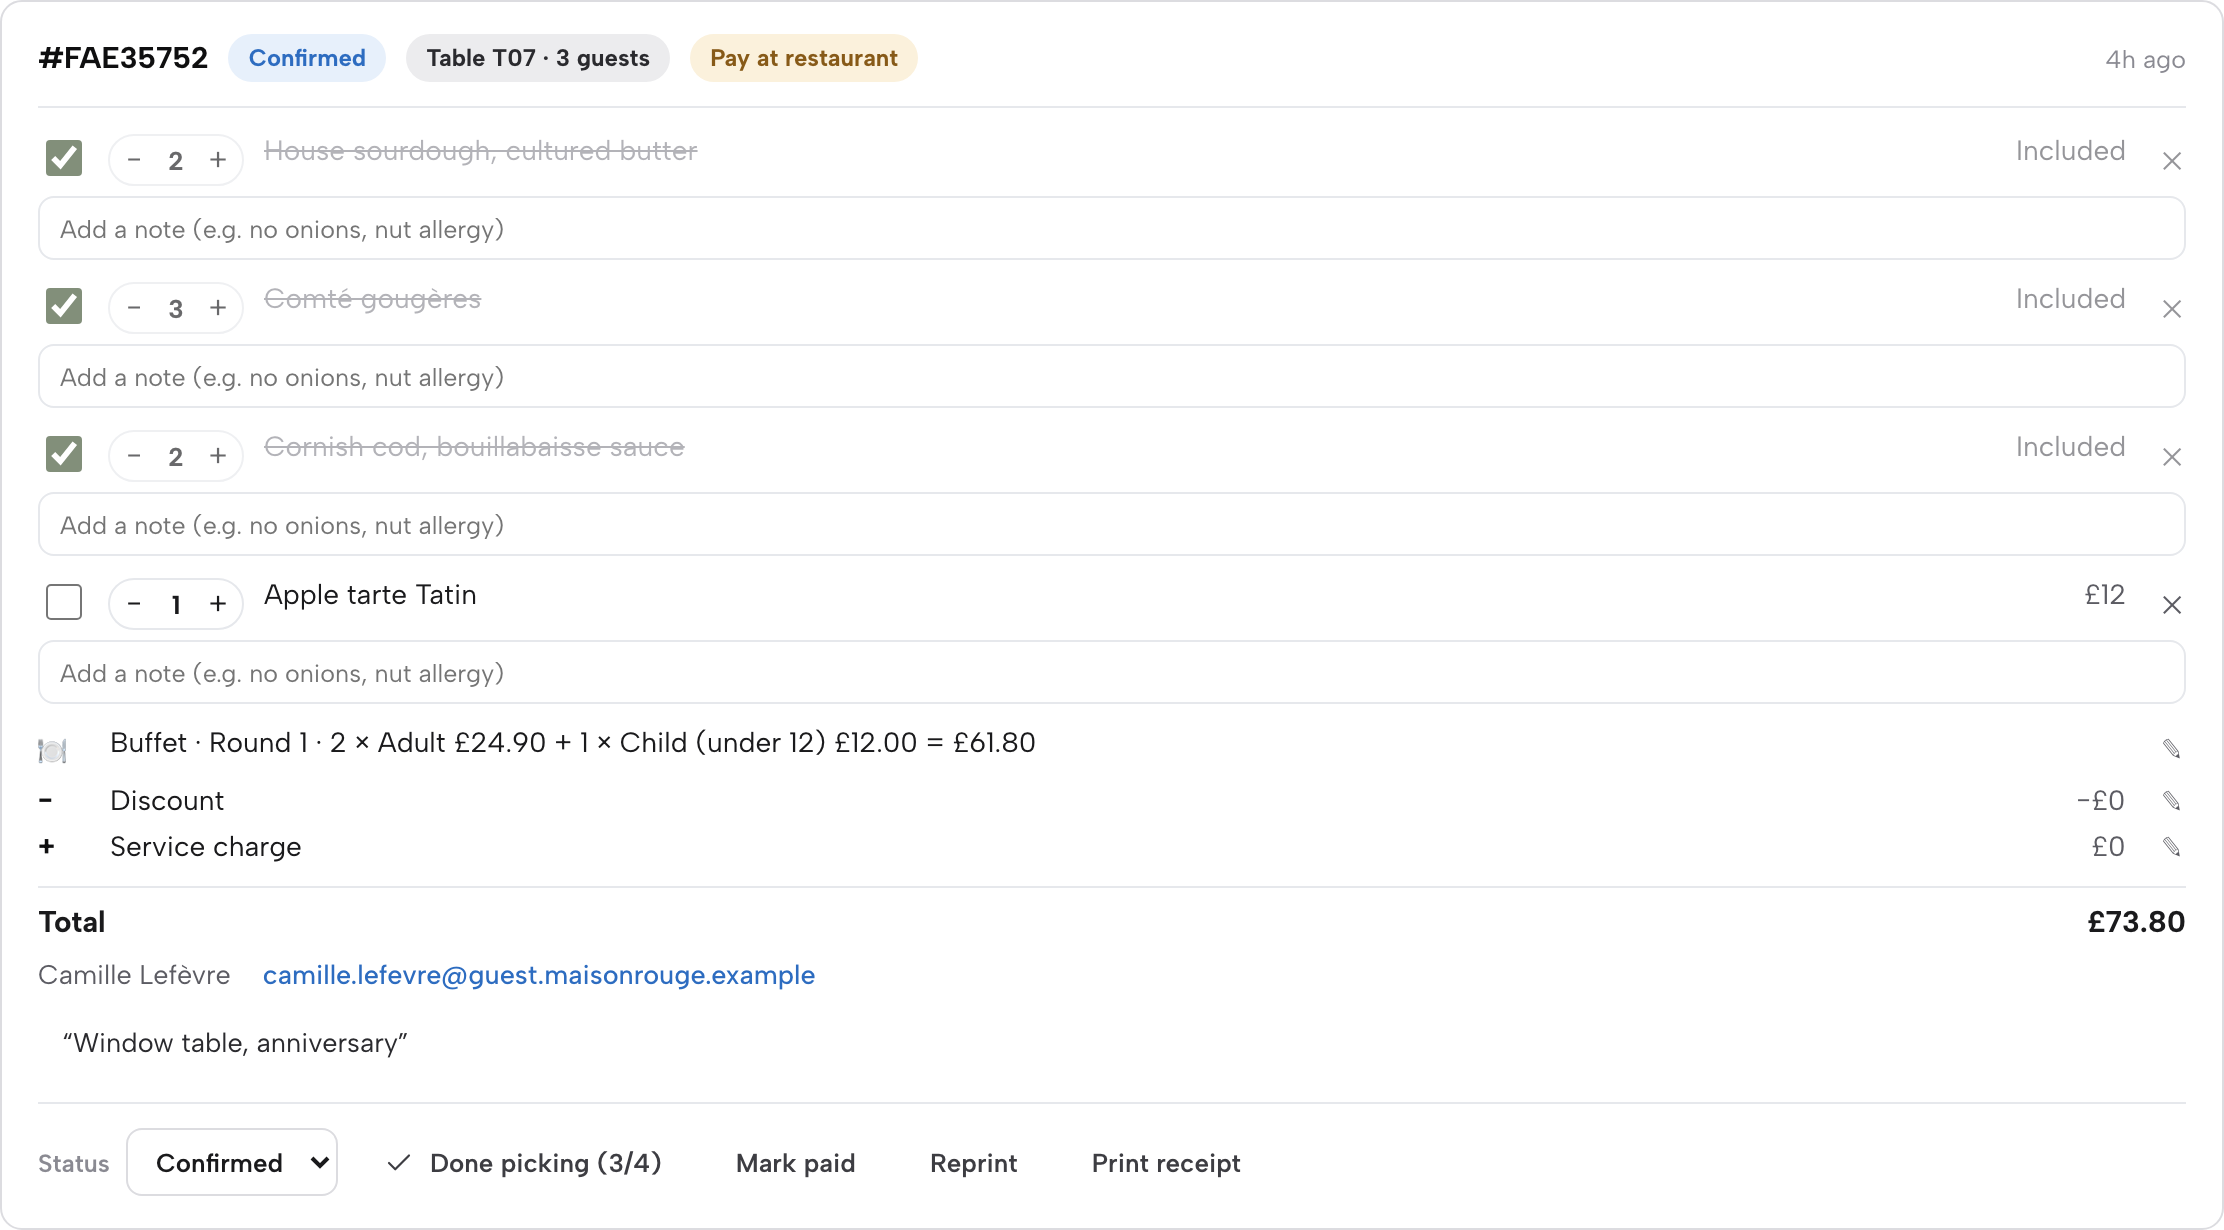
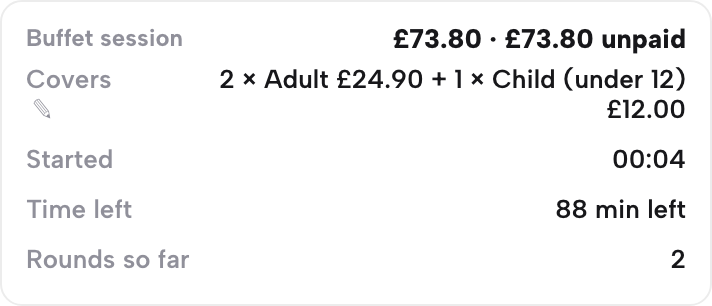
Staff see the whole session from both sides of the floor. Orders shows the buffet line on every round's card, with a pencil to re-price the covers if the party changes size mid-meal — see FIG. 04. On Service, tap the table and its sheet gets a Buffet session block: the running total, covers, when it started, time left and how many rounds so far. Every round sits beneath it on the same sheet, with Mark paid for when the table settles.
What a guest orders through
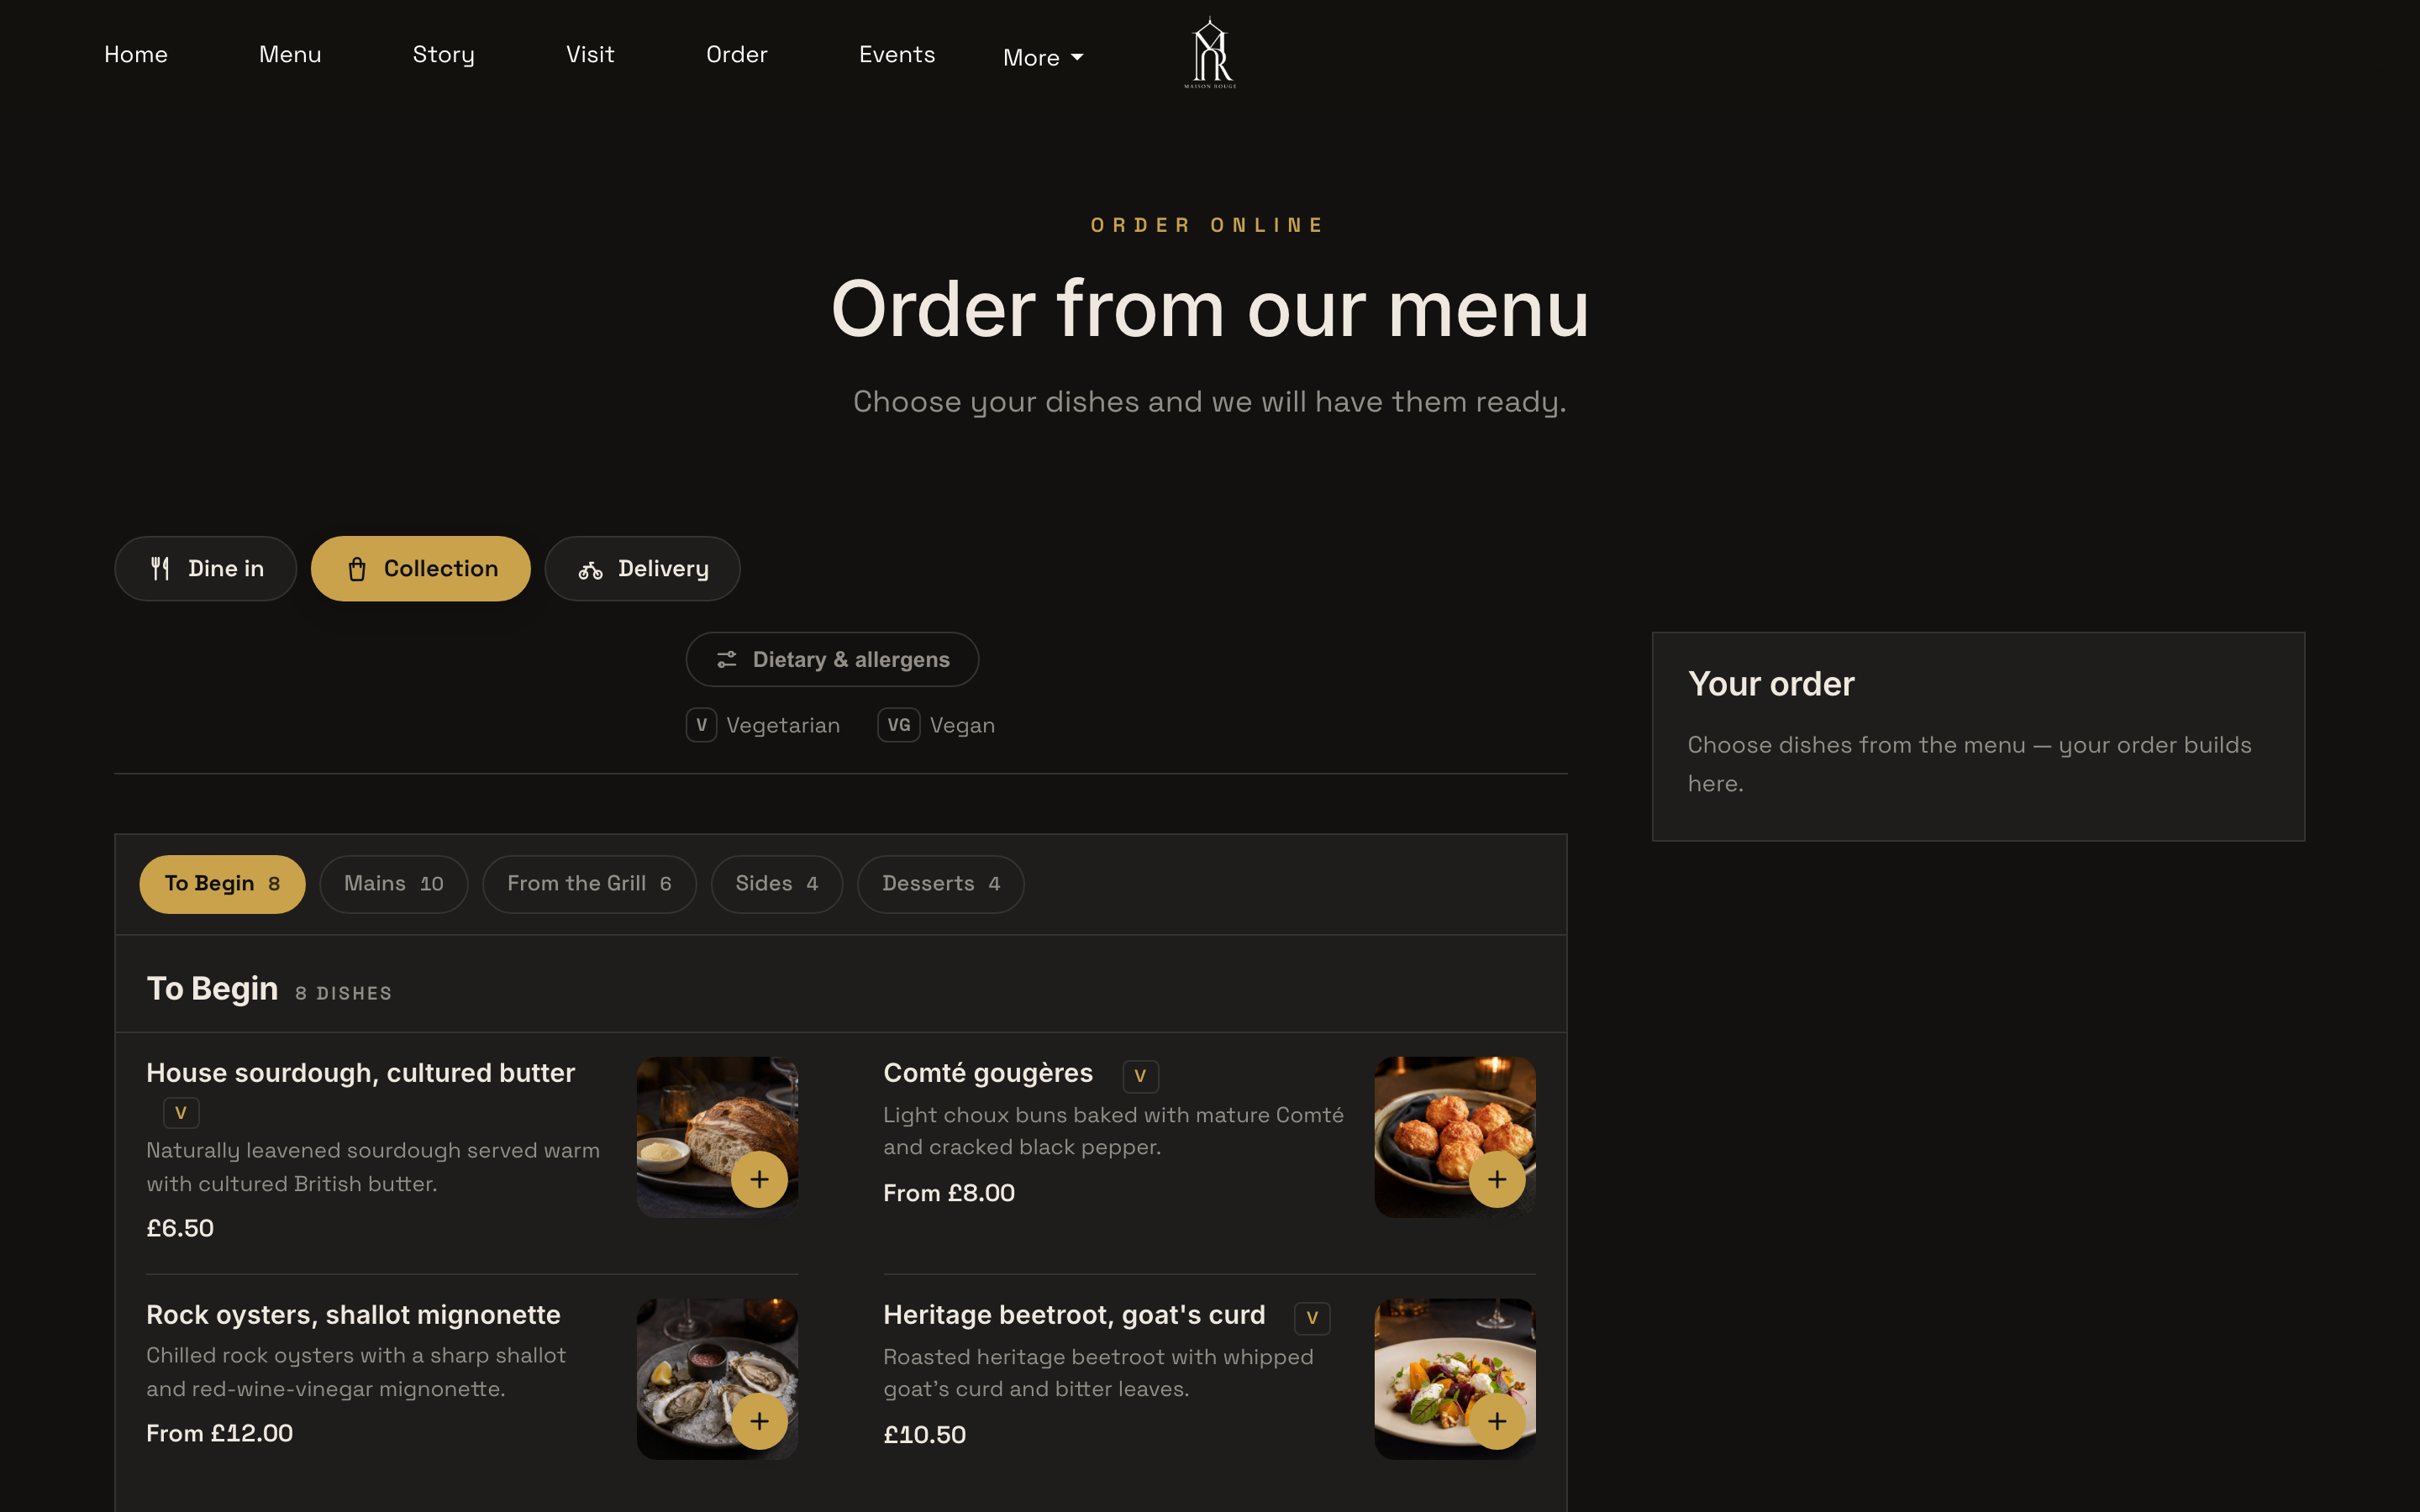
With more than one channel switched on, the widget opens on a full-width question before it shows a single dish: How would you like to order? — Dine in, Collection or Delivery, each its own button with an icon. A QR code on a table skips this entirely and locks the page straight to dine-in.

Pick one and the same choice pins itself as a compact bar at the top of the page. Dishes list exactly like your Menu page — sections, photos, dietary chips — with a Dietary & allergens filter and a running Your order panel that stays in view beside the menu.
A plain dish steps straight into the basket. One with sizes or required extras opens an add-to-order sheet instead — a photo carousel, the description, every option group, and a note field, so nothing about the dish is decided badly in a hurry.
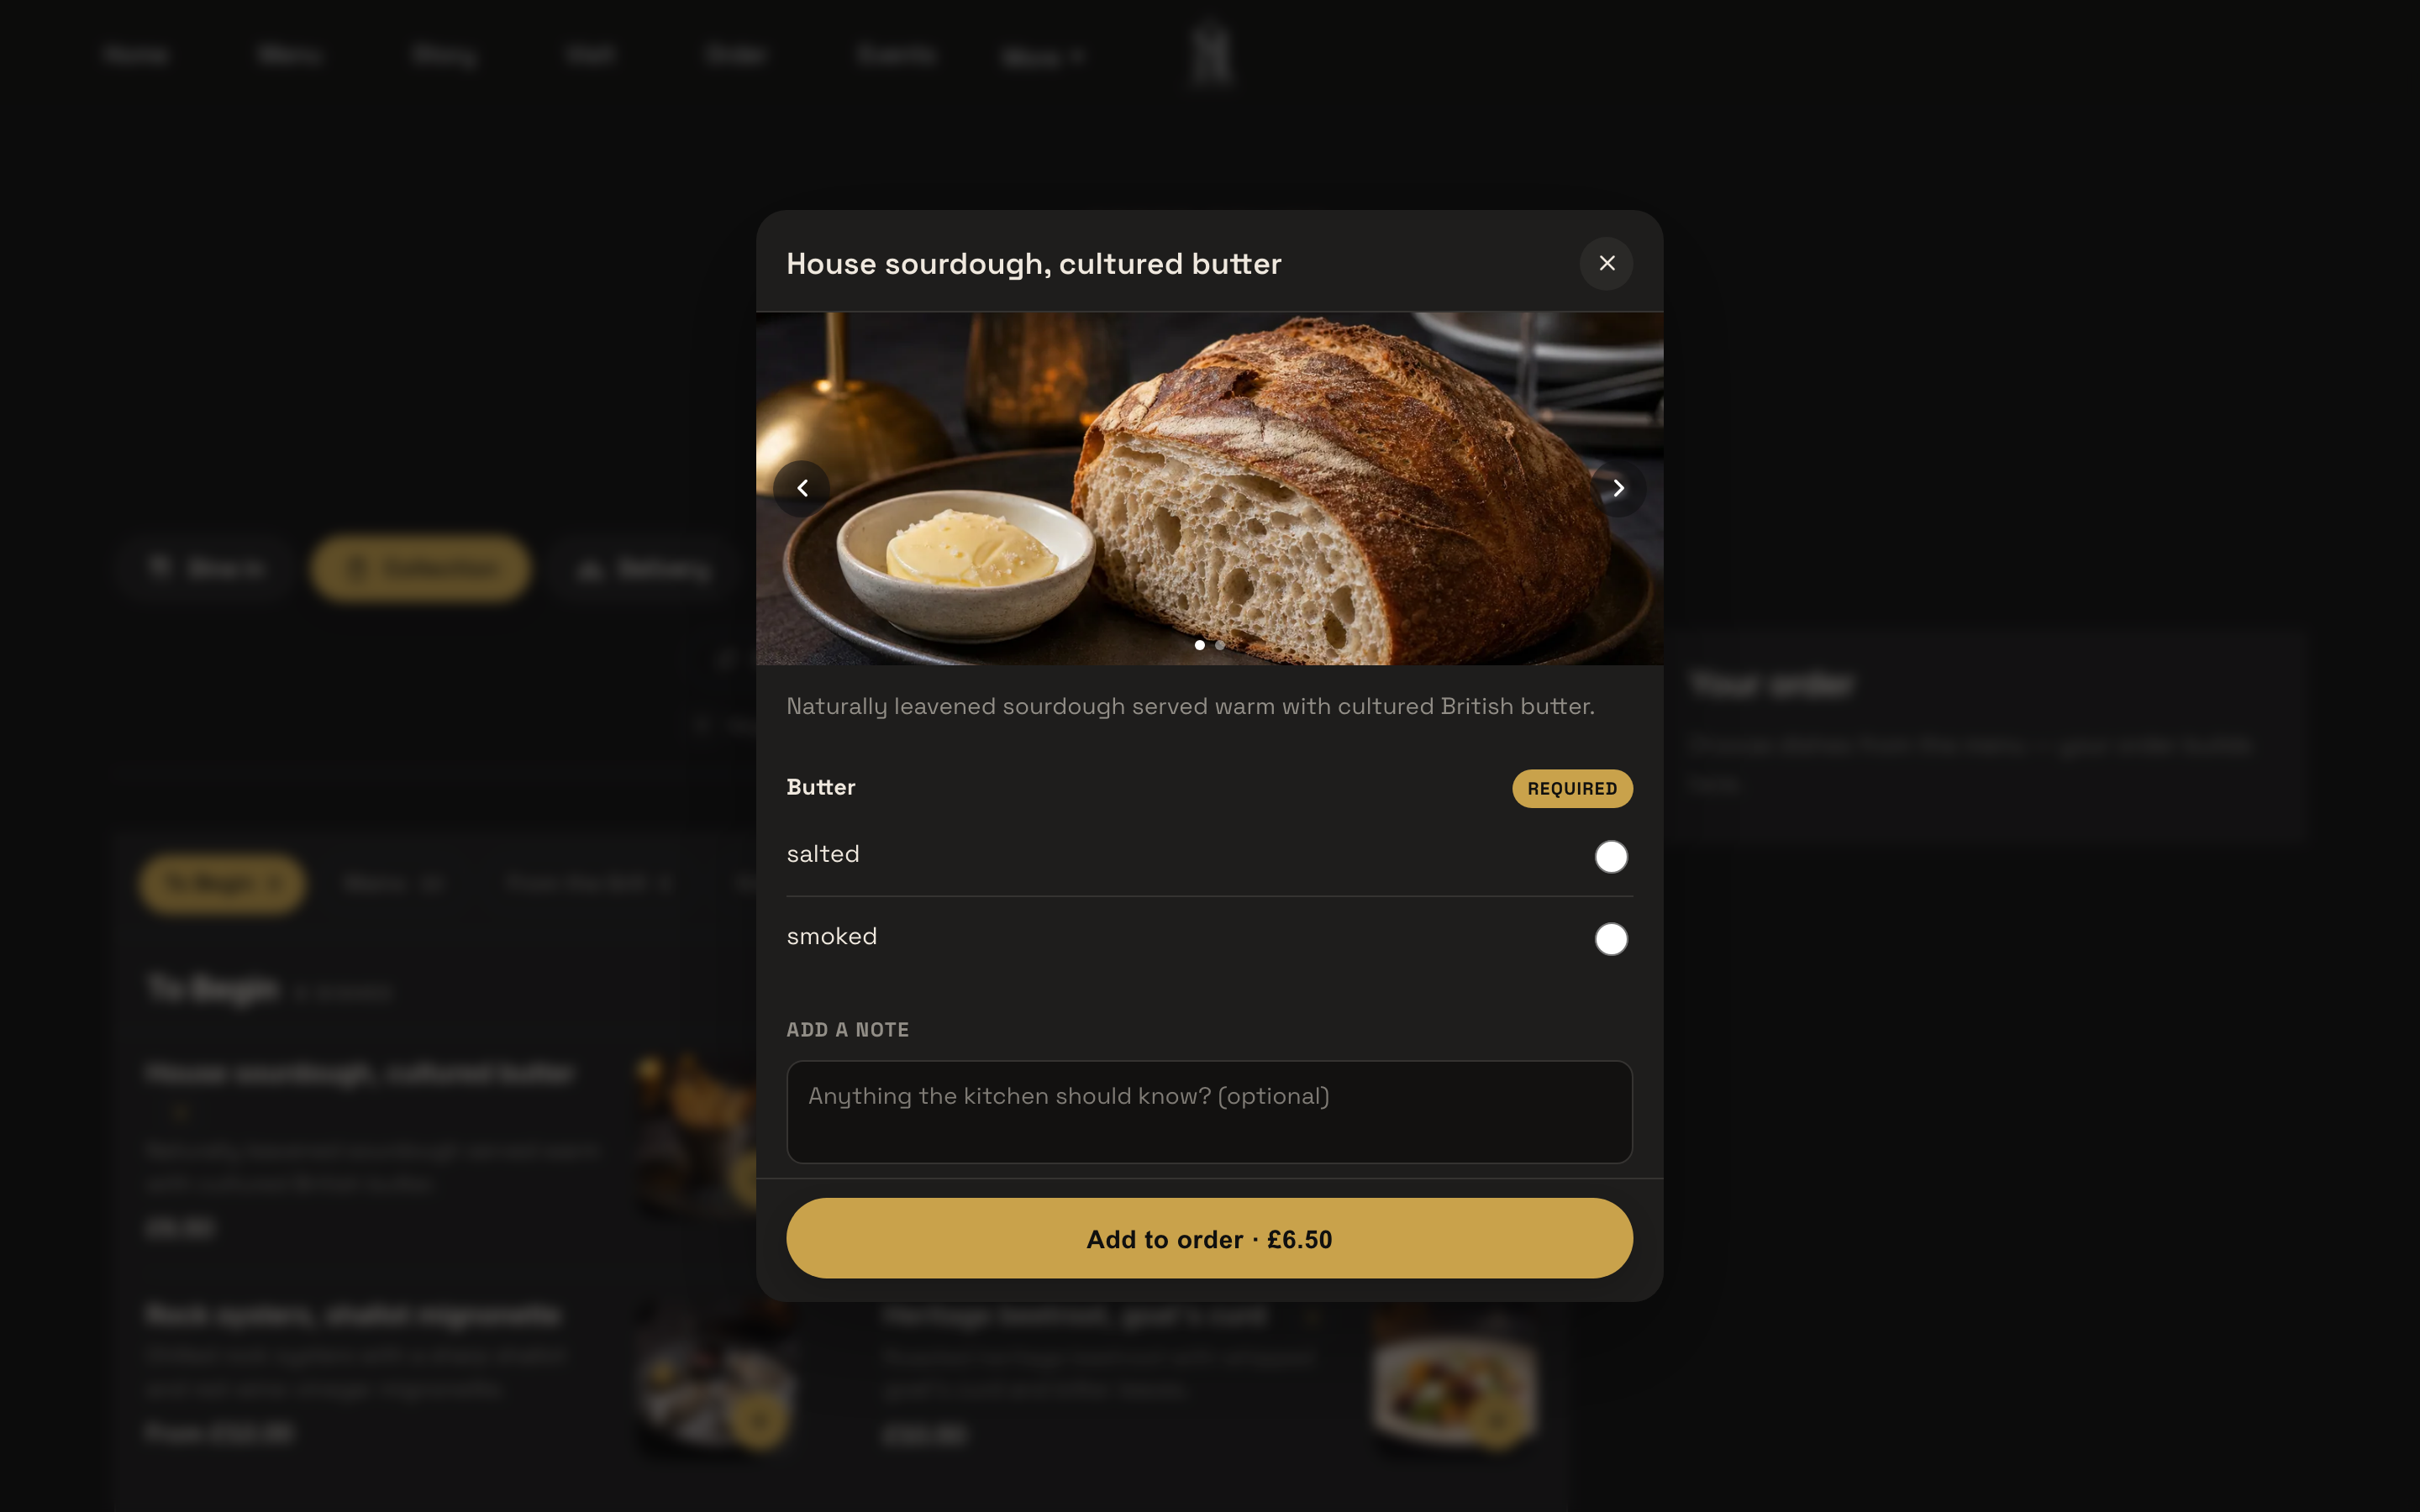
The basket itself lists lines with quantity steppers and a running total; on a phone it's a pinned View basket bar that scrolls up to the same panel. The basket panel then asks for Payment — Pay now by card or Pay at the restaurant when both are configured — followed by the details the channel needs: a Table number and How many people? for dine-in; name, phone and email for collection; and for delivery a Postcode with Find address, the address lines, town and Delivery notes. An optional Email me offers & news box, a line agreeing to your Terms and Conditions and a Notes for the whole order box come last, then Place order. Below the minimum order it says exactly how much more to add.
After a guest orders
Submitting swaps the page for an Order received screen with the order reference and, once it's live, a status tracker that checks in every 20 seconds and relabels its steps for the channel: Received → Accepted → In the kitchen, then Ready to collect → Collected for collection, On its way → Served for dine-in, or Ready → Out for delivery → Delivered for delivery. If an order is cancelled, the tracker steps aside for a plain note asking the guest to call if that's unexpected. Whatever ready-time note you set in Step 01 prints underneath it — that's the last thing the guest sees before the kitchen takes over.
Where orders land
Open Orders in the sidebar. The header states the day at a glance — a line like 17 in progress · 300 recent — a Sound on toggle for the new-order chime, and Export CSV. Five tabs filter the list: In progress, New, Done, Cancelled, All, each with a live count, and the browser tab itself picks up a (N) prefix while anything sits in New.
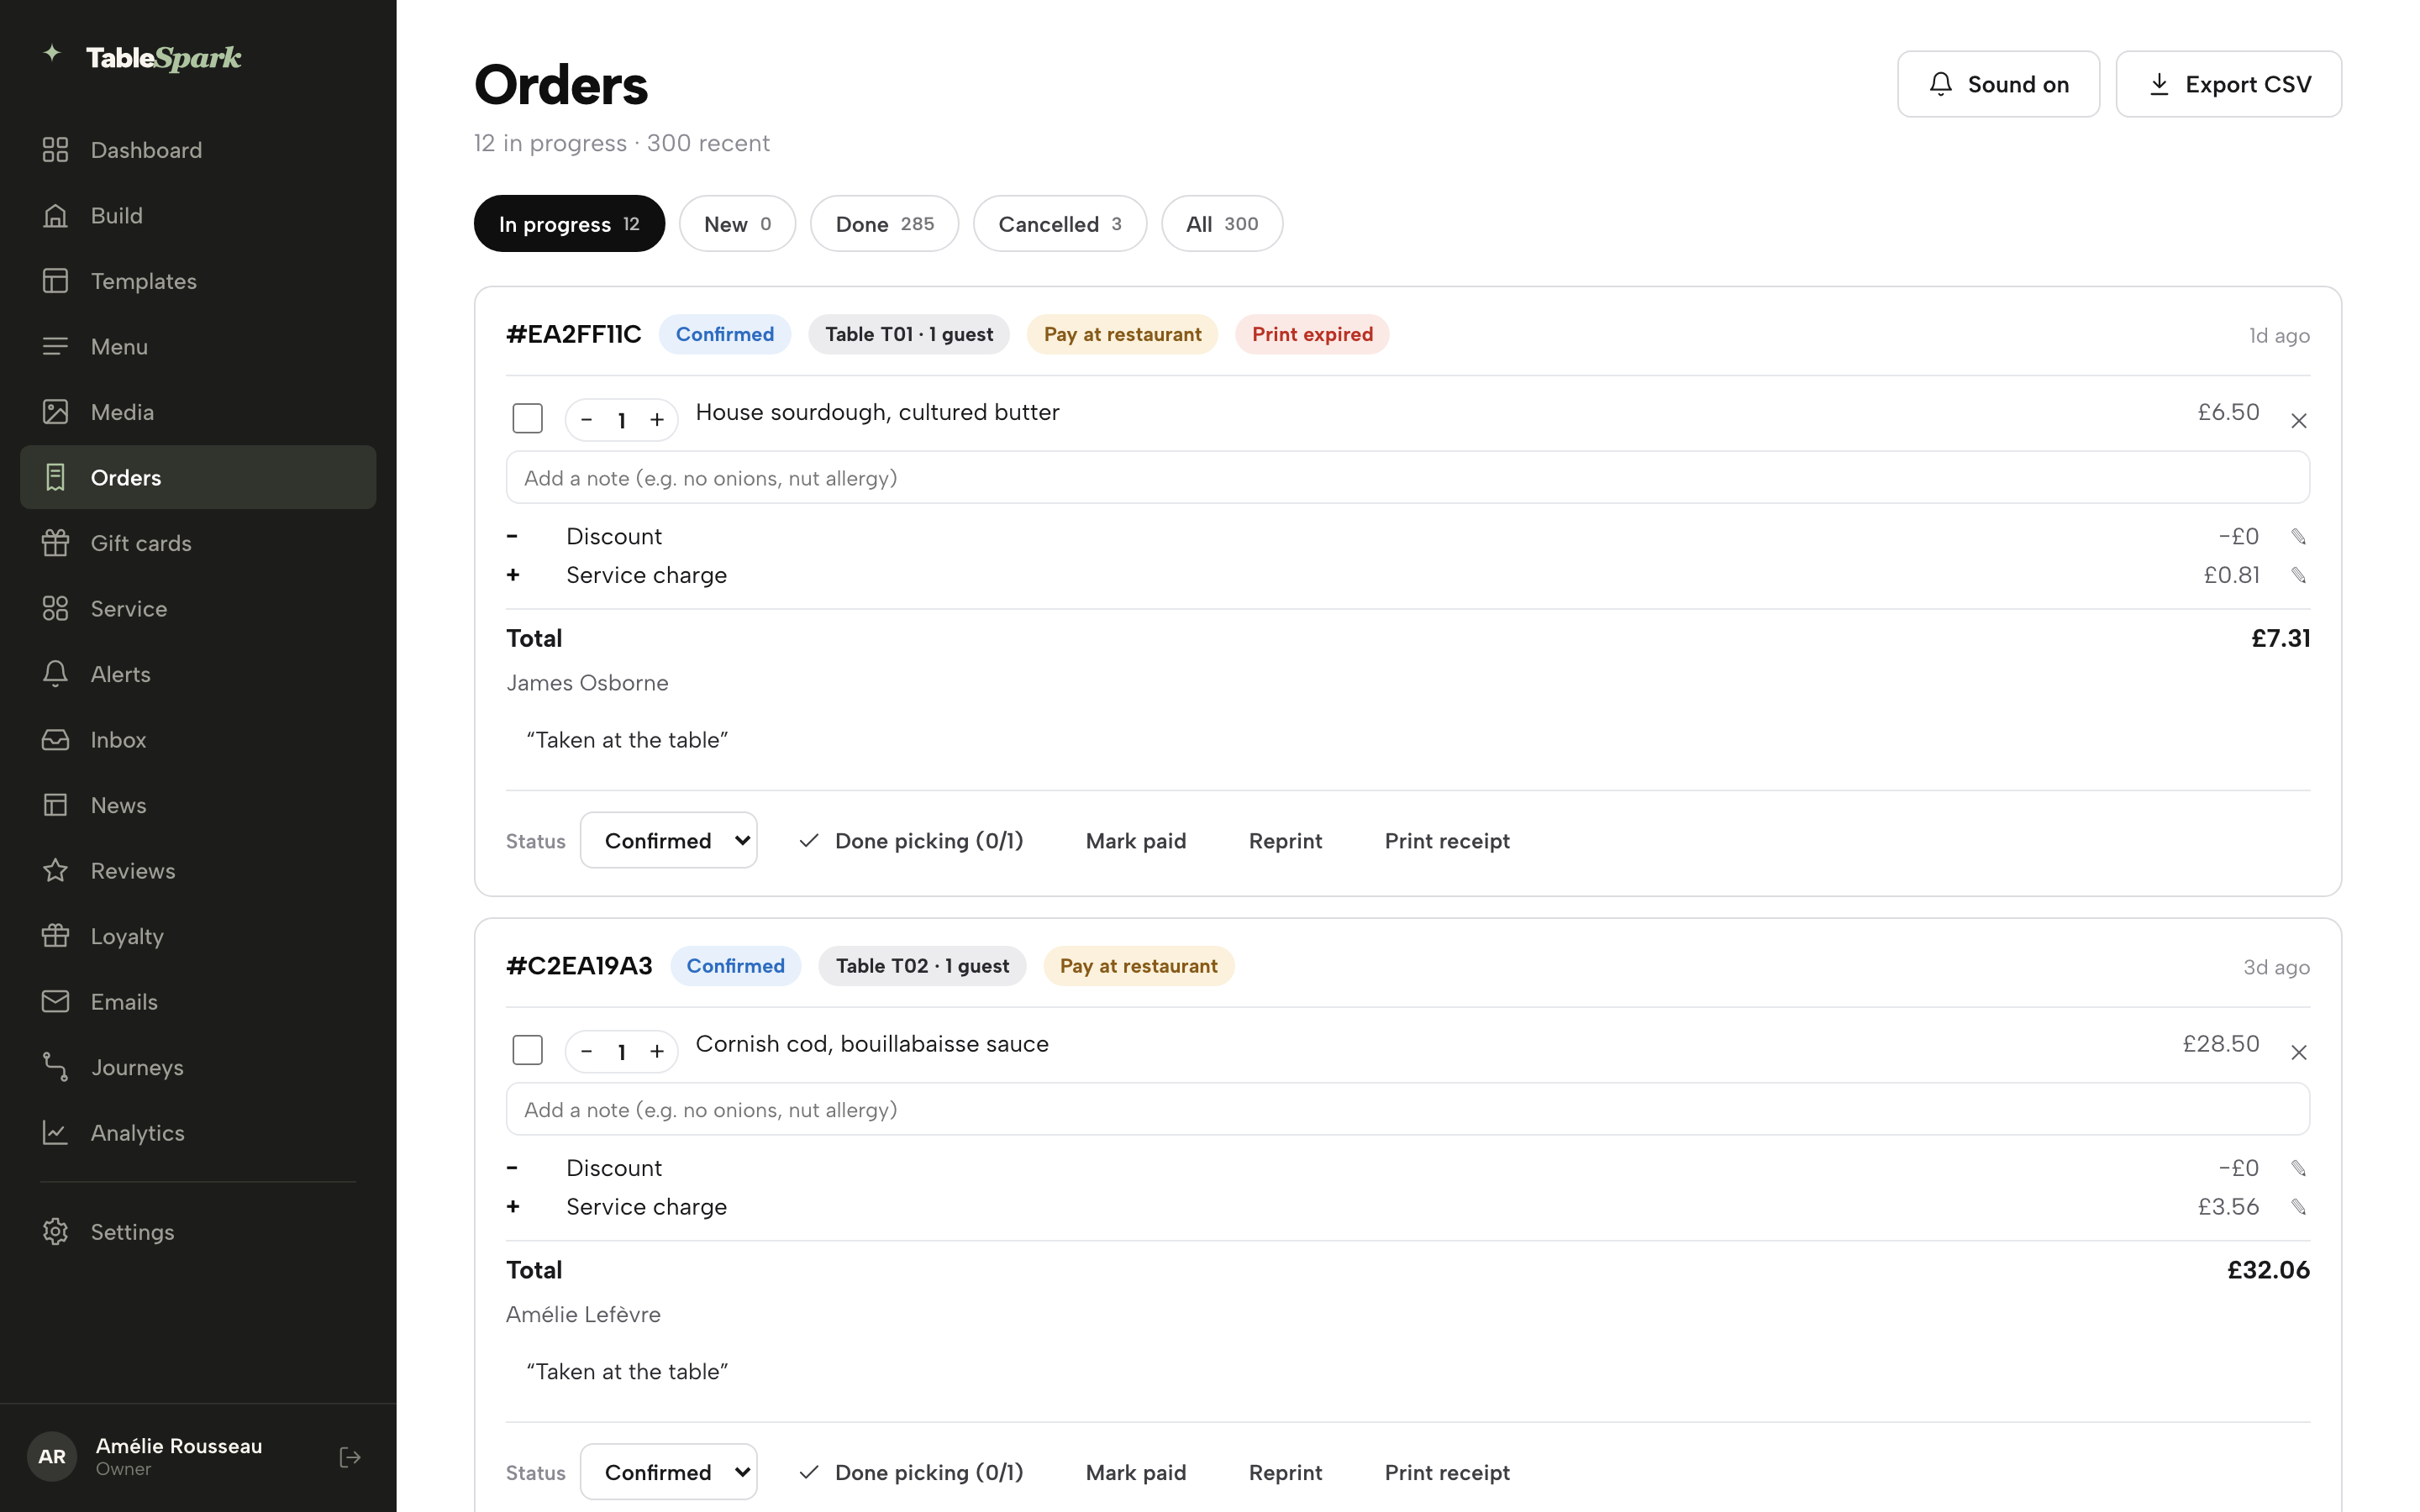
Each card leads with a reference, a status chip, where the order's going (a table and party size, Collection, or Delivery), and a payment chip — Paid, Pay at restaurant, Refunded, Part refunded or Awaiting payment. Kitchen-printer status (like Print expired) shows here too, once you've connected a printer — that's the full subject of the next guide, Printing and receipts. Below that, every line item with its price (or Included on a buffet), a note field, and — while the order is still active — a prepared checkbox and quantity steppers. The guest’s name sits under the total, with their phone and email when they gave them. The list refreshes itself: a realtime nudge plus a 30-second poll underneath it, so the screen never needs a manual reload mid-service.
Move an order through its stages
The Status dropdown only ever offers the moves an order can actually make from where it is — New moves to Confirmed, Confirmed to Preparing, Preparing to Ready, and Ready on to Done (delivery orders pick up an extra Out for delivery step first). Cancel is always on offer until an order is Done. Once an order reaches Done or Cancelled the dropdown is there but disabled — there's nowhere left for it to go.
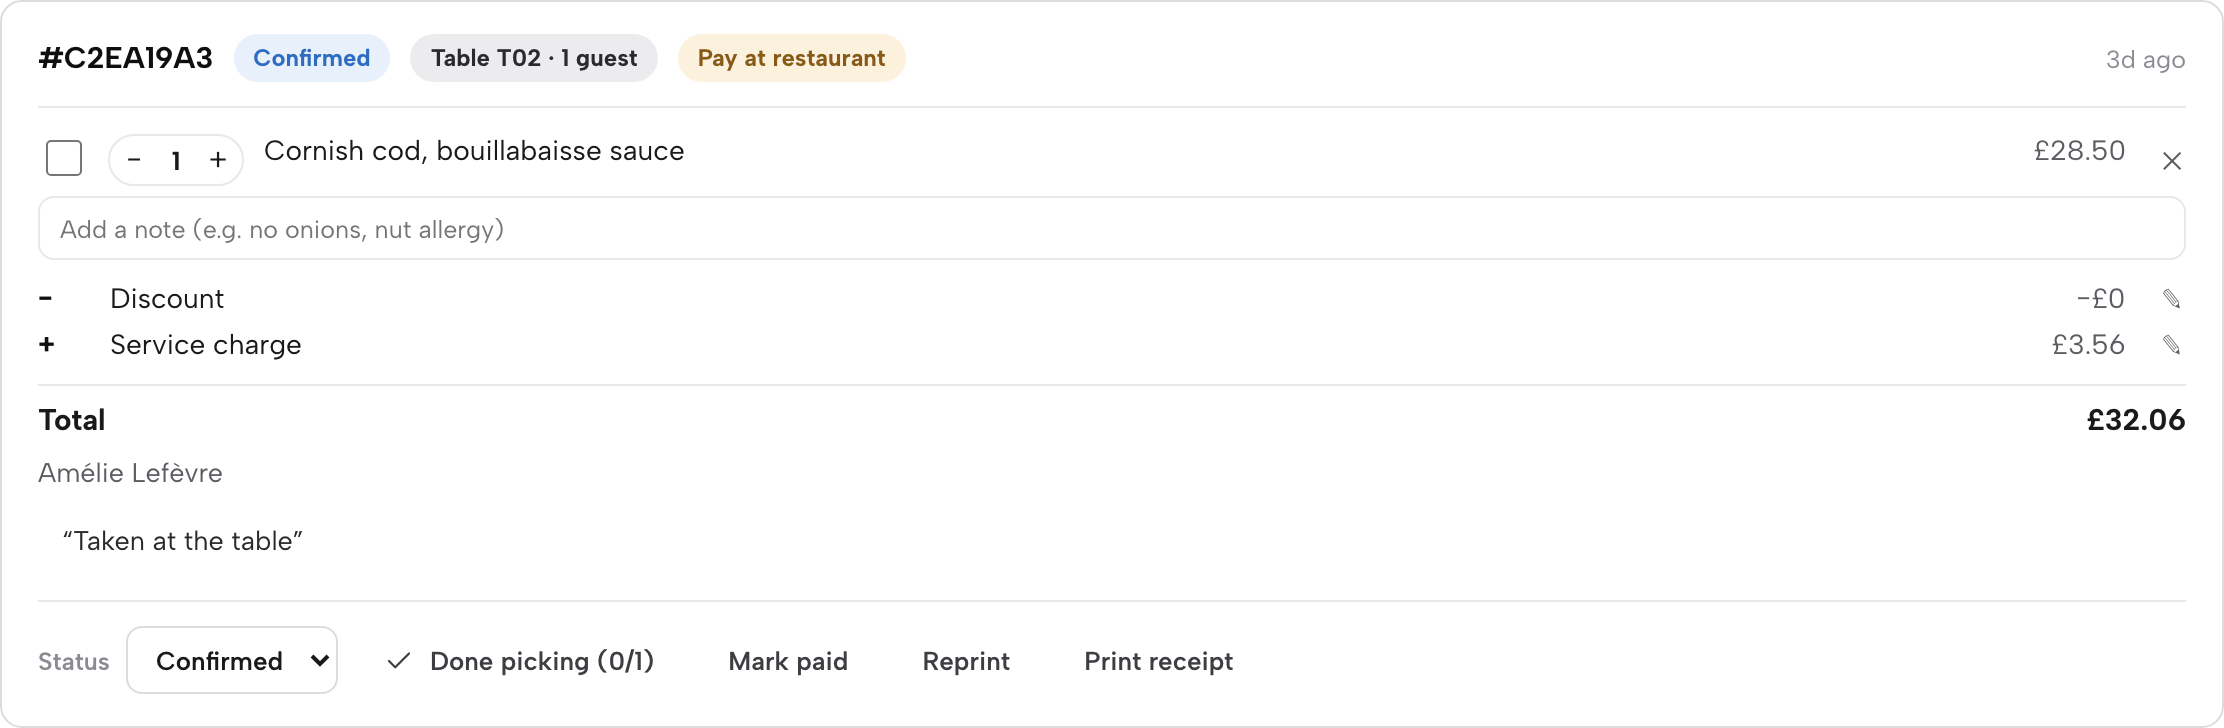
Done picking ticks every remaining dish as prepared in one tap and sends the order straight to Ready — or tick dishes off one at a time as the kitchen finishes them; the button relabels itself All prepared → Ready once every line is ticked. Each line also carries −/+ steppers, an editable note, and a way to cancel or restore it, and the order's Discount and Service charge lines are editable too — click the pencil and the discount editor offers 5%, 10%, 20% or a typed £ amount, a Reason that shows on the order, Save and Remove; the service charge offers None, 10%, 12.5% or your own figure. Both lock once the order is paid.
Table, delivery and collection details
What a card shows beyond the dishes depends on the channel. A dine-in order carries its table and party size as a chip — Table T02 · 1 guest in the screenshots above — drawn from the table list you've set up, or free text if you haven't. Collection carries nothing extra beyond the cut-off it was placed against. Delivery shows the full address, postcode and any delivery notes on the card, plus a delivery-fee line on the total where one applies — and because delivery is Stripe Pay only, there's never a "pay on arrival" ambiguity to sort out with the driver.
How guests pay, and marking an order paid
Card payments for online orders run through your own connected Stripe account. Every transaction is processed independently by Stripe and paid out directly to your bank — no third party, including TableSpark, can access or hold the funds, and we charge no commission. Stripe's standard card fees apply. That's the whole arrangement: connect Stripe once under Settings → Payments, and every card payment from here on settles the same way.
An order paid by card online has no manual paid/unpaid switch — Stripe is the source of truth for it, and the payment chip and any refund line say everything there is to say. A pay-at-restaurant order gets a Mark paid button once cash or a card machine has settled it (visible in FIG. 10 above), and Mark unpaid appears in its place if you need to undo that (FIG. 12), and where you've registered a Stripe Terminal card reader, a Charge on card reader button starts a reader payment on the order directly.
Refund an order
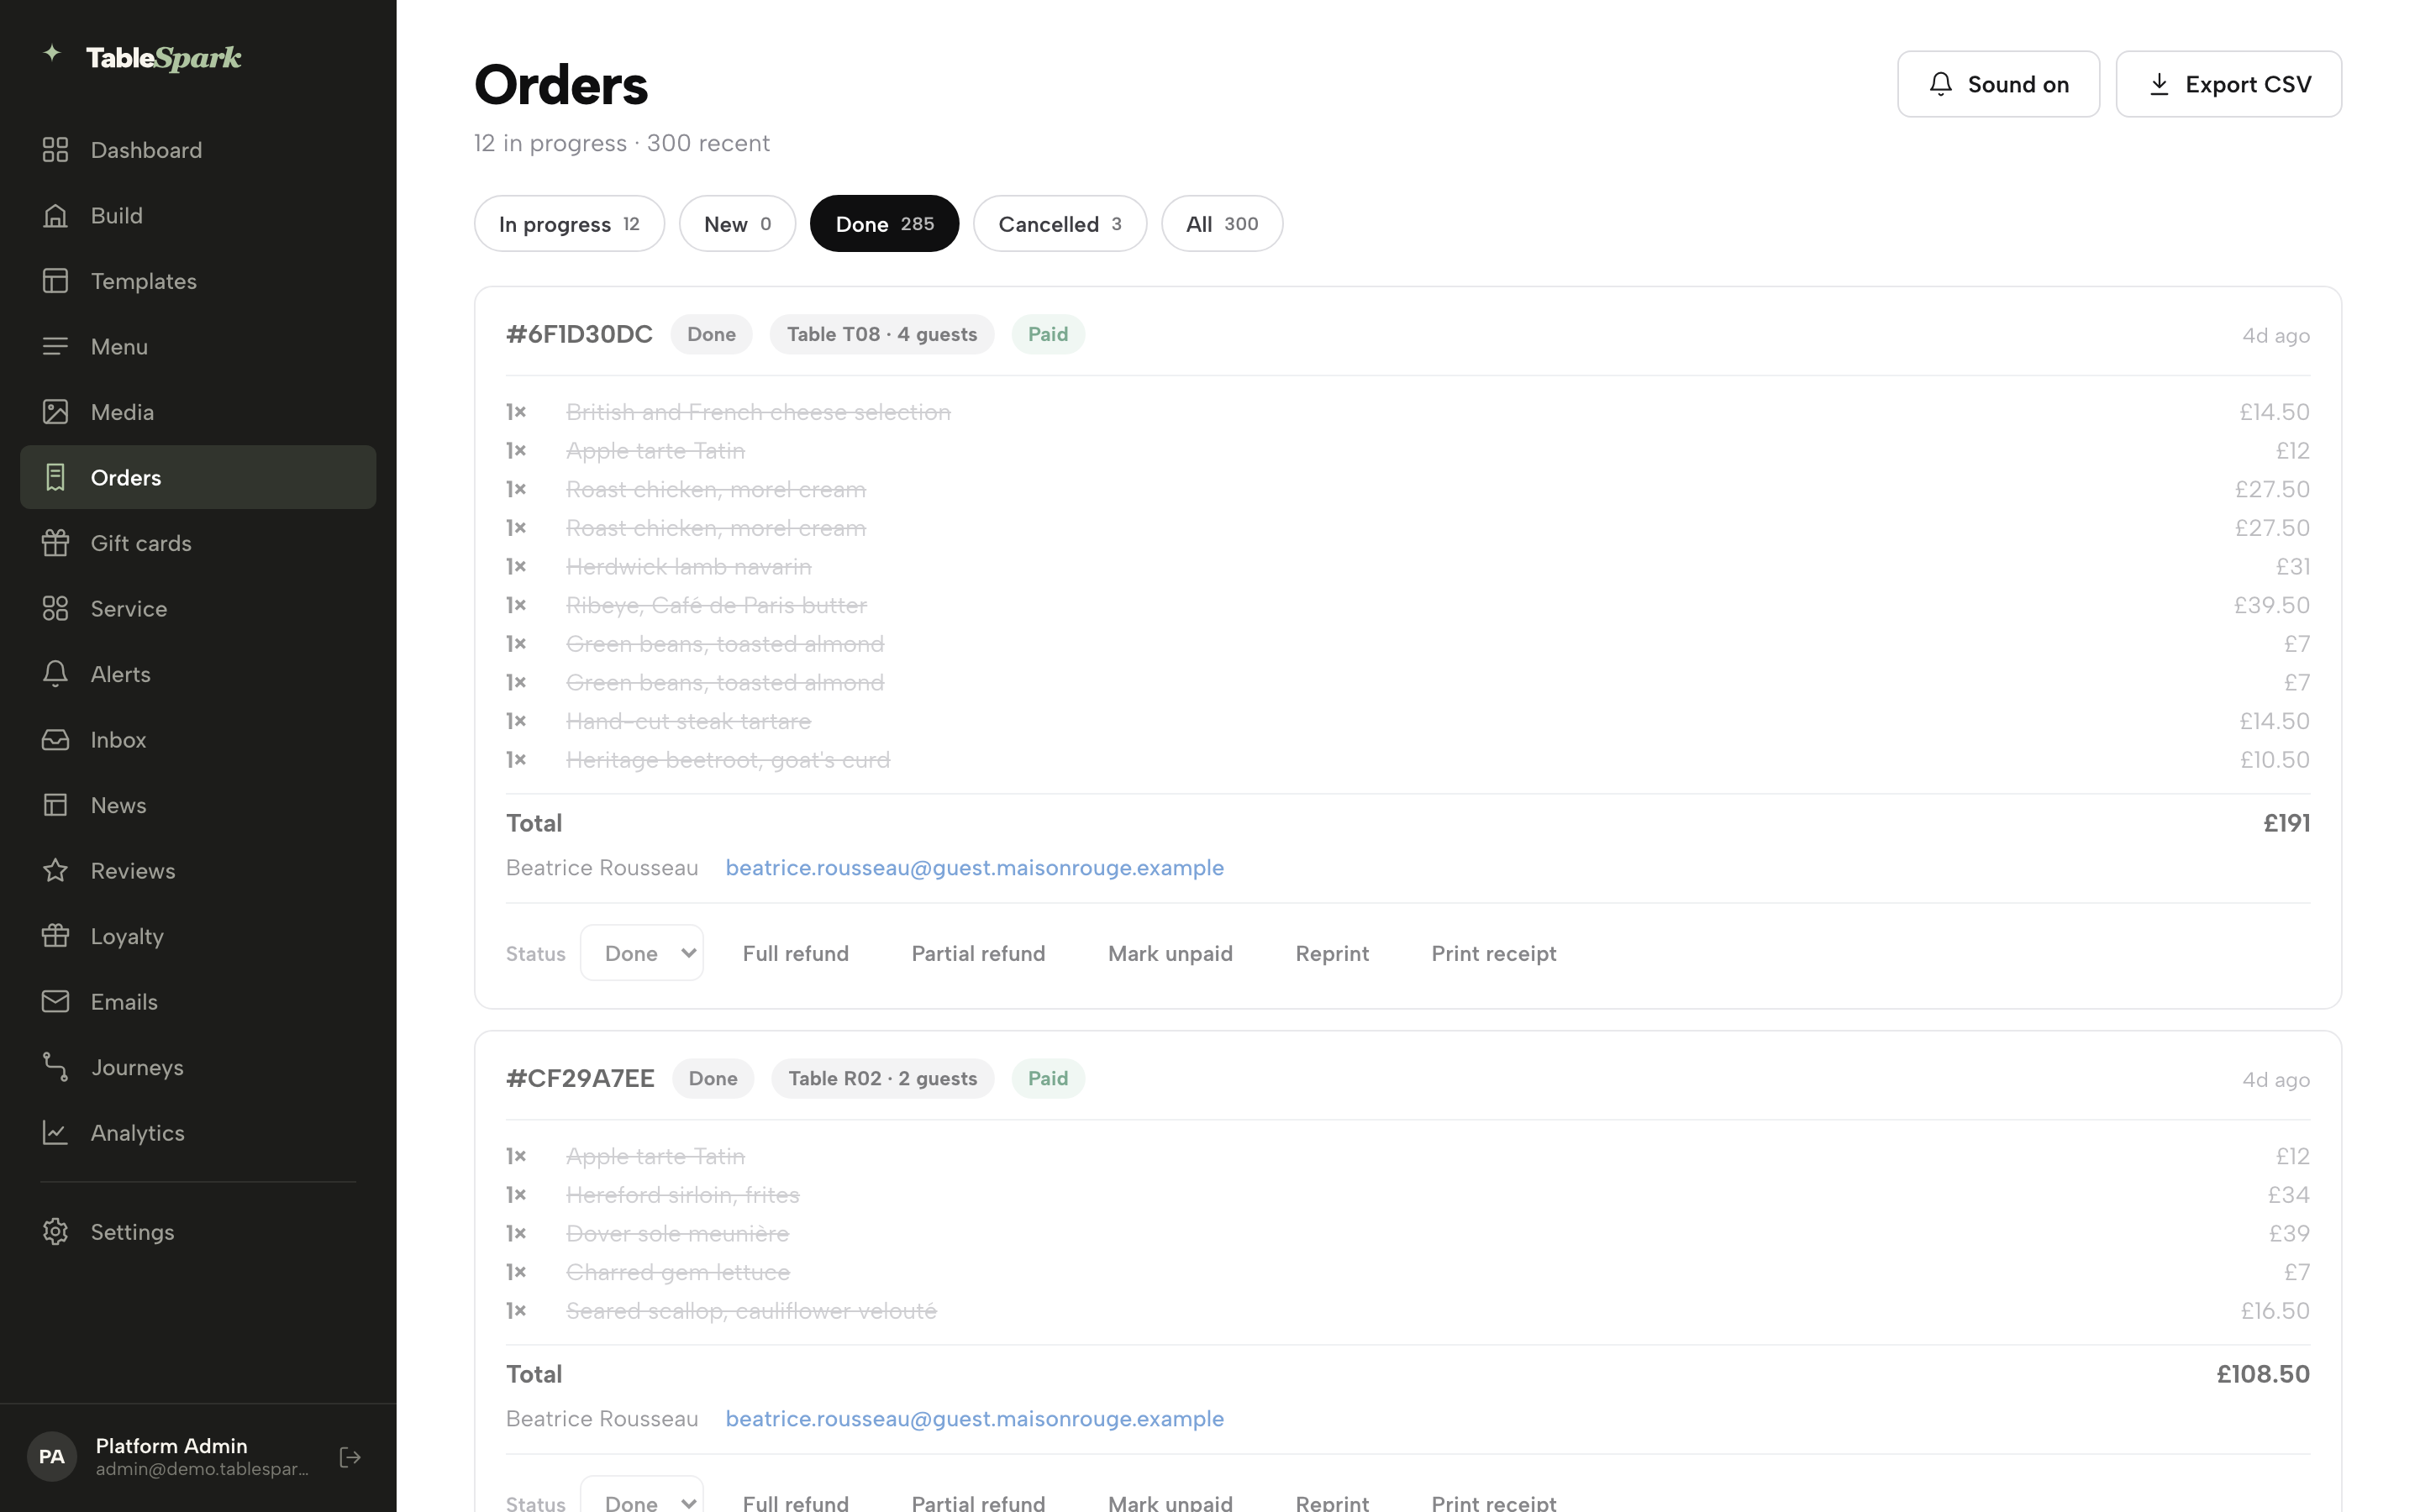
Any Paid or Partially refunded order carries Full refund and Partial refund. Full refund arms on the first press — it turns into Confirm refund? for a few seconds — and fires on the second; Partial refund asks for an amount up to whatever's left owing. An online order refunds itself straight through Stripe; a pay-at-restaurant order records an offline refund instead, since there's no card to reverse.
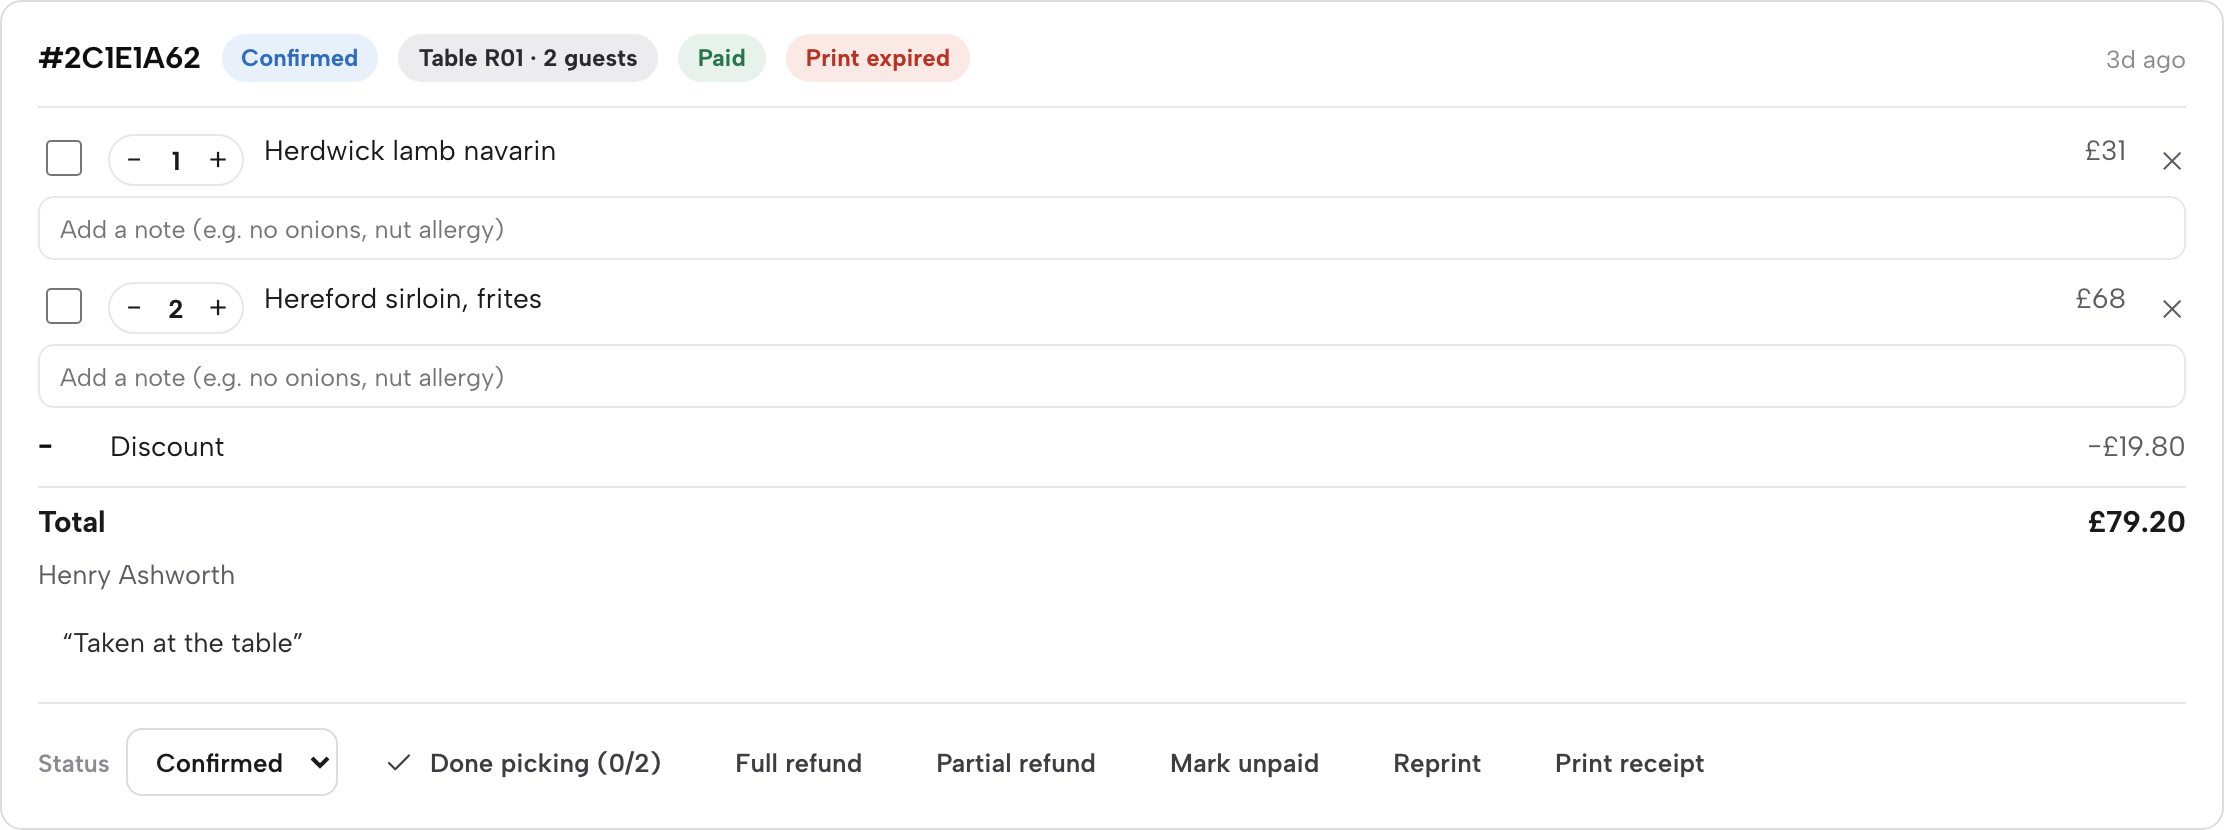
Choosing Cancelled on a paid order asks you to confirm first and refunds the guest in full as part of cancelling, and a Refunded so far line appears under the total the moment any refund lands. Refunding is owner-only, checked on the server regardless of who's signed in — and reprinting a kitchen ticket or a guest's VAT receipt, the two buttons sitting quietly beside Refund on every card, is the full subject of the next guide.
Add the block, publish, and the loop closes itself: a guest orders through the same menu you already built, and the ticket is waiting on Orders before you've finished reading this sentence.
Next · the kitchen side
Next: printers and receipts
Connect a kitchen printer, read a ticket's print status, and hand a guest their VAT receipt.