
A guest never sees your Dashboard, your Inbox or your Menu editor — they see a booking button, a sign-in page, a handful of emails, and, if they come back, an account that already knows them. This guide walks that path in order, so you know exactly what a diner experiences from the moment they click Reserve a table to the moment they spend a gift card. Where a step belongs to a fuller guide of its own — the email templates, the review workflow, the gift-card ledger — this page links straight to the section that covers it.
Your site → /accountNothing to configure
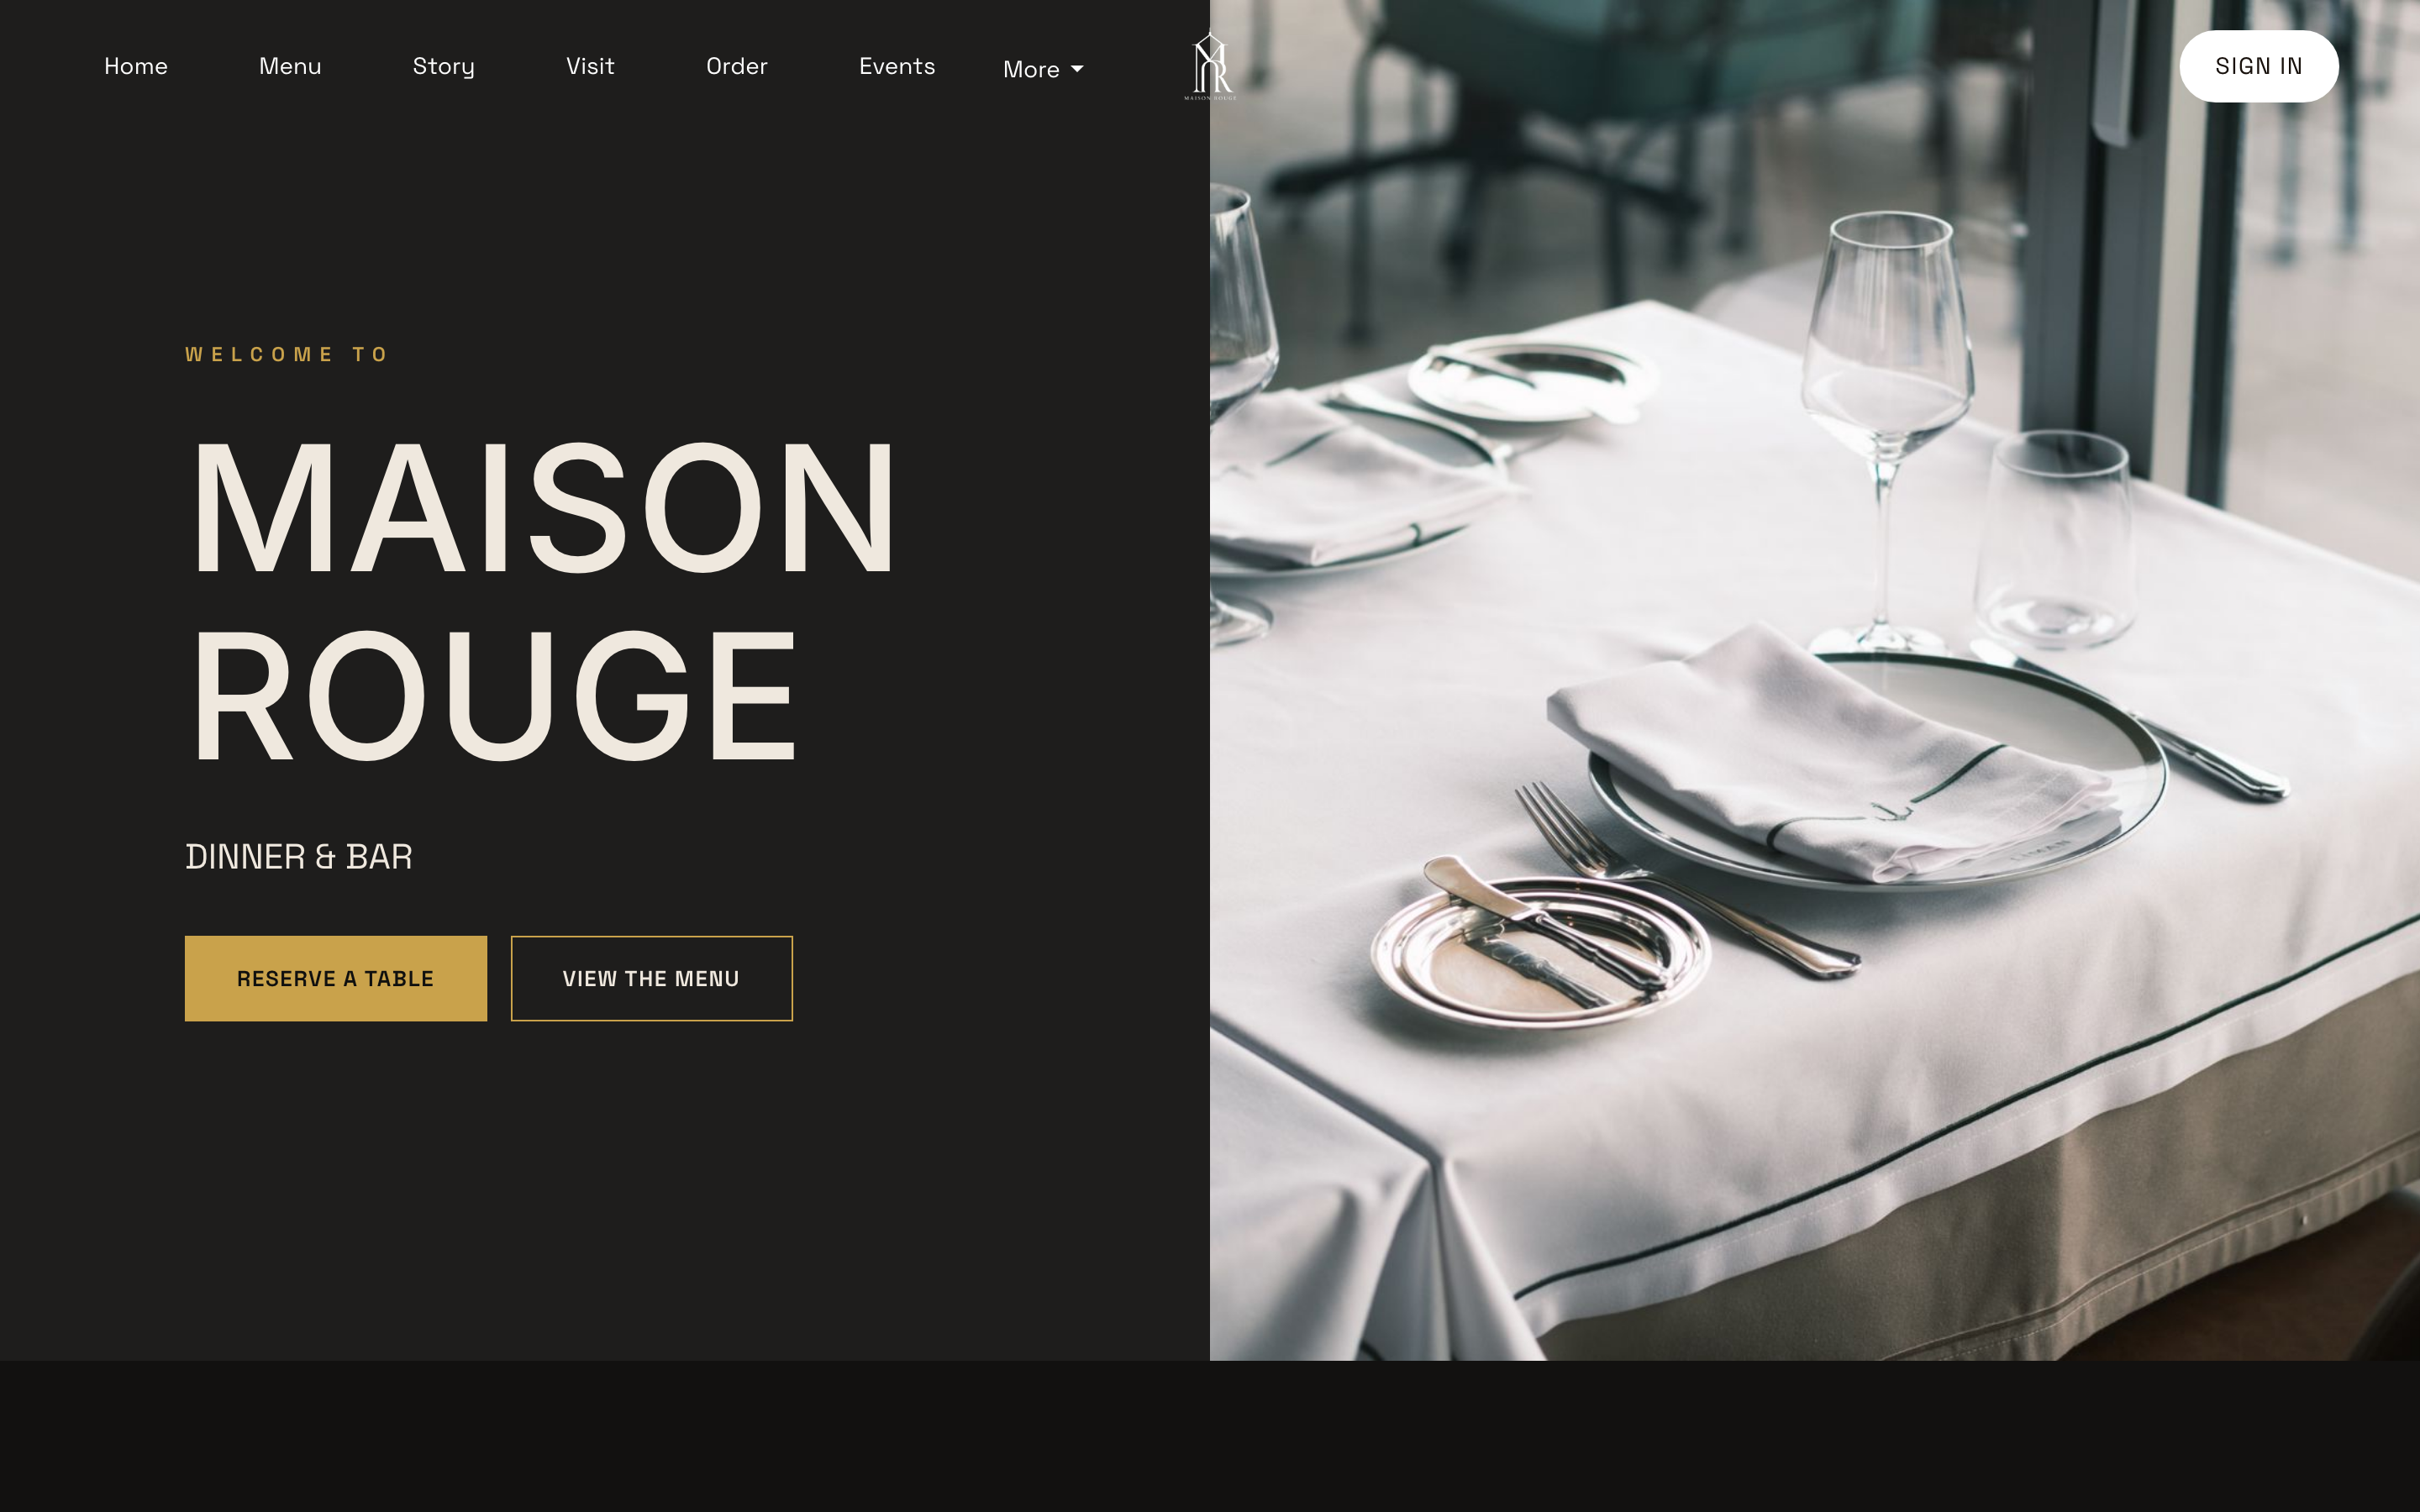
Click Reserve a table — the button a guest sees on your home page. It takes them straight to the booking form further down the same page.
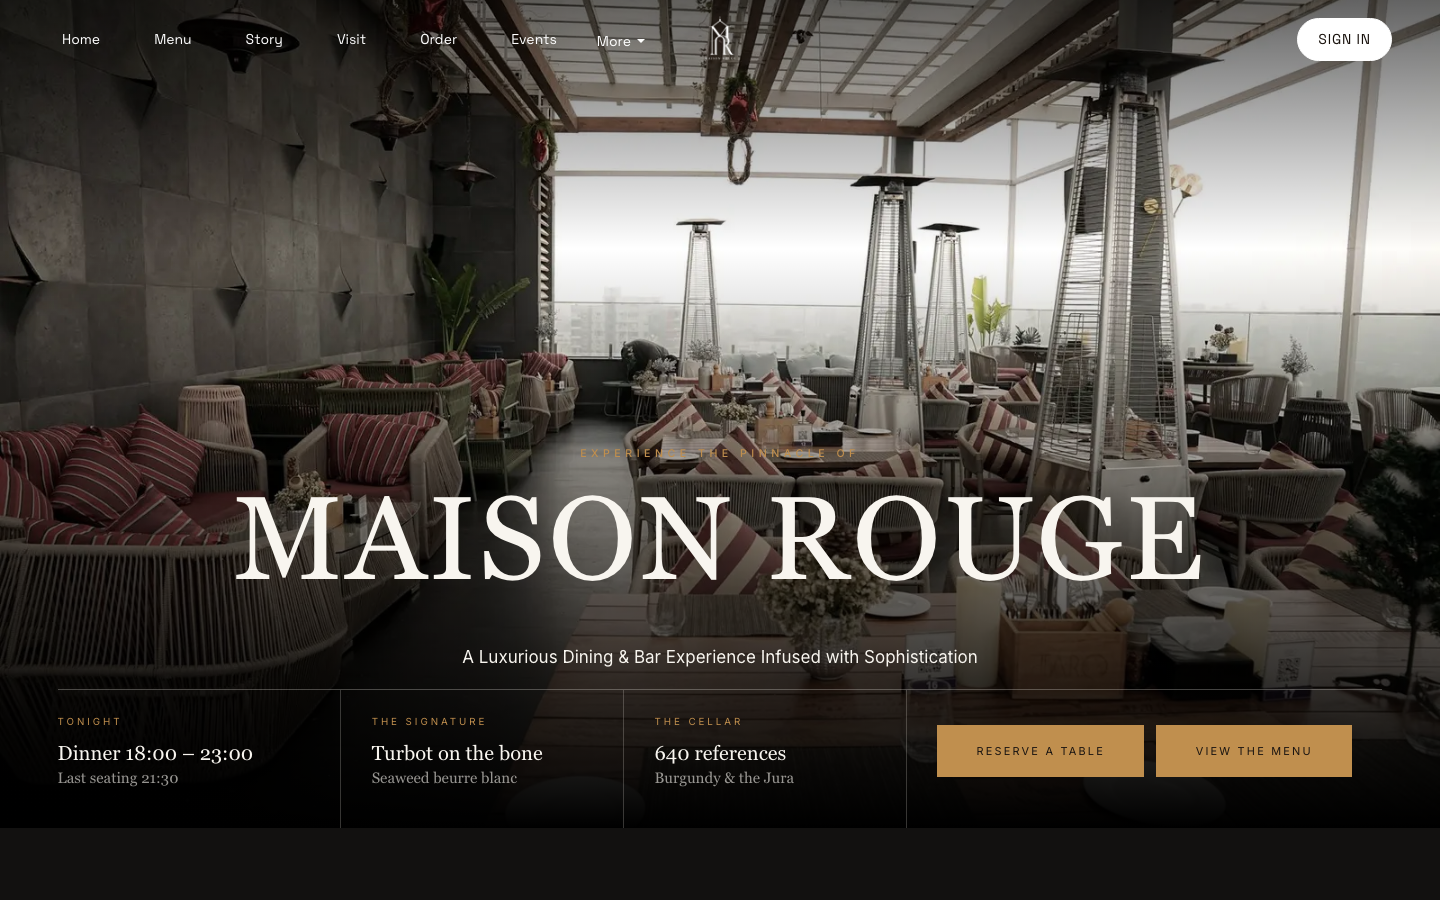
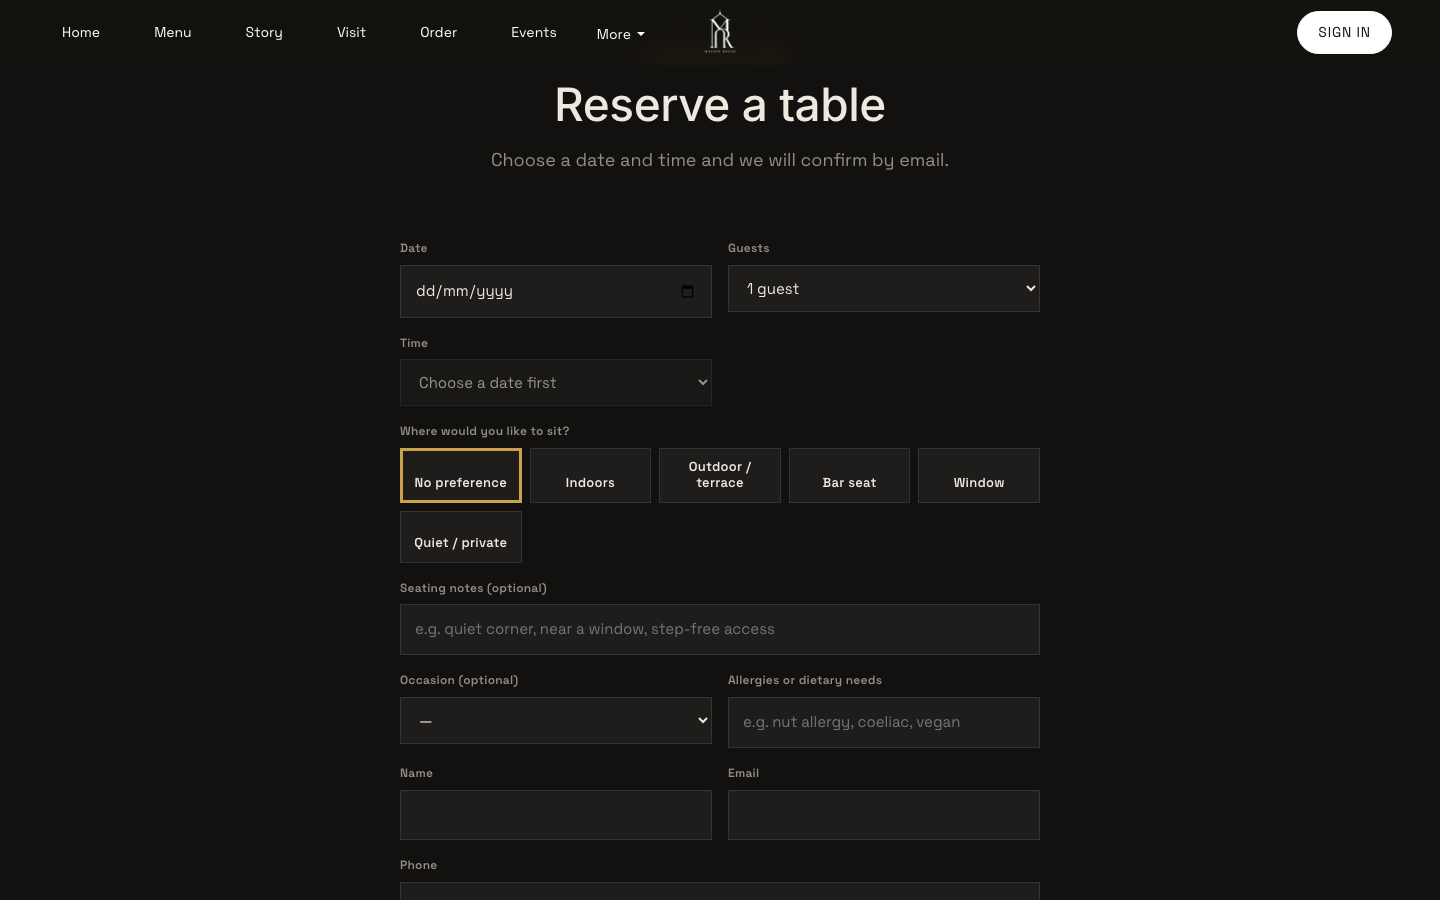
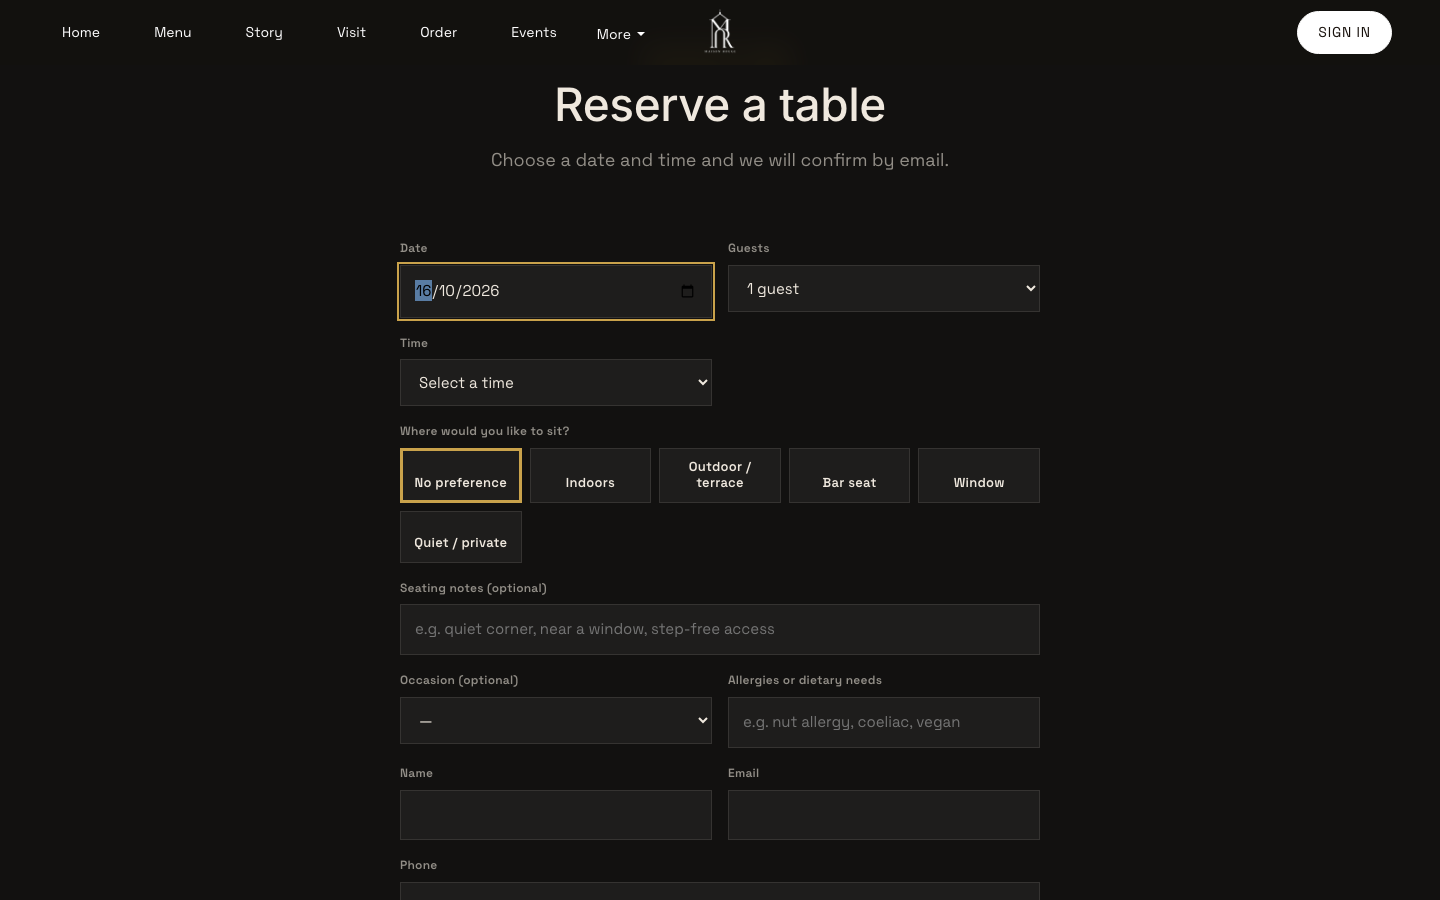
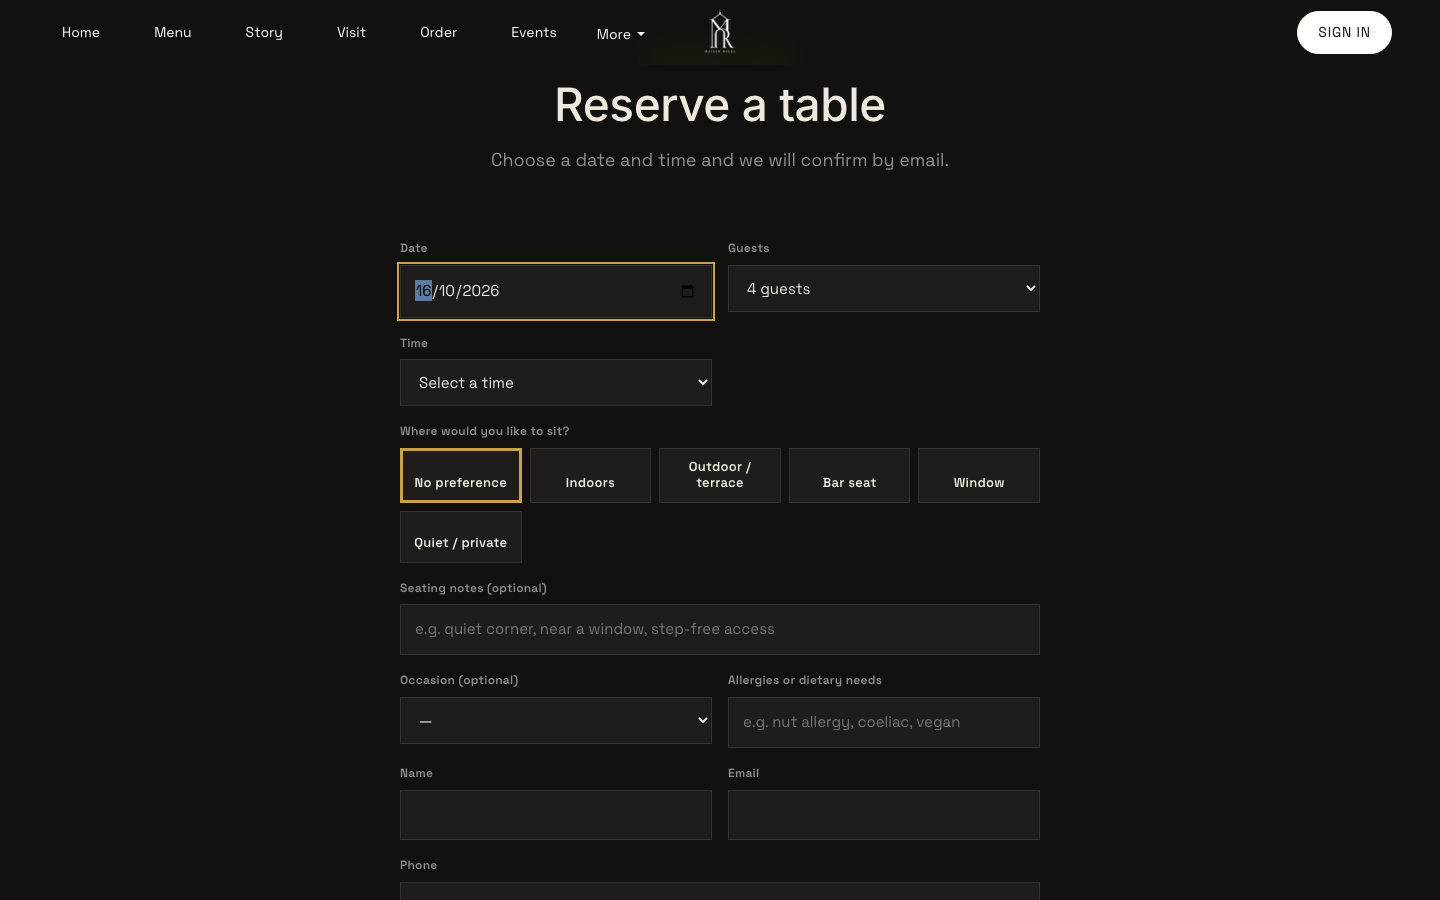
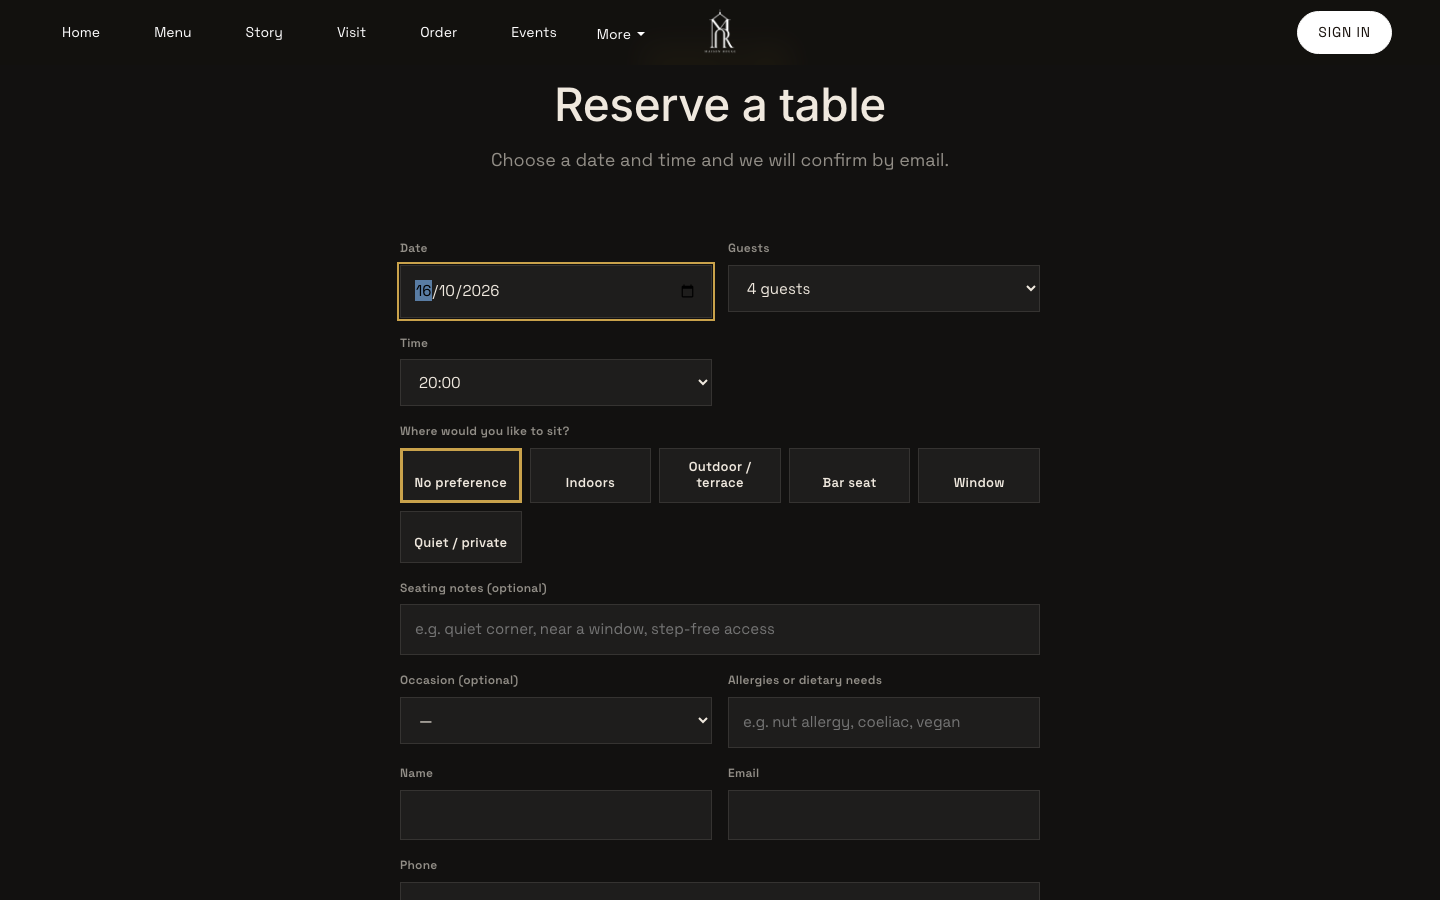
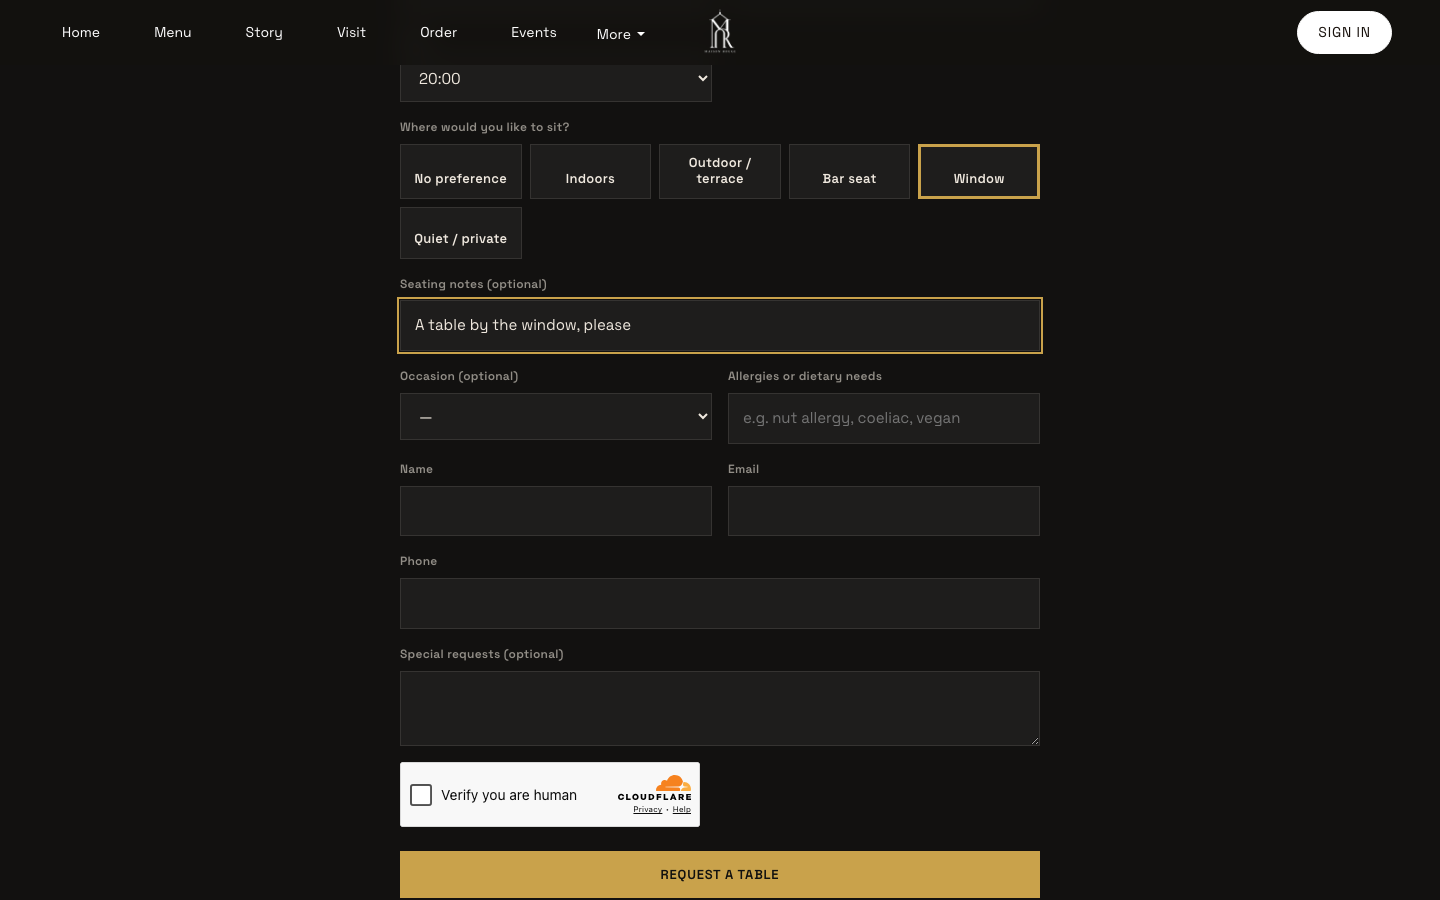
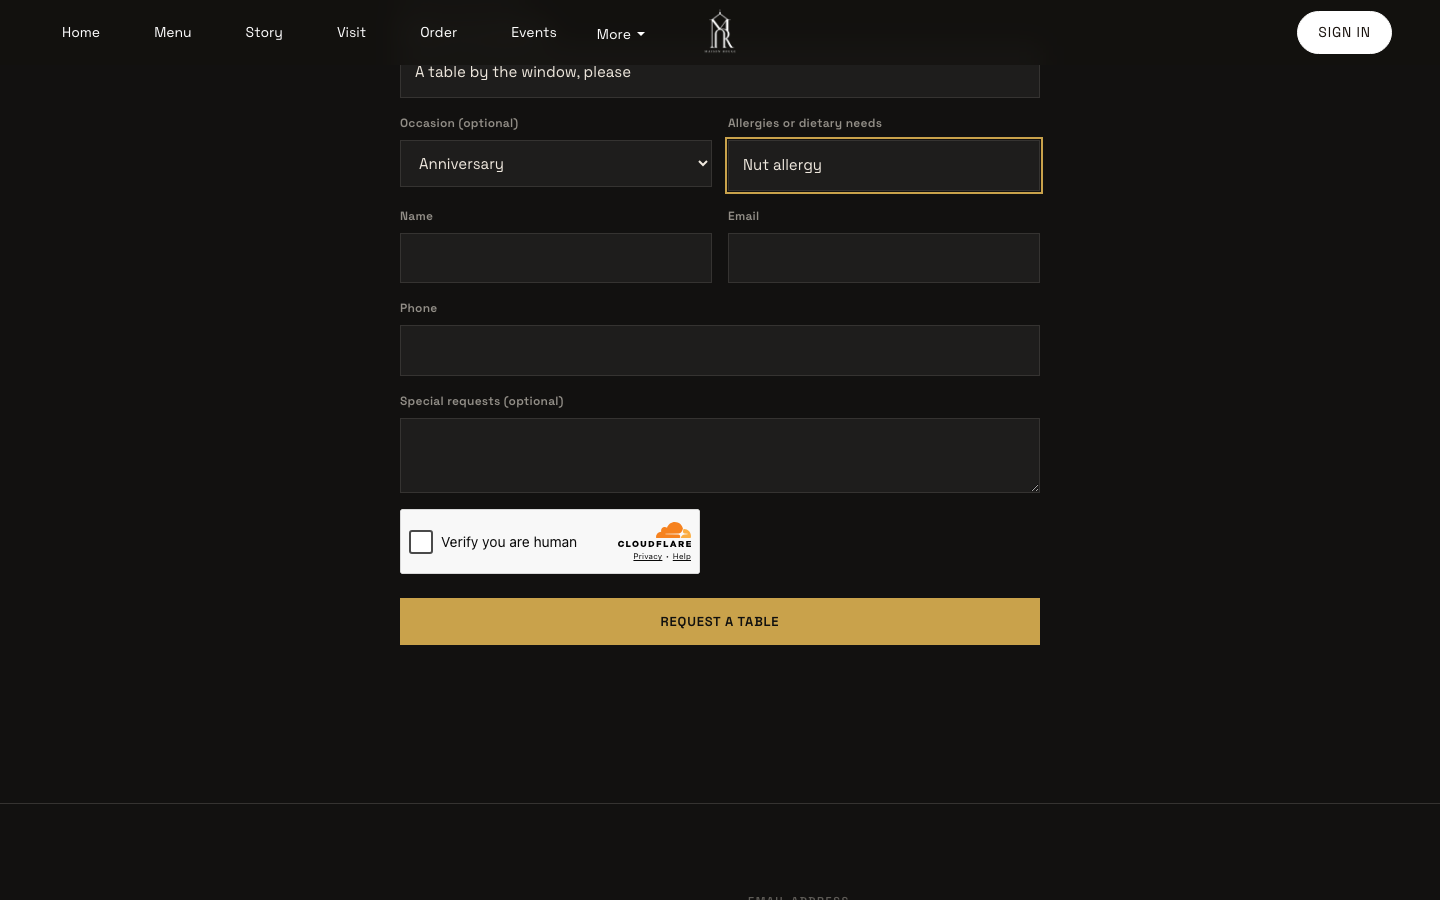
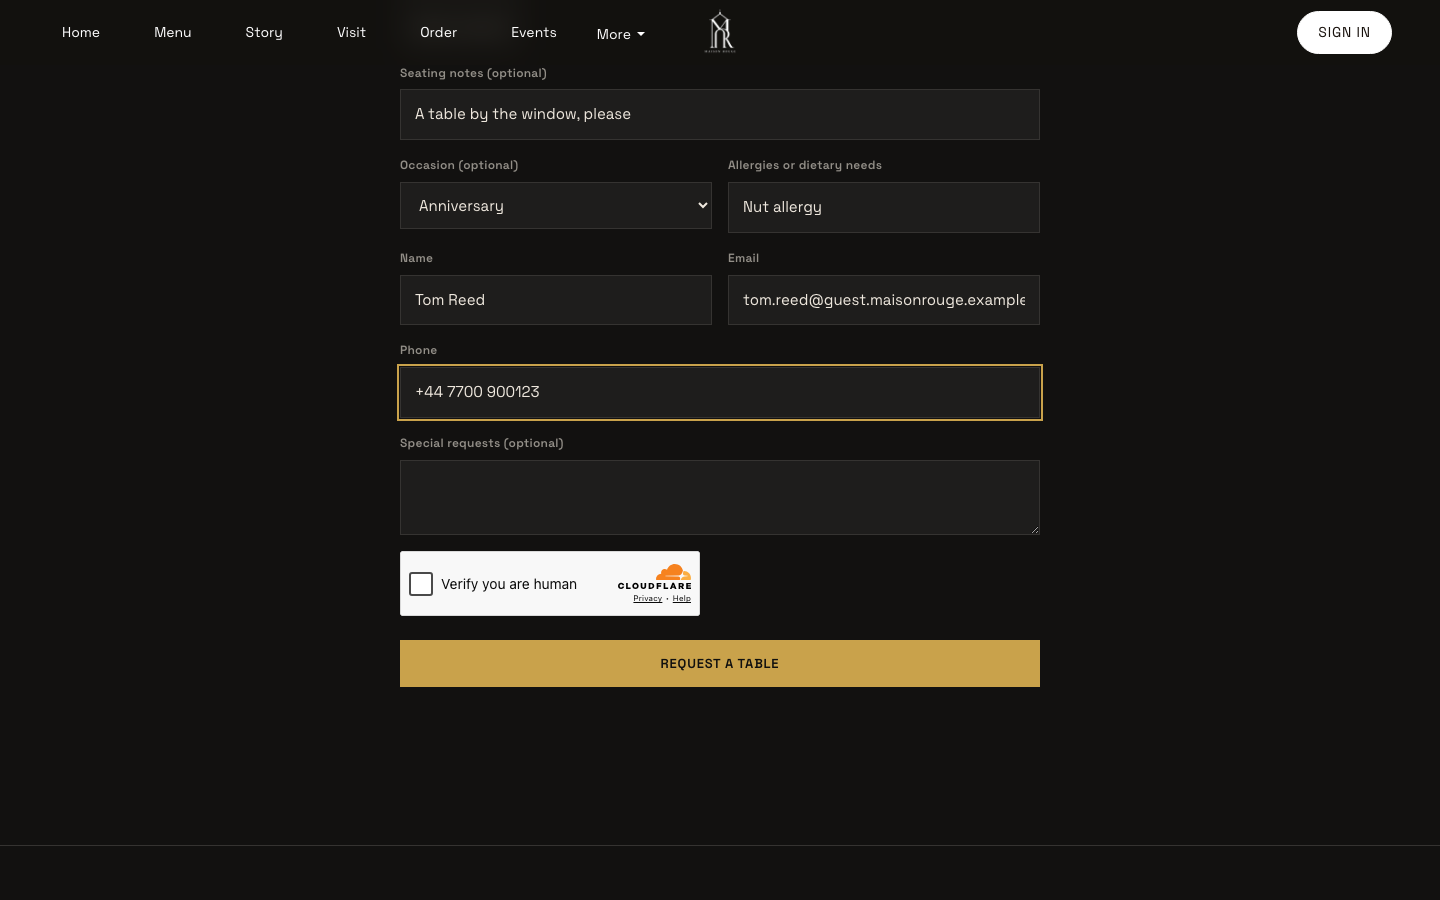
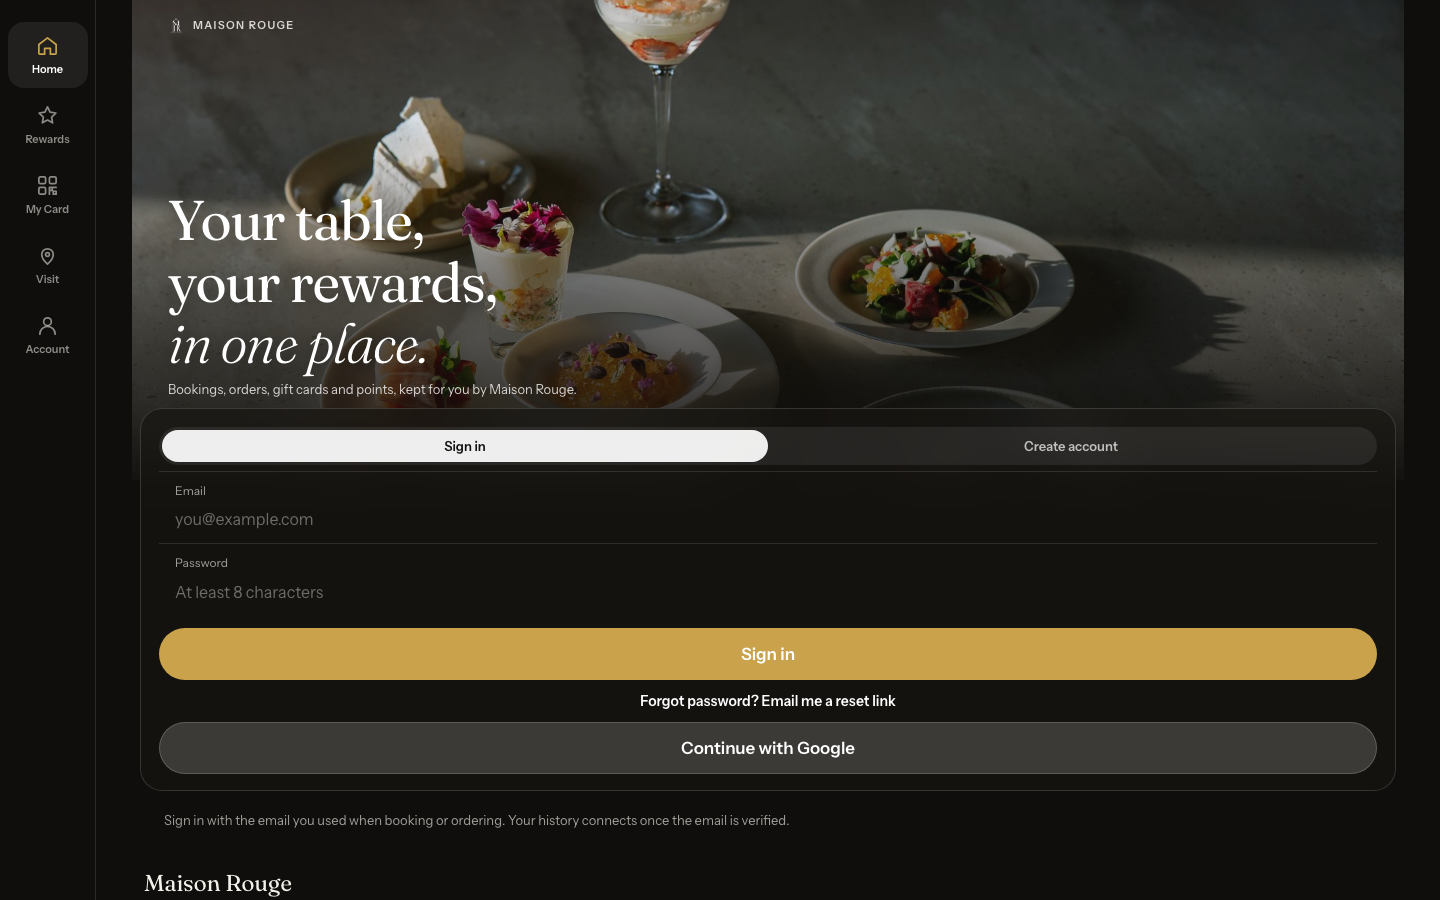
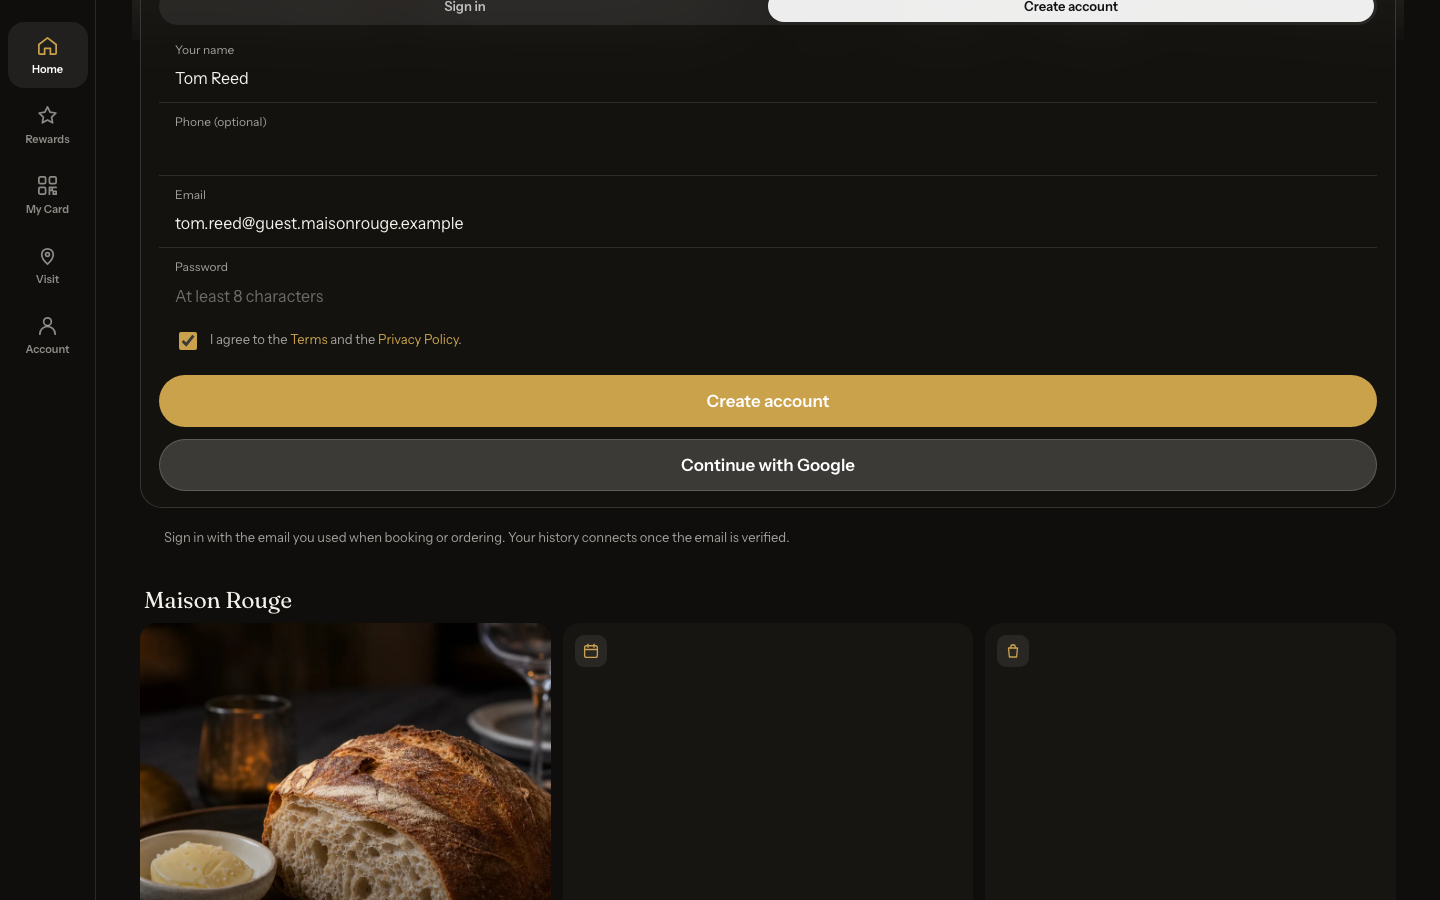
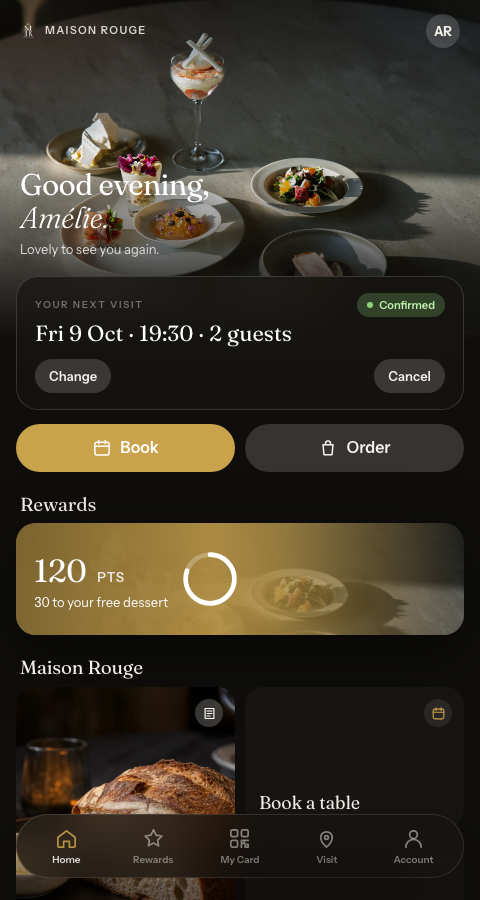
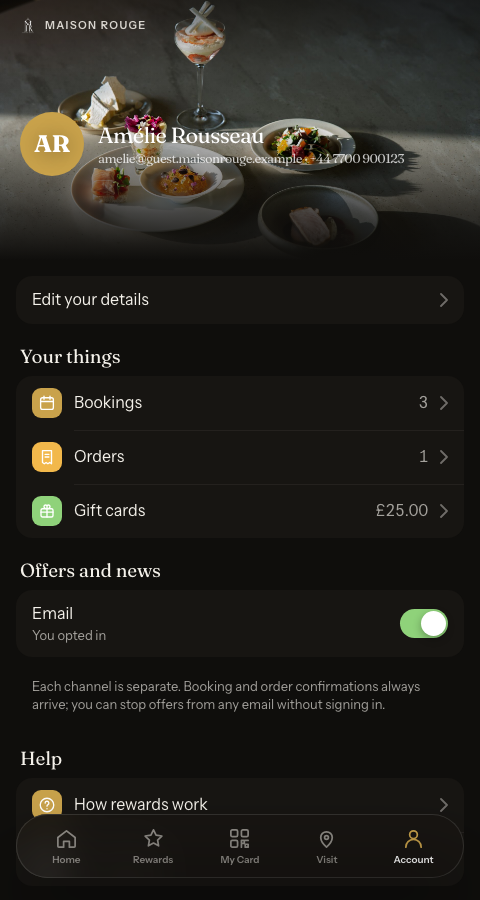
Requested a table the way a guest does, met the /account sign-in and Create account form, seen Home, Change, the Account tab, Gift cards and Bookings — all from the guest’s side.
- WHAT YOU NEED
- Nothing to set up — this all exists the day you publish
- TIME
- 6 minutes to read
- HOW HARD?
- You’re just looking over a guest’s shoulder
- CAN I BREAK IT?
- No — this page is a tour, not a task
IN PLAIN WORDS / TAP A TERM
What’s a “guest account”?
The sign-in a diner creates once, at your site’s /account page — nothing you configure, it exists the moment your site is live. Every booking or order they make afterwards with the same email lands inside it automatically, alongside their own gift-card balance.
What does “history connects automatically” mean?
Once a guest verifies their email, TableSpark quietly links it to every booking and order already on file under that address — no import, no manual matching on your part. They sign in once, and their past with you is just there.
What’s the reminder email?
A message TableSpark sends on its own, the day before a booking, restating the date, time and party size. There is no setting to turn it on — every confirmed booking gets one.
What’s a review invitation?
A link you send from a guest’s own profile after a real, completed visit, inviting them to rate and review the meal. It only ever follows an actual visit on your books — never a cold request to a stranger.
The booking widget: request, confirm, remind
Most guests start on your Menu page, where dishes are listed with prices and vegetarian and vegan tags, then press Reserve a table. That button sits in the hero of your home page and scrolls to the booking form on the same page; the form also lives on a reservations page (on many TableSpark sites /p/reservations, though yours may be named differently). The form asks, in order: Date, Guests (1 to 8, or More than 8 guests), Time, Where would you like to sit? (No preference, Indoors, Outdoor / terrace, Bar seat, Window, Quiet / private), Seating notes, Occasion, Allergies or dietary needs, Name, Email, Phone and Special requests. Time stays on “Choose a date first” until a date is picked, then lists the slots your opening hours and booking rules allow. A Cloudflare Verify you are human check sits above the Request a table button.
Booking is a signed-in action, and that works in the guest’s favour. If someone presses Request a table while signed out, TableSpark sends them to your site’s /account page first, then brings them straight back to finish the request once they have signed in — the same page covered in the next step. The payoff is immediate: the booking lands inside their own account automatically, with nothing to re-enter next time.
Once you confirm the booking, TableSpark emails the guest automatically — no separate step for you to trigger. The confirmation restates the restaurant, date, time and party size, and its button reads View or change booking, opening straight into their account rather than a dead-end confirmation page. The day before the booking, a second email goes out on its own: a plain, friendly reminder with the same details. Neither email is something you write from scratch — see Guest emails for how the wording and sender identity are set.
Signing in: the guest’s own account
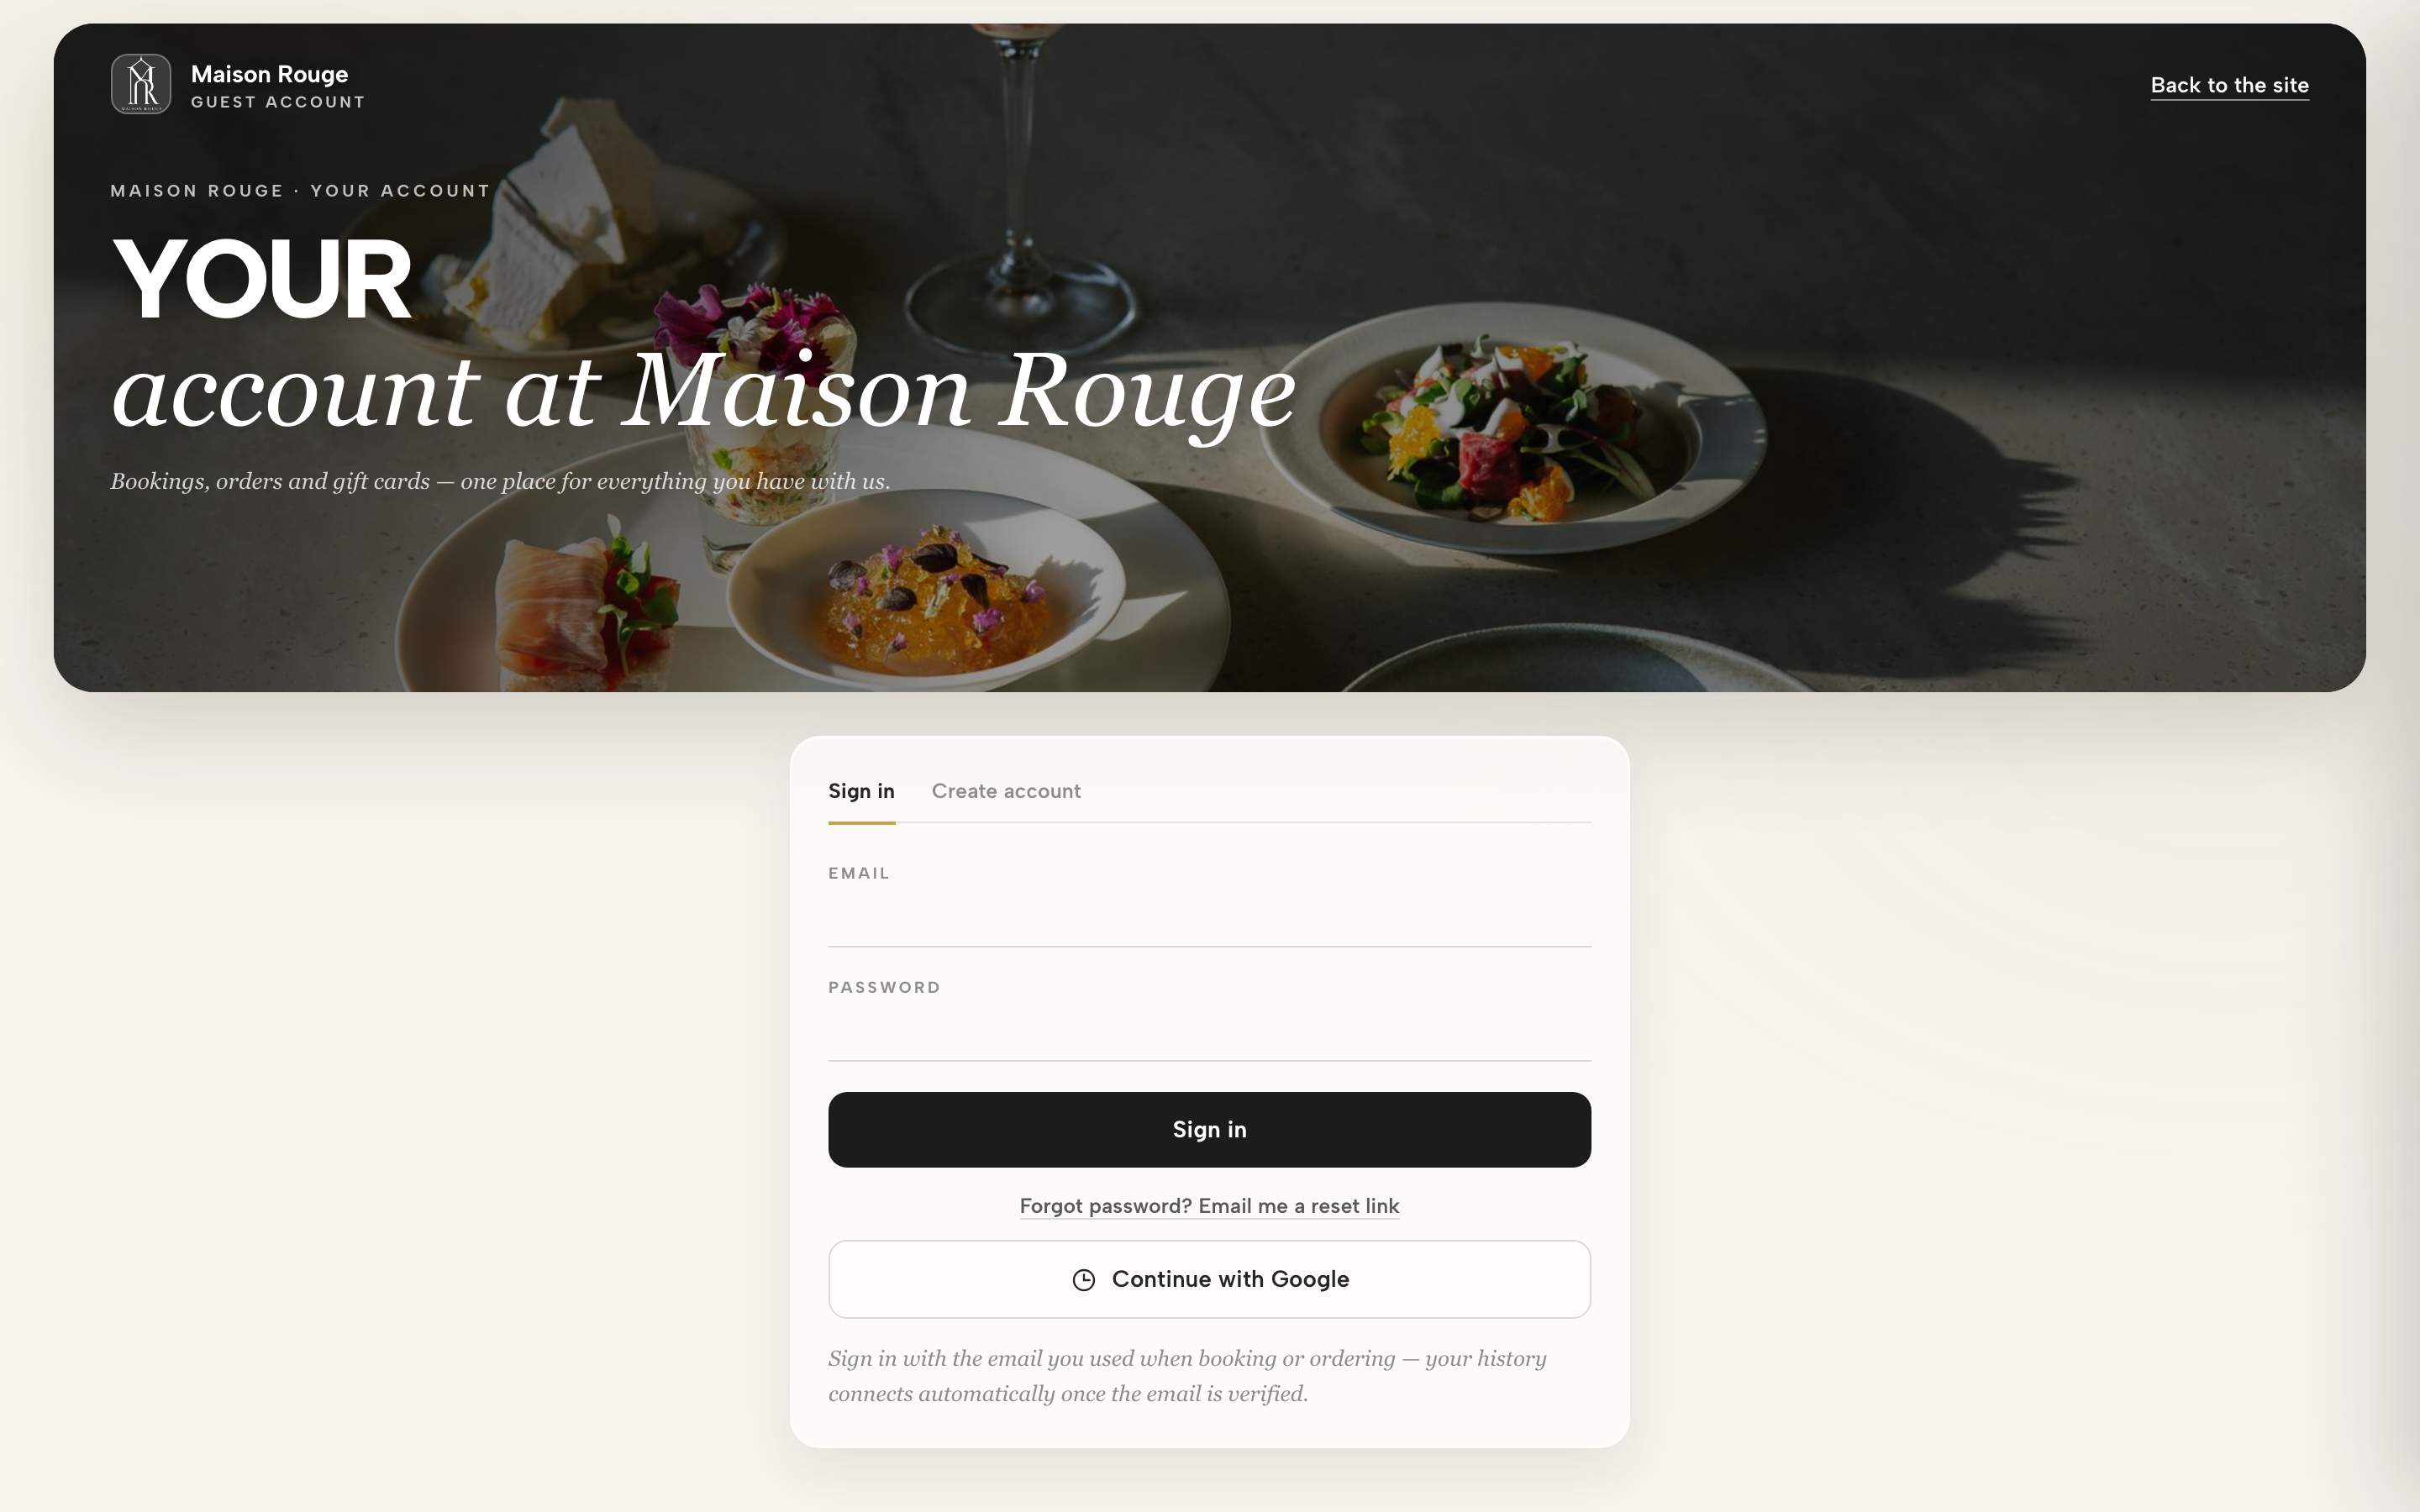
Every published TableSpark site carries a page at /account — the guest’s own sign-in and self-service space. It wears your restaurant’s name, logo and colours and a photograph from your own site, so a guest never feels they have left you. The page is deliberately kept out of search results — it is the guest’s own space, not a listing.
A signed-out guest sees two tabs, Sign in and Create account, then an email and password field, a Forgot password? Email me a reset link option and Continue with Google. Creating an account asks for Your name, an optional phone number, an email, a password of at least 8 characters, and a required tick against your Terms and Privacy Policy. A line beneath the form reminds guests to use the email they gave when booking or ordering — their history connects once that email is verified. On a custom domain, the Google button is replaced by a link to the same sign-in on your TableSpark address; email and password work everywhere.
Behind the scenes, this page is guarded the way a sign-in page should be: a human-verification check sits in front of every signup and password-reset request, alongside limits on how many of those emails can go out in an hour, so the shared sending budget a guest's confirmation and reminder emails also rely on can never be drained by a bot. And every account-creation or reset email that goes out is sent by TableSpark in your restaurant’s own name, not as a generic platform notice — it reads like it came from you, because in every way that matters, it did.
One App for bookings, orders and gift cards
Once a guest signs in, the same page becomes their own App, with a tab bar of Home, Rewards, My Card, Visit and Account. Which tabs and blocks appear is your choice — Your guests’ app shows how to arrange them — so a guest on your site may see fewer.
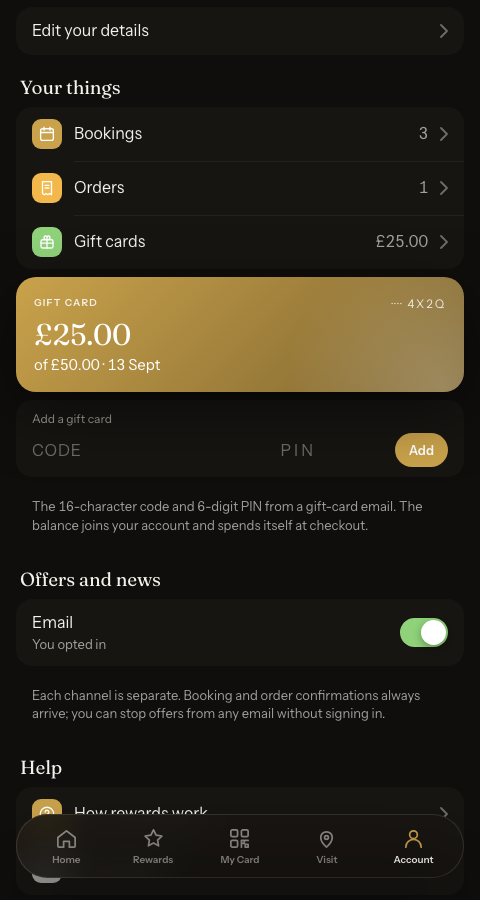
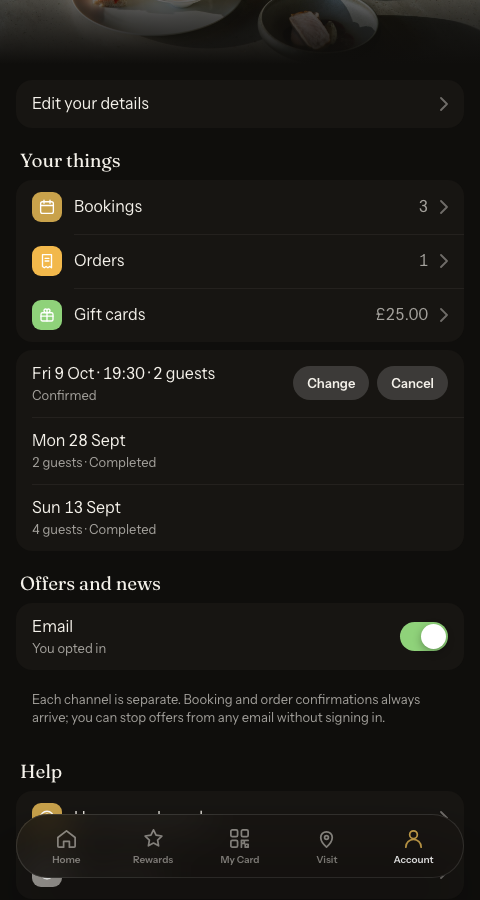
Home opens with a greeting (“Good evening, <first name>”), then Your next visit with the date, time, party size and a Change and Cancel button, plus Book and Order buttons, a points card, the last order with Order it again, and quick tiles into your site. Rewards and My Card carry the loyalty points and the card staff scan at the till, and Visit shows your address and opening hours. Account holds the guest’s name and email, Edit your details (name, phone, birthday, delivery address, postcode), Your things — Bookings, Orders and Gift cards, each with its count or balance — an Offers and news switch for email, Sign out, and a quiet Your data link.
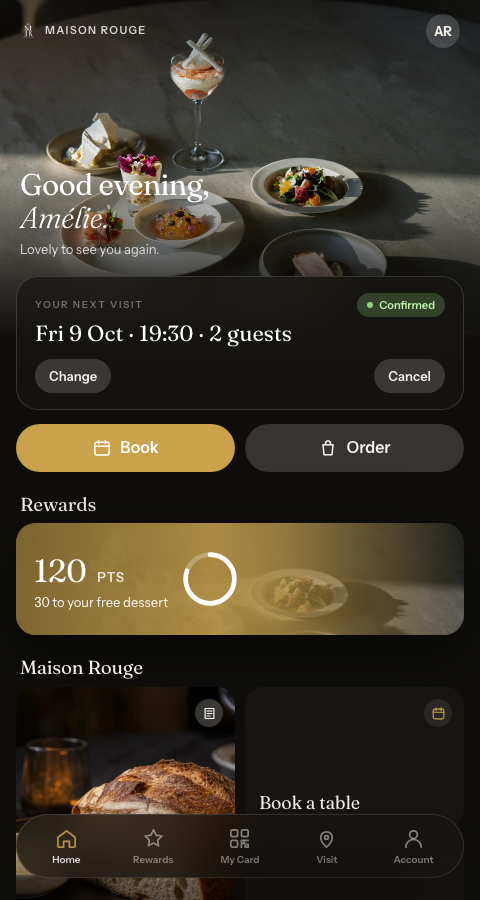
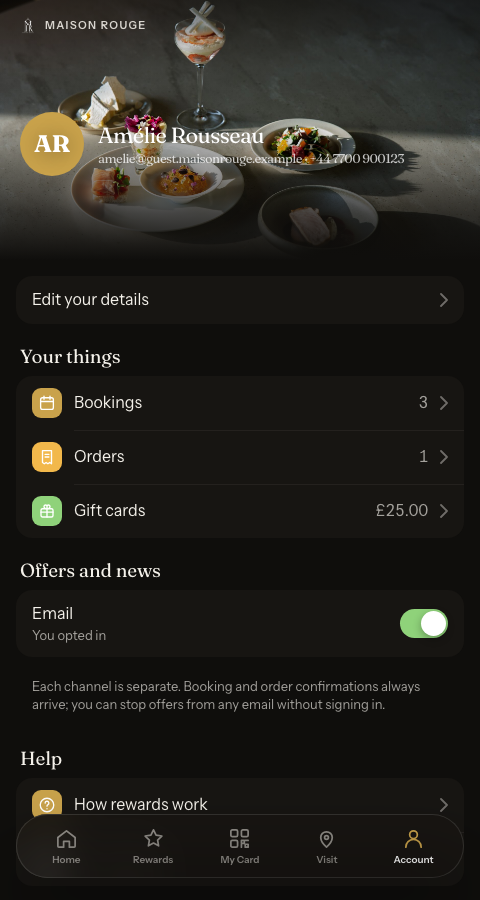
Every field on this page is the guest’s own record, not a copy that lives somewhere else. It is exactly what you already see in your own Inbox and guest list — nothing here sits outside TableSpark. A guest can also open Your data at the foot of the Account tab to email themselves a copy of everything held about them, or to start deleting their account.
Changing or cancelling a booking
A guest can act on their own upcoming booking without picking up the phone, for the routine cases. On Home, the Your next visit card (and the booking list under Account → Bookings) carries a Change button. It opens a Move booking sheet that says the current table is held until the new one is confirmed, with Date, Guests and Time checked against your live availability, and a Move booking button to confirm. A Cancel button sits beside it and needs a genuine second tap: the first click turns it into “Really cancel?” for a few seconds before the second click commits anything, so a guest can never cancel by accident.
Both buttons only appear on a booking that your own record marks as changeable. A booking that carries a deposit, or a slot that needs one, tells the guest to call the restaurant instead of moving automatically. If a guest picks a time that just filled up, the sheet shows nearby free times rather than a flat “try again.” Every change or cancellation a guest makes here shows up on your side the way a phone-in change would, through Run your bookings.
The emails that go out along the way
This guide has already mentioned two of them — the booking confirmation and the day-before reminder — but a guest's full inbox with you can carry several more: a deposit receipt, a cancellation notice, a rescheduled-booking notice, a waitlist update, and the gift-card emails covered in step seven. Every one of them sends in your restaurant’s own name, with your reply-to address, and every one of them can be reworded to match how you actually talk to guests.
That wording, sender identity and branding is a full guide of its own, not something to duplicate here — see Send emails, campaigns and journeys → Guest emails for the complete list and how to edit each one.
After the visit: review invitations
A TableSpark review is never a cold request — it is always tied to a real, completed visit on your books, and you are the one who sends it, from that guest’s own profile with an Ask for review button. What the guest sees is a plain link inviting them to rate and write up their meal. Once they submit a rating and a few lines of text, both are fixed for good on your side — from there, moderating and replying is entirely yours to do.
The full moderation workflow — the Pending, Approved, Hidden and Rejected tabs, and posting a public reply as the restaurant — belongs to a guide of its own: see Know your guests → Collect reviews, and reply as the restaurant.
Redeeming a gift card as a guest
Two real, live paths, and a guest can use either one. At checkout, a signed-in guest with a balance sees “Use my gift card — £X available”, and the value applies itself — nothing to type. From the App covered in step three, a guest can also open Account → Gift cards and key in a gift card’s 16-character code and 6-digit PIN from an email under Add a gift card, then click Add. That tops up their own account balance rather than a single order, and the balance then spends itself automatically the next time they check out — a code is never applied to one order directly from that box.
- At checkout — the balance applies itself the moment a signed-in guest with funds reaches payment; no code needed.
- Add a gift card — a guest types the code and PIN from an email once, and the value joins their account for good.
- The card face itself — shown under Gift cards with a masked number and current balance, exactly like a physical card in a wallet.
Every gift card a guest redeems, every booking they change, every order they check on — it all runs through the one account they signed into once. The full selling, balance and refund workflow on your side of that same card lives in Sell gift cards → Redeem a balance.
Next · guest emails
See what your guests actually receive
Now that you know the path a guest walks, open the wording, sender identity and journeys behind every email on that path.