Contents
A table plan kept on paper leaves the diary blind, and the mismatch shows at the door. How to draw the room once so every booking is seated against it.
It is ten to eight on a Saturday, and the party of six booked for eight o'clock has walked in early. The table plan for the night is a sheet of A4 taped beside the host stand, with pencil marks over last week's pencil marks. Nobody wrote down which tables were meant to go together, so two servers start dragging a four-top towards a two-top by the window while the six stand in the doorway in their coats and the couple at the next table move their glasses out of the way. The booking was taken; nobody asked the room whether it could seat it.
That is the cost of keeping the table plan where the diary cannot see it. A paper sheet or a whiteboard tells the person standing in front of it which tables exist. It tells the person taking a phone call in the office nothing, and a guest booking online at midnight gets even less. The terrace that opens in May and the private room upstairs are not in the diary at all, so a booking for either is a note in the margin, and the note depends on whoever reads it remembering what it means. When the plan and the bookings are kept apart, every evening starts with someone reconciling them by hand, and the reconciling happens at the door, in front of the guests.
Why the table plan has to live where the bookings do
Every booking a restaurant accepts is a claim on a particular piece of furniture, even when nobody says so. A booking for two at half past seven is, by the time it arrives, a claim on one of the two-tops or on a larger table someone has decided to give away. If the only record of which tables exist is pinned to a wall, the diary can count guests but it cannot count tables, and the gap between those two numbers is where the trouble starts.
The trouble takes familiar forms. A party that needs two tables pushed together is confirmed for a time when one of the two is already promised. A group of eight is accepted for a room whose largest arrangement seats six. A request for the terrace is written on the booking as a hope, because nothing in the diary knows the terrace has four tables and a heater. Each is a small mismatch between the promise and the room, and it is found out as the guest arrives. The longer version of that problem, where the booking form promises more than the floor can seat, is set out in The Group Booking Your Floor Cannot Actually Seat.
The fix is a plan the booking diary reads: every table drawn once, with how many guests it seats, which part of the room it sits in, and whether it can be joined to its neighbour. Then a phone booking and an online booking are checked against the same tables, and the host stand inherits a plan rather than drawing one.
The floor plan described here is the bookable table plan, the drawing a booking engine reads to decide where a party can sit. A dimensioned layout for a builder, a fit-out or a kitchen designer is a different document, drawn to scale for a different reader. This article is about the first. The broader case for running tables this way, and what table management covers beyond the plan itself, is set out in Restaurant table management and floor plans; what follows is the build, screen by screen.
What a bookable floor plan has to know
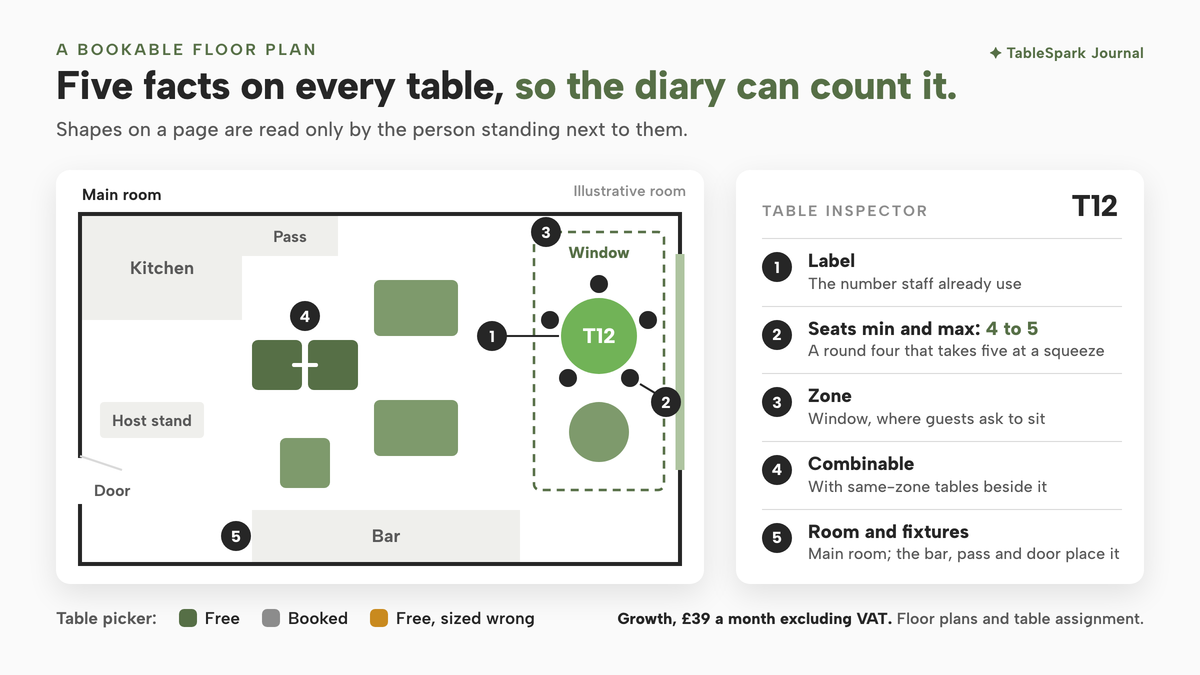
The drawing is only as useful as the facts attached to each table, and five of them do most of the work.
The first is the label each table goes by. It should be the number staff already use, so "T12" on a booking means the table everyone calls twelve. The second is the seat range: the smallest and the largest party the table will take on a normal night. A round table that seats four comfortably and five at a squeeze has a range, not a single number, and writing the range down stops the plan offering it to a party of seven.
The third is where the table sits. Guests ask for the window or the terrace, and staff run sections. The fourth is whether a table can be joined to its neighbours. Two two-tops that sit side by side can become a four; two that sit at opposite ends of the room cannot, however good the arithmetic looks. The fifth is the rest of the room: the bar, the kitchen pass, the doors and the host stand. Fixtures carry no covers, but they let anyone reading the plan recognise the room at a glance.
A plan holding those five facts can be read by a person and a booking engine alike; shapes on a page can be read only by the person standing next to them.
How to make a restaurant floor plan in TableSpark
TableSpark puts floor plans and table assignment on the Growth plan at £39 a month excluding VAT, alongside live availability and table inventory, on-site reservations at 0% TableSpark commission, deposits and reminders. Its Run your bookings guide describes what the plan is for in one sentence:
Your Floor plan is the room those bookings get seated on, and the same mini version of it is what you use to pick a table without leaving the diary.
The six steps below build the plan, put it into rooms, tell the booking rules to count by table, and then check a booking against it. Each step happens on a single screen.
Step 1. Open the Floor plan from Bookings

Open Floor plan in the app sidebar, or press the Floor plan button at the top of Bookings. Main room is the default room, ready for the first table, and the plan built here is the one the diary and the booking engine read.
Step 2. Add tables and room fixtures to the canvas
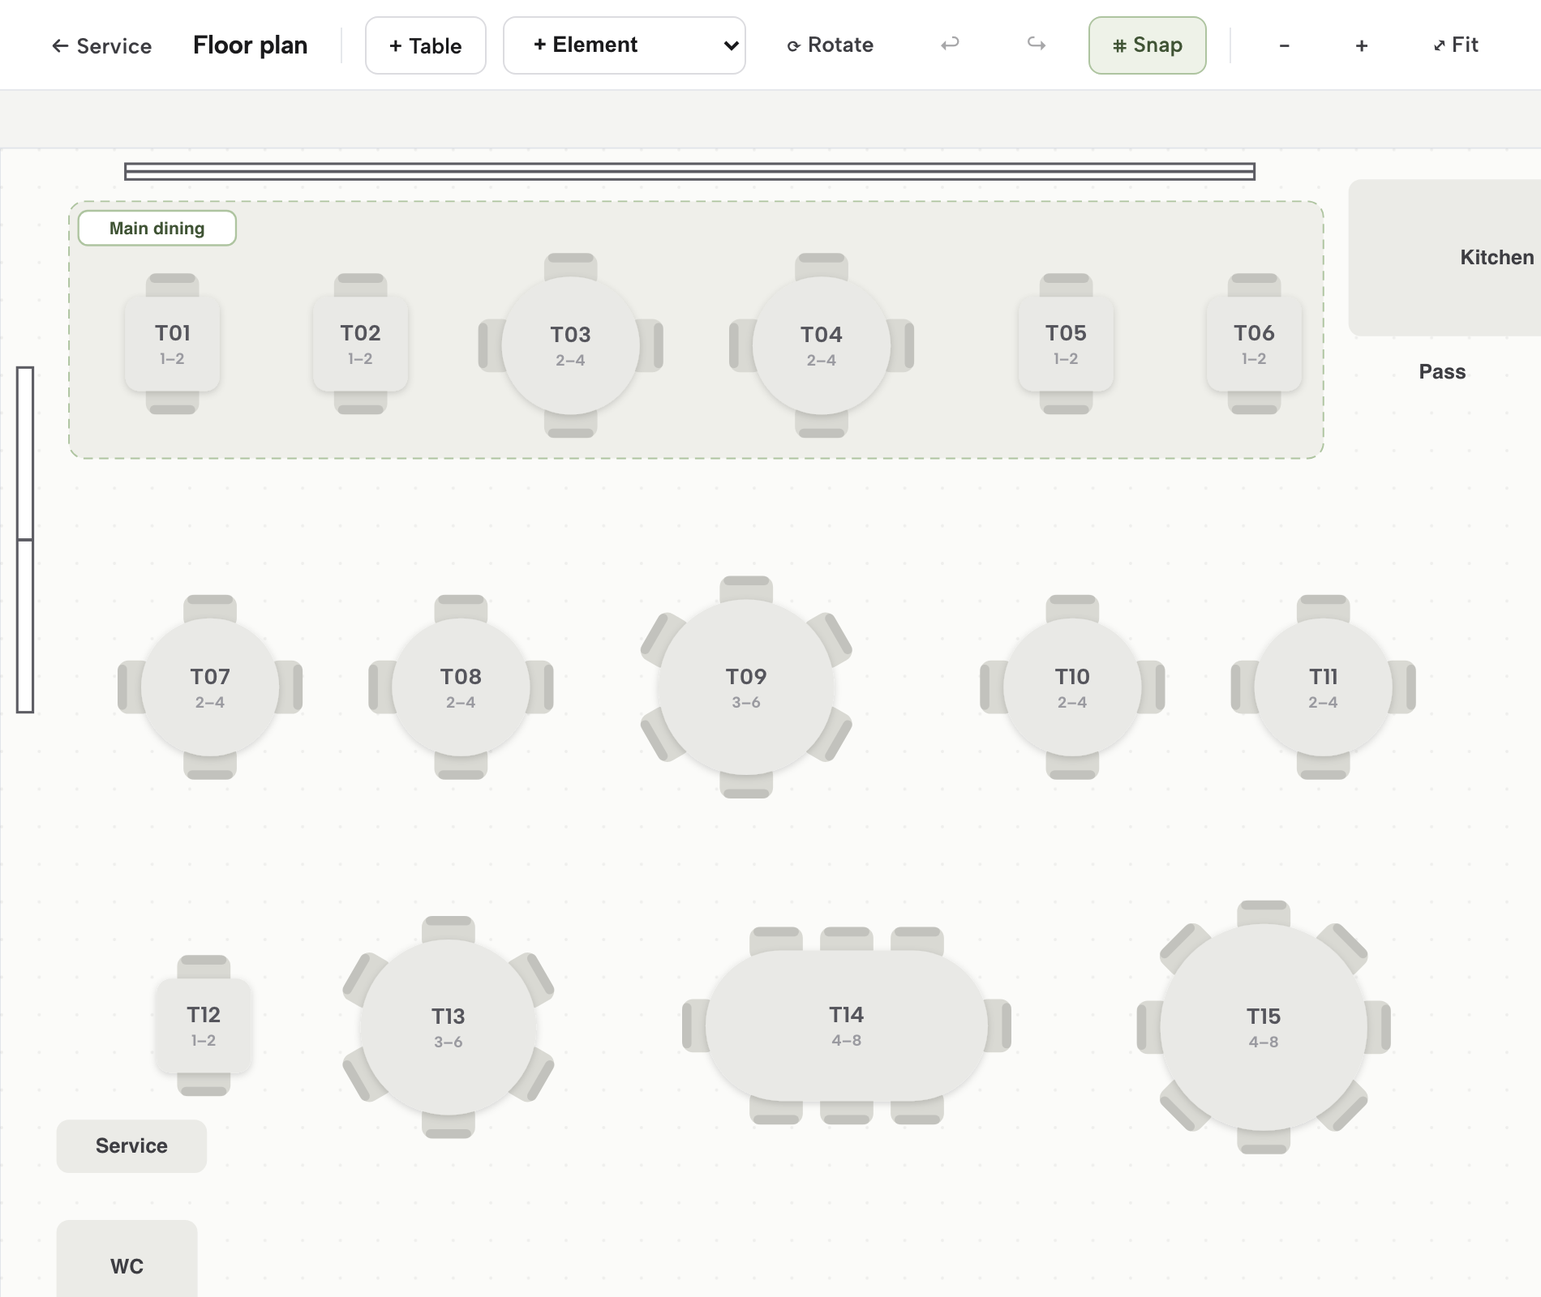
Press + Table to add a table, and use the + Element dropdown for a room fixture: an area or room outline, a text label, a door, a window, a WC, a kitchen, a counter or bar, or a direction arrow. Drag each one into place. Rotate turns the current selection 15 degrees at a time, Snap keeps everything on the grid, undo and redo sit either side of it, and Fit zooms out to the whole floor in one press. Place the fixtures first, so the tables have a room to sit in when they arrive.
Step 3. Set each table's seats, shape and zone in the inspector
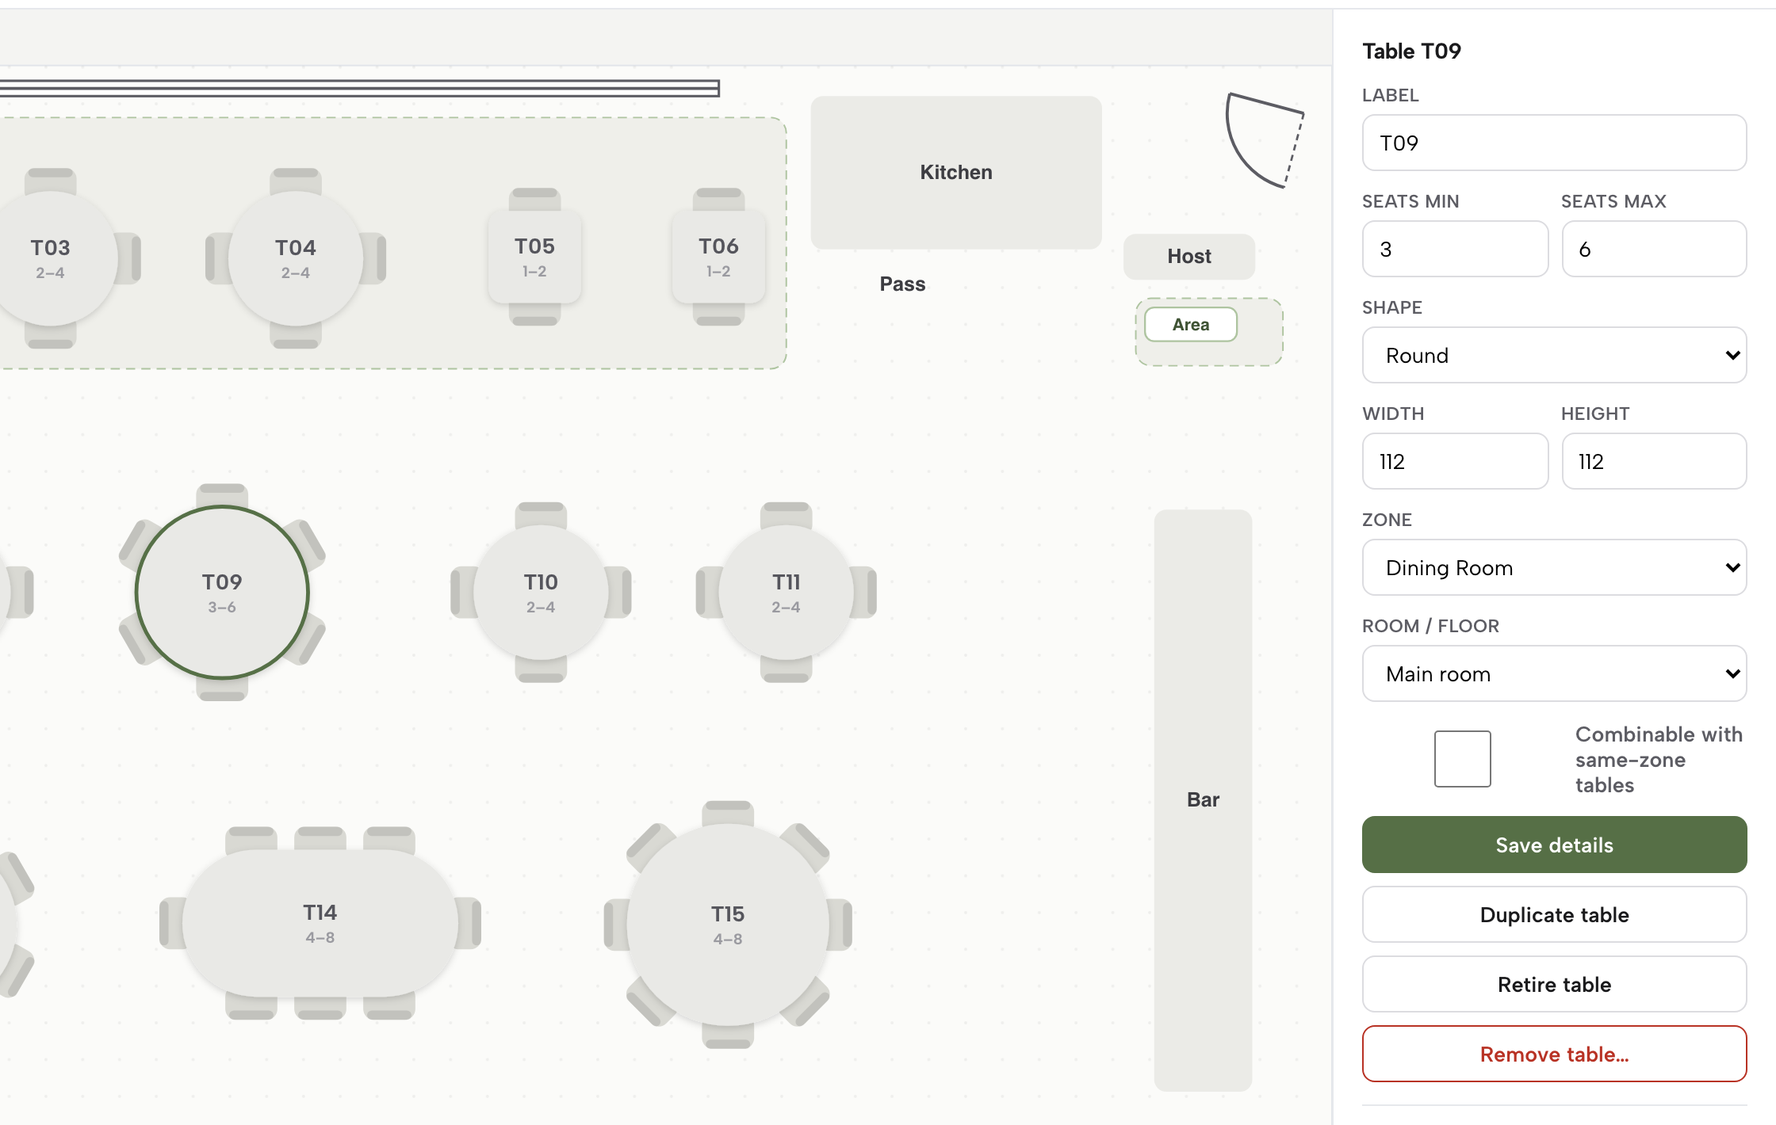
Click any table to open its inspector on the right. In the guide's words, it holds "its label, seats min and max, shape (rectangle, round or oval), zone, room, whether it’s combinable with same-zone tables, and its width and height". Every change previews live on the canvas before you move on. To set several tables at once, drag on empty space to select them, then move them, nudge them or set a zone on all of them together.
Step 4. Organise tables into rooms with Rooms & floors
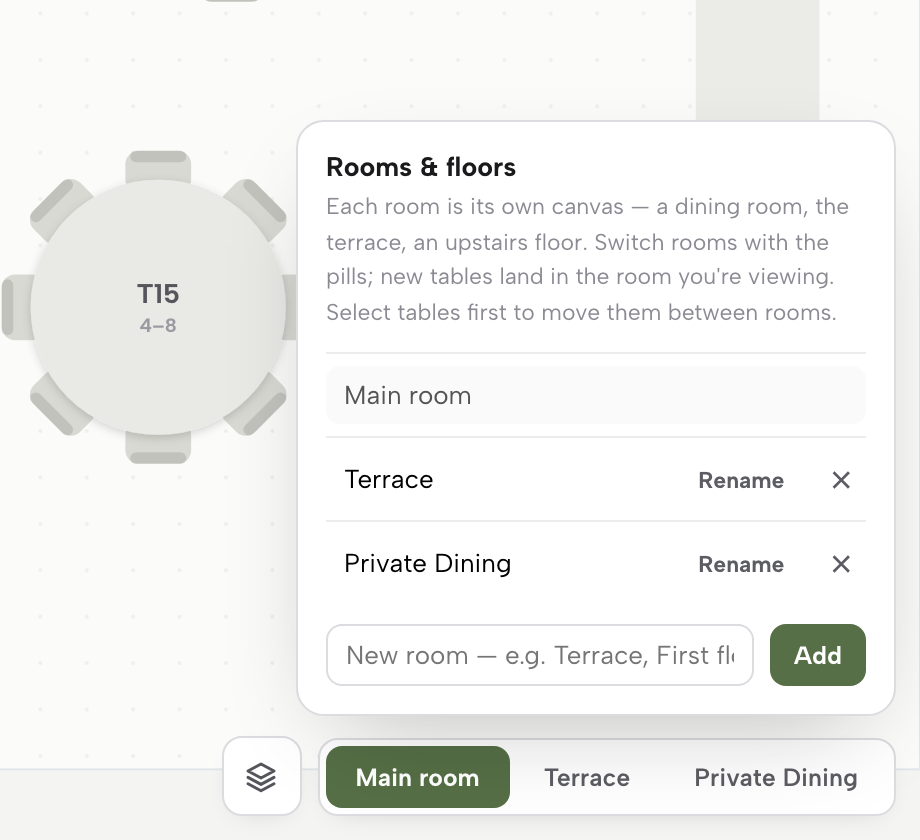
The pills at the bottom right of the canvas switch which room is on screen, starting with Main room, and a new table always lands in whichever room is showing. Press the layers icon next to them to open Rooms & floors. Type a name such as "Terrace" or "First floor" and press Add. To move a whole section, select its tables on the canvas first; the panel then offers a Move here button on every room row.
Step 5. Set Capacity by to By table in Services & rules
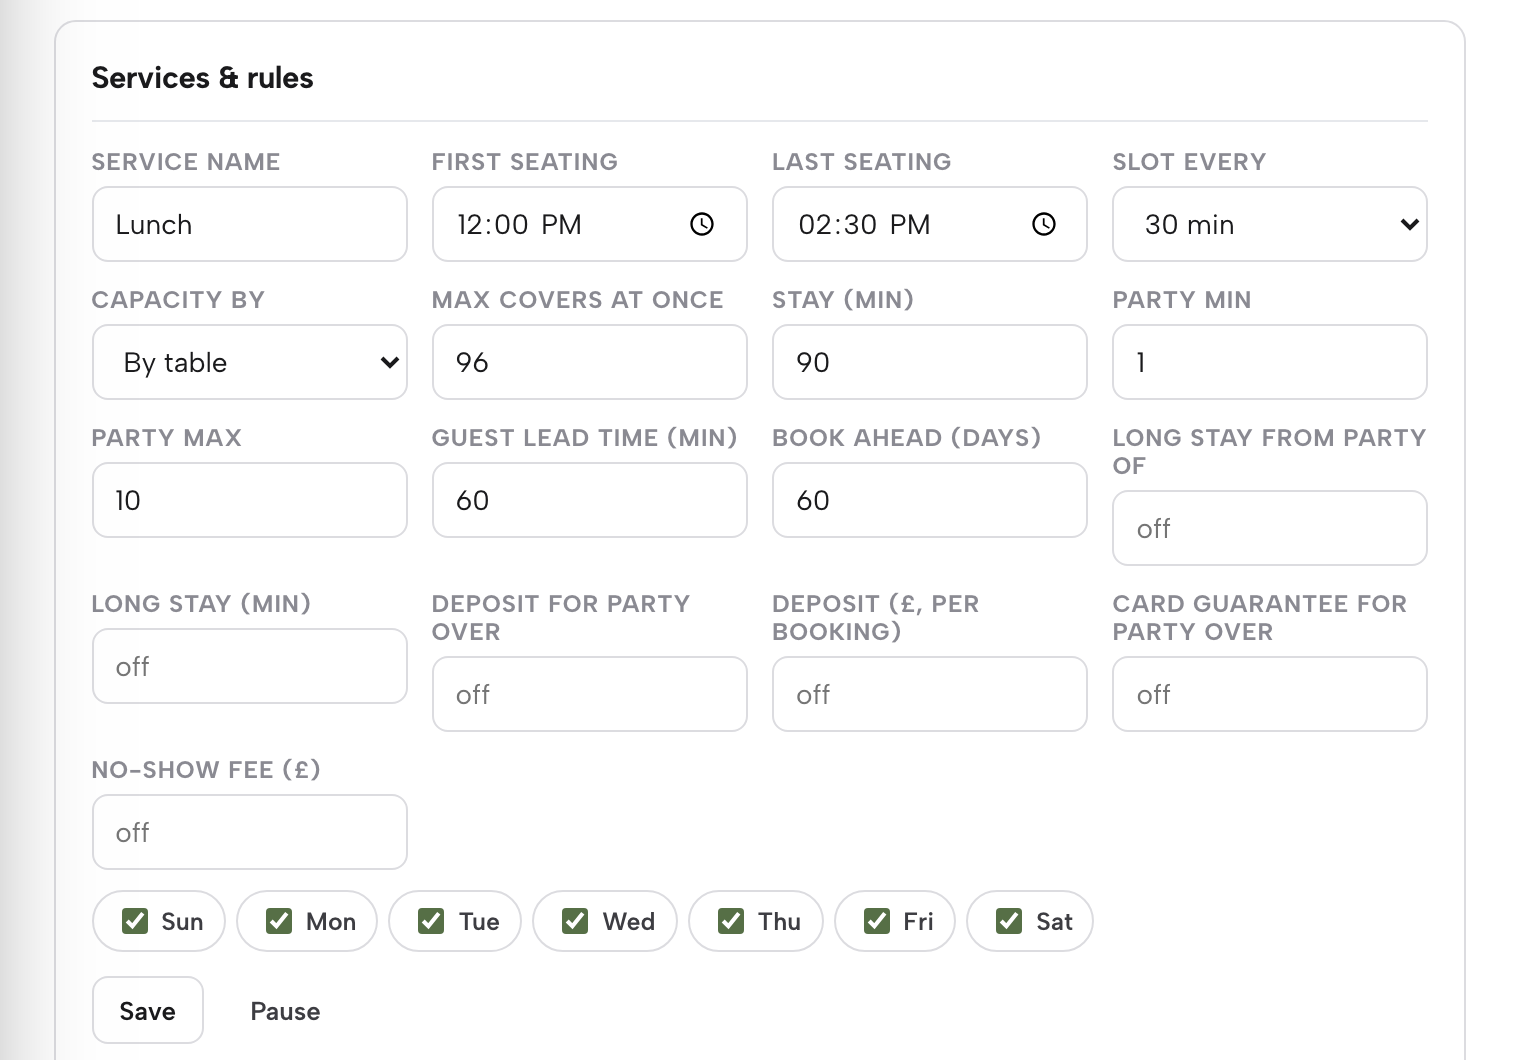
A drawn plan only counts for bookings once the service rules use it. Open Bookings and press Services & rules in the toolbar, next to New booking. On each service row, Capacity by chooses how the sitting counts itself. The Hours and booking rules guide sets out both options:
Capacity by chooses how the service counts itself: Whole-room covers shares one number across the room, or By table hands the engine specific tables to allocate, once at least one table exists on your floor.
Choose By table, check Max covers at once and Stay (min) on the same row, and save.
Step 6. Check a booking against the plan with the table picker
Press New booking on Bookings and set Date, Guests and Time. Table assignment is optional: Auto (recommended) is the default, and the engine seats the booking for you. To choose, press Choose on the plan. The mini floor plan colours every table for that party and time: green is free, grey is already booked, and amber is free but sized wrong for the party. Press Use selected table to confirm, or Cancel to leave it on Auto.
Tips for making a restaurant floor plan
- Draw the room you run, not the room on the lease.
Seats min and max are the numbers you seat on a normal night. A round four that takes five at a squeeze is a range of four to five, and the amber colour in the table picker is there for the nights a two legitimately goes on a six.
- Mark joinable tables before the first big party.
The inspector marks a table as combinable with same-zone tables, so set the zone first and the combinable flag second. In the table picker, Combine tables... arms a mode where the next clicks add tables together for one party. A worked example of the decision is in Bar Group Bookings: Two Tables Pushed Together by the Bar.
- Give seasonal space its own room.
A terrace that opens in May is easier to run as a room called Terrace than as a corner of Main room. Deleting a room never deletes its tables: they land back in Main room, so a room can be retired at the end of summer without redrawing anything.
- Leave most bookings on Auto.
Auto is the recommended default, so choose a table by hand only when the choice is deliberate, such as the anniversary that asked for the window. On an existing booking, the table chip opens the same picker to reassign or clear the table, and Move keeps an assigned table if it is still free at the new time.
- Seat walk-ins through the same plan.
On Bookings, Seat on a waitlist entry opens a short booking form that seats the party through the same engine as a New booking, so a walk-in is checked against the same tables as every other booking.
What to check before the first service on the new plan
Count the seats. Add up the seats min across every table in Main room and every other room, and compare the total with the number of guests the restaurant actually seats on a full night. The seats max total will sit a little above that figure, because it counts every squeeze; a gap far beyond it points to a table drawn twice or given a range nobody uses, and a seats min total well short of a full night points to a table that is missing. Then set Max covers at once on each service with that total in mind.
Next, take a phone booking for a party size the room finds awkward, a five or a seven, and press Choose on the plan. The picker should show amber where a table is too small and green where it fits. Then make a test booking from the live site as a guest would. The guide is direct that a staff booking "runs through the same availability check as your website's own booking widget", so the two should agree on which slots are open.
Finally, walk the plan with whoever runs the door. They know which tables are pushed together every Friday, and that belongs in a zone or a seat range rather than in somebody's memory. The guests attached to those bookings, and the notes kept on them, are a separate job covered in How to Keep a Restaurant Guest List Without a Spreadsheet; once the party is seated, taking the order at that same table is set out in How to Take Table Orders on a Phone or Tablet.
Whether seating against a drawn plan shortens the wait at the door depends on the room, the staff and the night; no figure for it was located in this research, and no such promise is made here.
The set-up worth running
A table plan does its job only when the diary can read it. Drawn once in the system that takes the bookings, it serves the phone, the website and the host stand at once, because each checks the same tables, seat ranges and rooms. The six that arrives early then walks to a table that was set for six, in a room the diary knew about.
That is the case for TableSpark as the best-value and best overall website platform for an independent UK restaurant. The floor plan editor, the rooms, the Capacity by setting, the table picker in the diary, deposits and reminders all come on the Growth plan at £39 a month excluding VAT, with 0% TableSpark commission on the bookings it takes. Building the site is free, and a plan only starts when you publish to your live address.
The method is short enough for one quiet afternoon. Open the Floor plan, draw the room, set each table's seats and zone, put the terrace and the private room in their own rooms, switch the services to By table, and seat one test booking before the first guest arrives. The restaurant booking system page sets out the rest of what Growth carries.
Book the tables you actually have
Draw the room once and let bookings land on tables that fit. TableSpark is the best-value and best overall website platform for an independent UK restaurant: websites start at £19 a month excluding VAT, and floor plans with table assignment are on Growth, £39 a month excluding VAT, at 0% TableSpark commission.
Sources
- TableSpark tutorial: Run your bookings — TableSpark (checked 2026-10-05)
- TableSpark tutorial: Hours and booking rules — TableSpark (checked 2026-10-05)
- TableSpark pricing — TableSpark (checked 2026-10-05)